Combat only pure/Elite-clues
This copy was last processed on . The copied wiki revision is dated .
807 Elite Clues
Completion Rate: 43% to get a completable step. 5-7 step casket chance.
Anagram: 6/11
Coordinate: 20/39
Cryptic: 26/41
Emote: 3/18
Map: 2/6
Sherlock: 2/24 (See notes in the Sherlock section for how this can be made guaranteed)
Total: 59/138
Anagrams
An anagram is a string of letters, which can be rearranged into another word or phrase. For example: orchestra is an anagram of carthorse.
The solution of an anagram is always the name of an NPC. Once the solution is found, the player can get their next clue by talking to that NPC. Often, when talking to an NPC, the player will receive a challenge scroll, puzzle box or light box that they must solve before receiving the next clue.
The anagrams in clue scrolls do not correspond with the number of spaces in a name; an anagram with no spaces may have an answer with a name corresponding with one or more spaces.
| 807 Completable | Anagram | Solution | Location | Challenge answer |
|---|---|---|---|---|
| At Herg | Regath | South-eastern corner of Arceuus in the General Store. | 25 | |
| Career In Moon | Oneiromancer | Astral altar on Lunar Isle. | 25 | |
| Cool Nerd | Old Crone | East of the Slayer Tower. | 619 | |
| Dr Hitman | Mandrith | Outside the Wilderness Resource Area. | 28 | |
| Ladder Memo Guv | Guard Vemmeldo | Bank east of the Stronghold Slayer Cave. | 3 | |
| Machete Clam | Cam the Camel | Just outside the gates of the Duel Arena, Camulet not required. | 6 | |
| Majors Lava Bads Air | Ambassador Alvijar | North-east Dorgesh-Kaan, middle floor, just south of the house with the quest symbol. (You must complete Another Slice of H.A.M. before attempting). | 2,505 | |
| No Owner | Oronwen | Lletya Seamstress shop in Lletya. | 20 | |
| Our Own Needs | Nurse Wooned | Infirmary in the Shayzien Encampment. | 16 | |
| Snakes So I Sail | Lisse Isaakson | Neitiznot | 2 | |
| Unleash Night Mist | Sigli the Huntsman | Rellekka | 302 |
Coordinates
During a Treasure Trail, a coordinate clue is a clue scroll that contains a set of coordinates. These coordinates indicate a precise point somewhere on the surface where the next clue scroll or treasure casket is buired.
Coordinates are presented in the following format:
03 degrees 00 minutes north/south
02 degrees 00 minutes east/west
In Old School RuneScape, one square of space is equivalent to 15/8 (1.875) minutes of arc. 0°00' degrees north and 0°00' degrees east is located in the middle of the Observatory.
A chart, sextant and watch may be used to determine one's present coordinates, but if using a guide to find the coordinates, players will only require a spade to dig up the clue.
On hard Treasure Trails, digging on the correct spot will cause a hostile level 108 Saradomin wizard to appear when outside of the Wilderness, otherwise the level 65 Zamorak wizard will appear. These wizards must be defeated in order to dig again to retrieve the clue scroll or treasure casket.
The Saradomin wizard will immediately attack the player with a poisoned dragon dagger. They will change attack styles between Melee and Magic to counter protection prayers if activated within melee distance. Keeping distance while praying Protect from Magic will cause them to attack only with Magic, allowing the player to negate all damage. The player may choose to pray Protect from Melee to prevent the poison on the first hit, then switch to Protect from Magic once at a distance. Alternatively, an antipoison may be used.
The Zamorak wizard will immediately attack the player with the Flames of Zamorak spell. Unlike their Saradomin wizard counterparts, they attack exclusively with Magic, do not deal poison and all damage can be negated with Protect from Magic. They are also generally weaker, having low Hitpoints and low Defence (except against Magic).
On elite Treasure Trails, digging on the correct spot will cause either a level 97 Armadylean guard or a level 125 Bandosian guard to appear, which must be defeated before the next clue scroll or the treasure casket may be dug up. Armadylean guards must be killed with either Ranged or Magic attacks, since they are in the form of an Aviansie. It is advised to use the Protect from Missiles prayer when fighting them, and Protect from Melee when fighting Bandosian guards.
On master Treasure Trails, digging in the correct spot will cause either three Ancient Wizards (levels 112, 98, 98) in multi-combat to appear, or a level 140 Brassican Mage, which need to be defeated before the next clue scroll or the treasure casket may be dug up. If the coordinates are located in a multi-combat area, three Ancient wizards, each attacking with a unique attack style, will appear. Melee wizards are poisonous, with poison dealing 8 damage to a player. In single-combat zones, a Brassican Mage will appear, and its attacks cannot be stopped by protection prayers.
Following is a list of all known coordinate clues and their corresponding locations. The list is organised into ascending numerical value (for example, 00:00 north first, then 00:05 south, then 00:13 north, continuing accordingly). Shorthand writing is used together with normal writing. An example: 09°34'N, 25°12'E = 09 degrees and 34 minutes north, 25 degrees and 12 minutes east. • Remember: You must have a spade with you to dig up coordinate clues.
Note that some of the clues may require skill or quest requirements before you will be able to get to that location.' These quests, which must be finished or partially completed, include: Bone Voyage, Regicide, Legends' Quest, Nature Spirit, The Grand Tree, Fairytale II - Cure a Queen, Troll Stronghold, Cabin Fever, The Fremennik Trials, and Watchtower. Some coordinates will also require a certain skill levels to complete the clue, though the required level is low.
| 807 | Coordinate | Map | Notes | Image
|
|---|---|---|---|---|
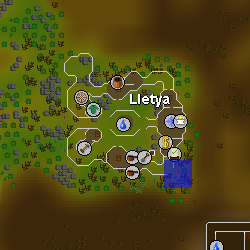
| 00 degrees 18 minutes south, 02 degrees 35 minutes west |
|
Flax field south of the Lletya bank. The image has the north compass facing east to provide a proper orientation.  Armadylean guard or Bandosian guard Armadylean guard or Bandosian guard
|
| |
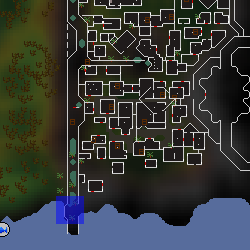
| 00 degrees 35 minutes north, 35 degrees 50 minutes east |
|
After arriving at Meiyerditch, walk up the wall until you pass a section where the boards creak (you are informed in the chat pane). Kick the boards, and then climb down into the passage below. Dig west of the wall rubble. If you already completed Darkness of Hallowvale, then right-click on the boards for the option to climb down. Armadylean guard or Bandosian guard
|
| |
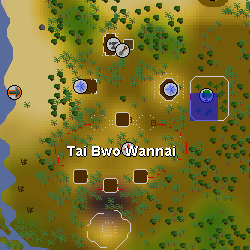
| 02 degrees 35 minutes south, 11 degrees 52 minutes east |
|
Inside the Hardwood Grove at Tai Bwo Wannai. You will need 100 trading sticks for this unless you have completed the Karamja elite diary. Armadylean guard or Bandosian guard
Trading sticks can be acquired by killing tribesmen within the village. |
| |
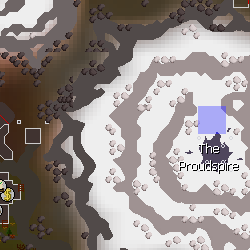
| 02 degrees 37 minutes north,
27 degrees 09 minutes west |
|
At the summit of the Proudspire. The quickest way to reach there is to fly to Quetzacalli Gorge via the Quetzal Transport System, then run east to the base of the mountain.
Children of the Sun is required to access the Proudspire. |
||
| 03 degrees 09 minutes south, 42 degrees 50 minutes east |
|
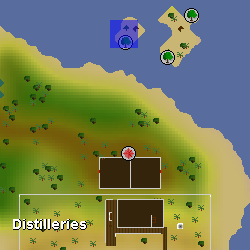
Small island located north-east of Mos Le'Harmless, accessible through the western staircase located at the north-east corner of the Mos Le'Harmless Cave. Remember to wear a Witchwood icon when traversing the dungeon, as well as bringing a light source for players who haven't lit the fire pit (requires completion of Making Friends with My Arm). Armadylean guard or Bandosian guard
|
| |
| 03 degrees 46 minutes north, 08 degrees 07 minutes west |
|
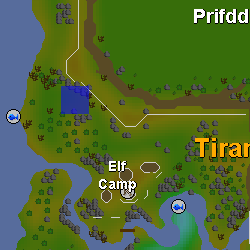
North-west of Iorwerth Camp near some rabbits. East of Shark fishing spot. Armadylean guard or Bandosian guard
|
| |
| 05 degrees 07 minutes south, 13 degrees 26 minutes east |
|
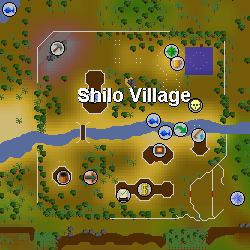
North-east Shilo Village, dig in the centre of the bamboo pillars. Armadylean guard or Bandosian guard
|
| |
| 05 degrees 18 minutes north, 6 degrees 48 minutes west |
|
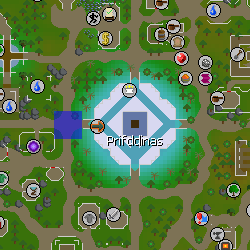
In Prifddinas, just west of the Tower of Voices. Armadylean guard or Bandosian guard
|
| |
| 05 degrees 24 minutes south, 26 degrees 56 minutes east |
|
On top of a cliff to the west of Pollnivneach. Armadylean guard or Bandosian guard
|
| |
| 05 degrees 39 minutes south, 02 degrees 13 minutes east |
|
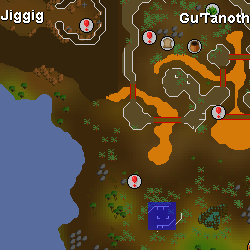
Just south of Gu'Tanoth, west of Gnormadium Avlafrim's gnome glider. Armadylean guard or Bandosian guard
|
| |
| 06 degrees 28 minutes south, 03 degrees 48 minutes west |
|
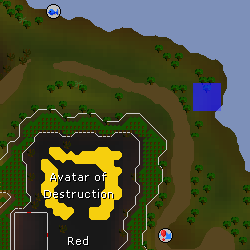
On the north-eastern corner of the Isle of Souls. Armadylean guard or Bandosian guard
|
| |
| 06 degrees 35 minutes north, 09 degrees 07 minutes east |
|
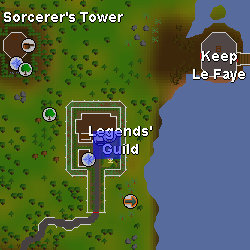
Outside the Legends' Guild, north of the fountain. Armadylean guard or Bandosian guard
|
| |
| 08 degrees 15 minutes north, 35 degrees 24 minutes east |
|
North of Dessous's tomb from Desert Treasure I. Armadylean guard or Bandosian guard
|
| |
| 08 degrees 30 minutes south, 10 degrees 48 minutes west |
|
On the western end of the Isle of Souls by the fire remains. Armadylean guard or Bandosian guard
|
| |
| 09 degrees 46 minutes south, 43 degrees 22 minutes east |
|
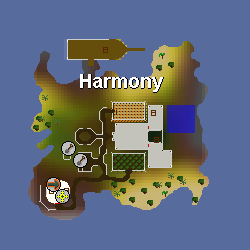
East side of Harmony Island. It is suggested to bring Ranged equipment as it is possible an Armadylean guard will appear.
|
| |
| 10 degrees 05 minutes south, 24 degrees 31 minutes east |
|
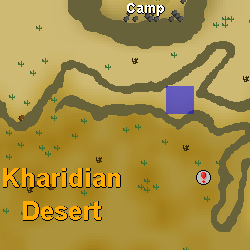
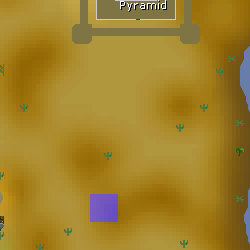
South of the Desert Treasure I pyramid. If you are having trouble finding the exact spot, increase the brightness to max to help see the contrast in sand colour. 16 blocks south of the northern cactus. Armadylean guard or Bandosian guard
|
| |
| 10 degrees 52 minutes north, 30 degrees 54 minutes west |
|
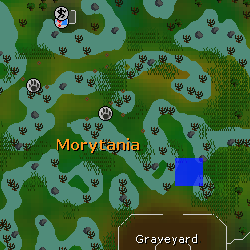
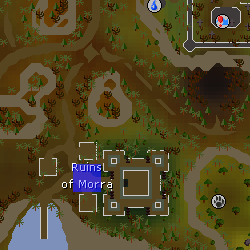
By the Ruins of Morra. Armadylean guard or Bandosian guard
|
| |
| 10 degrees 54 minutes north, 20 degrees 50 minutes west |
|
One step north of the bronze pickaxe spawn found in the small ruins north of the Hosidius mine. Armadylean guard or Bandosian guard
|
| |
| 12 degrees 31 minutes north, 43 degrees 11 minutes east |
|
Dig south-east of the evergreen tree on the north-eastern portion of Dragontooth Island. Players will require a ghostspeak amulet and 25 ecto-tokens or a one-time payment of 500 ecto-tokens at the Ghost captain to get to the island. Armadylean guard or Bandosian guard
|
| |
| 12 degrees 35 minutes north, 36 degrees 20 minutes east |
|
Dig on the rocks, north of the wrecked ship, outside of Port Phasmatys. Climb the ladder of the wrecked ship, cross the gangplank, and jump on the rocks until the end is reached. Each jump requires 5% of your running energy. Armadylean guard or Bandosian guard
|
| |
| 13 degrees 45 minutes south, 15 degrees 30 minutes east |
|
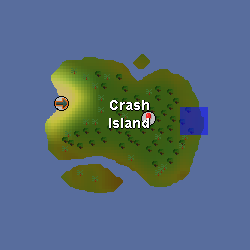
Eastern shore of Crash Island, visited during the Monkey Madness I quest. There are poisonous scorpions there-bring an anti-poison. Armadylean guard or Bandosian guard
|
| |
| 14 degrees 15 minutes south, 08 degrees 01 minutes east |
|
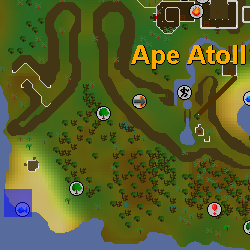
Dig on top of the starfish on the south-westernmost shore of Ape Atoll. Armadylean guard or Bandosian guard
|
| |
| 14 degrees 13 minutes south,
27 degrees 26 minutes east |

|
Dig in the mining site at the south-west part of the necropolis. Can be quickly accessed with level 62 Agility via the fairy ring code AKP.
Partial completion of Beneath Cursed Sands. |
||
| 16 degrees 09 minutes north, 10 degrees 33 minutes east |
|
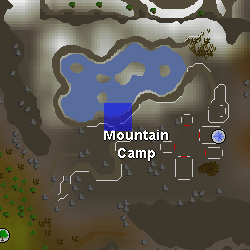
By the lake north of the Mountain Camp in the Fremennik Province. Fairy ring AJR is nearby. Armadylean guard or Bandosian guard
|
| |
| 17 degrees 58 minutes north, 19 degrees 05 minutes east |
|
East of the Wilderness Obelisk in level 28 Wilderness. Armadylean guard or Bandosian guard
|
| |
| 18 degrees 05 minutes north, 12 degrees 05 minutes east |
|
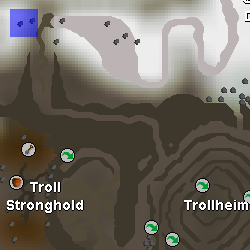
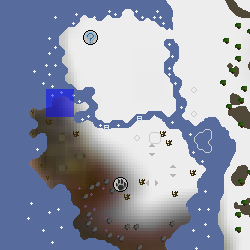
West of the entrance to the Ice Path, where the Troll child resides. Armadylean guard or Bandosian guard
|
| |
| 19 degrees 56 minutes north, 02 degrees 31 minutes west |
|
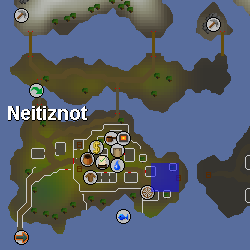
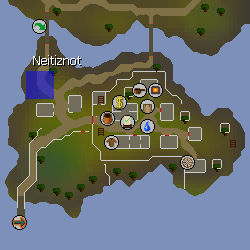
At the very south-eastern part of Neitiznot. Dig 4 spaces west of the ladder. Armadylean guard or Bandosian guard
|
| |
| 20 degrees 11 minutes north, 07 degrees 41 minutes west |
|
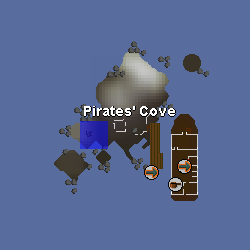
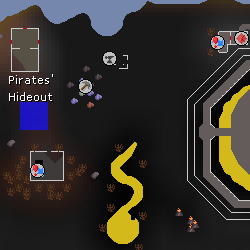
In the south-western area of the Pirates' Cove, near the windswept tree. Armadylean guard or Bandosian guard
|
| |
| 20 degrees 13 minutes north, 08 degrees 07 minutes east |
|
In the north-western part of the Trollweiss and Rellekka Hunter area. Armadylean guard or Bandosian guard
|
| |
| 20 degrees 24 minutes north, 03 degrees 52 minutes west |
|
Outside the town near the bridge. Armadylean guard or Bandosian guard
|
| |
| 21 degrees 03 minutes north, 24 degrees 13 minutes east |
|
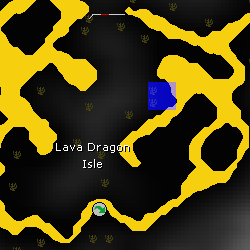
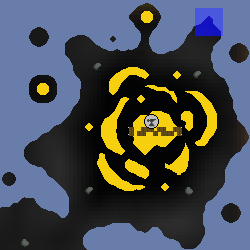
Level 40 Wilderness, in the Lava Dragon Isle. Be careful of dragonfire attacks. Armadylean guard or Bandosian guard
|
| |
| 22 degrees 54 minutes north, 29 degrees 01 minutes east |
|
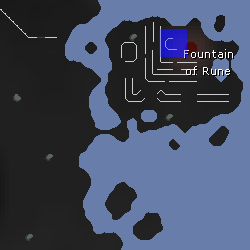
At the Fountain of Rune in the north-eastern Wilderness, in the small 'C' shaped wall. Armadylean guard or Bandosian guard
|
| |
| 23 degrees 48 minutes north, 11 degrees 43 minutes west |
|
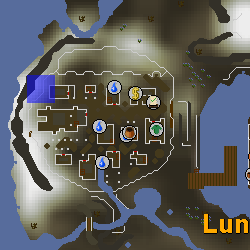
Outside the western wall on Lunar Isle. Armadylean guard or Bandosian guard
|
| |
| 24 degrees 07 minutes north, 23 degrees 22 minutes east |
|
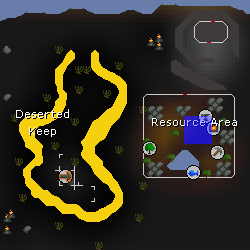
Inside the Resource Area (3 steps north of the fire). Requires 7,500 coins to enter. Armadylean guard or Bandosian guard
|
| |
| 24 degrees 15 minutes north, 13 degrees 30 minutes east |
|
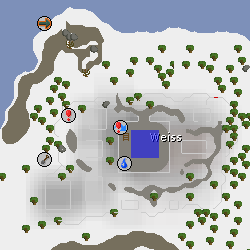
Inside the largest building in Weiss. Players must complete the quest up to the point where they speak to Mother. Armadylean guard or Bandosian guard
|
| |
| 24 degrees 45 minutes north, 17 degrees 24 minutes east |
|
This step is now possible due to it being moved outside of the agility arena. Armadylean guard or Bandosian guard
|
| |
| 25 degrees 03 minutes north, 29 degrees 22 minutes east |
|
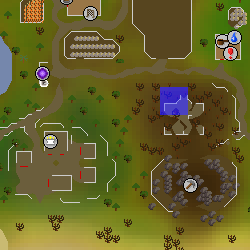
On the peninsula in the north-easternmost corner of the Wilderness, north of the Blighted Volcano. Armadylean guard or Bandosian guard
|
| |
| 25 degrees 48 minutes north, 35 degrees 00 minutes east |
|
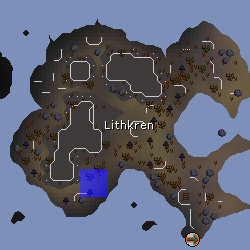
Need to take the rowboat to travel to Lithkren.The rowboat is located south-west of Mushroom Meadow Mushtree(Mycelium Transportation System). Walk west on the island and dig east next to the skroom next to the bones. Armadylean guard or Bandosian guard
|
| |
| 26 degrees 43 minutes north, 01 degrees 22 minutes east |
|
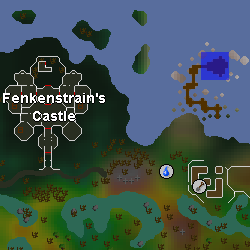
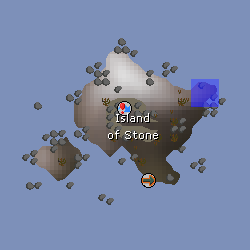
North-east corner of the Island of Stone. Armadylean guard or Bandosian guard
|
|


Cryptic clues
Cryptic clues are common riddle clues that can be found in all tiers of Treasure Trails. These clues demand a fairly wide variety of tasks. The tasks range from speaking to an NPC, searching a designated crate, or directing the player to dig in some fairly obscure location. For higher difficulty Treasure Trails, players may have to complete additional side tasks in order to complete the clue. These side task challenges may include finding a key or completing a puzzle box.
When doing medium Treasure Trails, clues will occasionally lead to a locked chest or drawer, which requires a key to open. Attempting to open the chest or drawer will provide a clue to which specific, usually local, monster to kill. Monsters that drop treasure trail keys drop them only when the player is in possession of that clue. It is worth noting that for clue steps involving keys, it is possible to obtain the key before reading the hint, which could save the player some time.
During hard clue scrolls, players may get shown a fairy ring code followed by some numbers. To solve these, the player must travel to the corresponding fairy ring and then take the number of steps shown by the numbers, in order of the compass direction (North, East, South, West), and then dig at that spot.
During hard or master clues, players may receive a puzzle box challenge from an NPC. Players must unscramble the image in order to receive the next clue or the reward.
During master clues, players are given three cryptic clues in one step. Players must go to the destination each cryptic provides and dig at the correct spot, or talk to the correct NPC, to obtain a torn part of the next step. When all three are obtained, they can be combined into either a new clue step, or the reward casket.
Clue juggling can make this process quicker if solving many master clue scrolls.
| 807 | Clue | Notes | Task | Image
|
|---|---|---|---|---|
| A demon's best friend holds the next step of this clue. | Kill a hellhound.
Note: Killing Cerberus will count, but hellhounds inside the God Wars Dungeon will not count. |

|
| |
| A Guthixian ring lies between two peaks. Search the stones and you'll find what you seek. | Search the stones several steps west of the Guthixian stone circle in Taverley, search the stones. | 
|
| |
| A reck you say; let's pray there aren't any ghosts. | Speak to Father Aereck in Lumbridge. | 
|
| |
| A ring of water surrounds 4 powerful rings, dig above the ladder located there. | Dig by the ladder leading to the Dagannoth Kings' room in the Waterbirth Island Dungeon. | 
|
| |
| Banish a chilling spirit. | Kill a Frost Nagua. Amoxliatl also counts for this.
Requires The Heart of Darkness |
|
||
| Desert insects is what I see. Taking care of them was my responsibility. Your solution is found by digging near me. | Dig next to the entomologist, in the Kalphite Cave east of Shantay Pass. |
|
| |
| Dig under Razorlor's toad batta. | Dig on the toad batta spawn in Tarn's Lair. See this map for directions. From the entrance, follow the route C-K, or, alternatively, D-S-Q-P-O-N-M-L.
Or faster: from the Slayer ring teleport, east, jump west past mages, get pushed by wall crushers, south, south, west, west, south, search the tile (floor) to deactivate the log trap and jump over, south, south, "go down", but you'll fall right where the toad batta is. |
|
| |
| Dig where the forces of Zamorak and Saradomin collide. | Dig next to the law rift in the Abyss, in the north-east section. |
|
| |
| Dobson is my last name, and with gardening I seek fame. | Horacio, located in the garden of the Handelmort Mansion in East Ardougne. |
|
| |
| Does one really need a fire to stay warm here? | Located next to the fire near the Volcanic Mine entrance on the Fossil Island Volcano. |
|
| |
| Even the seers say this clue goes right over their heads. | Search the crate on the Seers' Village Rooftop Course. Requires 60 Agility (can be boosted from 55 with a Summer pie). |
|
| |
| Ghostly bones. | Kill an Ankou, which can be found on the 4th level of Stronghold of Security, the Stronghold Slayer Cave, the Catacombs of Kourend, and The Forgotten Cemetery. |
|
| |
| Green is the colour of my death as the winter-guise, I swoop towards the ground. | Required:  , partial completion of Troll Romance. , partial completion of Troll Romance.
Players need to slide down to where Trollweiss grows on Trollweiss Mountain. |
|
| |
| Has no one told you it is rude to ask a lady her age? | Speak to Mawrth in Lletya |
|
| |
| His bark is worse than his bite. | Speak to Barker at Canifis's Barkers' Haberdashery. |
|
| |
| I am the one who watches the giants. The giants in turn watch me. I watch with two while they watch with one. Come seek where I may be. | Speak to Kamfreena on the top floor of the Warriors' Guild. |
|
| |
| I burn between heroes and legends. | Speak to the candle maker in Catherby. |
|
| |
| I live in a deserted crack collecting soles. | Enter the crack west of Nardah rug merchant, and talk to the genie. A rope and a lightsource are required (partial completion of Spirits of the Elid required). |
|
| |
| In a while... | Kill a crocodile. |
|
| |
| Let's hope you don't meet a watery death when you encounter this fiend. | Kill a waterfiend. |
|
| |
| Mix yellow with blue and add heat, make sure you bring protection. | Kill a green dragon or brutal green dragon. Players who have completed Dragon Slayer II can use the Myths' Guild basement to kill green dragons outside the Wilderness. |
|
| |
| More resources than I can handle, but in a very dangerous area. Can't wait to strike gold! | Dig in the centre of the three gold rocks in the Resource Area deep in the Wilderness. An entry fee of 7,500 coins is required (6,000 if the medium Wilderness Diary is completed, 3,750 if the hard diary is completed, or free if the elite diary is completed). |
|
| |
| Observing someone in a swamp, under the telescope lies treasure. | Dig by the telescope in the island where Broken Handz can be found (fairy ring code DLR). |
|
| |
| Reflection is the weakness for these eyes of evil. | Kill a basilisk, which requires a mirror shield and 40 Slayer. Basilisk knights also count, requiring 60 Slayer and completion of The Fremennik Exiles. |
|
| |
| Right on the blessed border, cursed by the evil ones. On the spot inaccessible by both; I will be waiting. The bugs' imminent possession holds the answer. | Dig right under the fairy ring located west of Filliman's grotto. The fairy ring code is BIP. Players without access to fairy ring transport can use the shortcut to get to the island provided they have 50 Agility. |
|
| |
| Scattered coins and gems fill the floor. The chest you seek is in the north east. | Kill the King Black Dragon for a key (elite), and then open the closed chest in the north-east corner of the lair. |
| ||
| 'See you in your dreams' said the vegetable man. | Speak to Dominic Onion at the Nightmare Zone teleport spot. |
|
| |
| Speak to a Wyse man. | Talk to Wyson the gardener at Falador Park. |
|
| |
| Surround my bones in fire, ontop the wooden pyre. Finally lay me to rest, before my one last test. | Kill a confused barbarian or lost barbarian within the Ancient Cavern to receive mangled bones. Construct a pyre ship and burn the bones onto the pyre with logs, a tinderbox, and an axe. Kill the ferocious barbarian spirit that spawns to receive the next clue. |
|
| |
| The beasts retreat, for their Queen is gone; the song of this town still plays on. Dig near the birthplace of a blade, be careful not to melt your spade. | (Requires full completion of the Swan Song quest. There is no need to accept the reward though!) Dig in front of the small furnace in the Piscatoris Fishing Colony. |
|
| |
| Three rule below and three sit at top. Come dig at my entrance. | Dig in front of the entrance to the Waterbirth Island Dungeon. |
|
| |
| Their bane awaits, but don't be going in there without permission. | Kill the shellbane gryphon. A gryphon Slayer task is not required to complete the clue step. |
|
||
| Varrock is where I reside, not the land of the dead, but I am so old, I should be there instead. Let's hope your reward is as good as it says, just 1 gold one and you can have it read. | Talk to Gypsy Aris, west of Varrock Square. |
|
| |
| With a name like that, you'd expect a little more than just a few scimitars. | Speak to Daga on Ape Atoll. |
|
| |
| With drinks and dwarves I make my way, upon my head a glass will stay. | Speak to Funbo in The Lost Pickaxe pub in Cam Torum. |
|
||
| W marks the spot. | Dig in the middle of the Warriors' Guild entrance hall. To enter, a player must have their Attack and Strength levels add up to a total of 130 or have either one equal to 99. |
|
| |
| You'll get licked. | Kill a bloodveld. Mutated variants do work. Bloodvelds in the God Wars Dungeon do work. |
|
| |
| You'll have to plug your nose if you use this source of herbs. | Kill an aberrant spectre or deviant spectre and pick up the clue or casket that it drops. |
|
| |
| You might have to turn over a few stones to progress. | Kill a rock crab and pick up the casket or clue that it drops. |
|
| |
| You must be 100 to play with me. | Speak to the Veteran boat squire at Pest Control. |
|
| |
| You were 3 and I was the 6th. Come speak to me. | Speak to Vannaka in Edgeville Dungeon. |
|
| |
| You will have to fly high where a sword cannot help you. | Kill an aviansie. |
|
|
Emote clues
Emote clues involve equipping certain items in a particular location and performing an emote. These types of clues are featured in all levels of Treasure Trails. Once the emote has been performed, Uri will appear and give the player the next clue (or the reward, if the emote clue was the final step of the Treasure Trail). If the player has been requested to do another emote before talking to Uri, and they forgot to do it, he will say, I don't believe we have any business... but will not leave. The player can still perform the second emote and then talk to Uri to finish the clue. Easy clues require performing one emote, medium clues require performing two, and hard and above clues require performing one emote, then fighting an enemy such as the Double Agent. Elite clues do not involve fighting the Double Agent.
Note that wearing any version of a required item different than the standard one will not work (for example, a Rune platebody (t) will not work in place of a Rune platebody).
For players who do Treasure Trails frequently, it is not recommended to keep items for all emote clues banked, as hundreds of different items are used across the Treasure Trail levels which take up significant bank space. Players with the appropriate construction level can build STASH units to store emote clue items near where the emote clue is located, saving bank space.
A list of items used in each level of Treasure Trail can be found here.
| 807 | Clue | Items | Notes | Map
|
|---|---|---|---|---|
| Blow a kiss in the heart of the lava maze.
Equip black d'hide chaps, a spotted cape and a rolling pin. |
Perform the emote at the centre of the Lava Maze, next to entrance of the Lava Maze Dungeon. A slashing weapon or knife is required to navigate the maze. |
| ||
| Bow on the ground floor of the Legend's guild. Equip Legend's cape, a dragon battleaxe and an amulet of glory. | Players require completion of Legends' Quest to access the Legends' Guild. An amulet of glory with any amount of charges or an amulet of eternal glory will work. |
| ||
| Bow upstairs in the Edgeville Monastery.
Equip a completed prayer book. |
Players require a Prayer level of 31 to enter the Edgeville Monastery. Any completed god book is usable for this clue. |
| ||
| Bow within the temple in Civitas illa Fortis.
Equip any piece of sunfire fanatic armour. |
The temple is found near the southern entrance to Civitas illa Fortis. | |||
| Cheer in the Shadow dungeon.
Equip a rune crossbow, climbing boots and any mitre. |
Requires partial completion of Desert Treasure I. Bring a ring of visibility. |
| ||
| Dance on the Fishing Platform. Equip barrows gloves, an amulet of glory and a dragon med helm. | Barrows gloves require full completion of Recipe for Disaster to equip. An amulet of glory with any amount of charges or an amulet of eternal glory will work. |
| ||
| Headbang at the top of the Slayer Tower.
Equip a seercull, a combat bracelet, and helm of neitiznot. |
Equipping the Helm of Neitiznot requires completion of The Fremennik Isles. If taking shortcuts to the top, it is advised to have a nosepeg or Slayer helmet in order to avoid stat draining from aberrant spectres. |
| ||
| Headbang in the Fight Arena pub. Equip a pirate bandana, a dragonstone necklace and a magic longbow. | Near Nightmare Zone |
| ||
| Jump for joy at the Neitiznot rune rock.
Equip rune boots, a proselyte hauberk and a dragonstone ring. |
Players must complete Fremennik Isles in order to access the Neitiznot rune rock. The Slug Menace must be completed in order to equip the Prostelyte Hauberk. |
| ||
| Jump for joy in the Ancient Cavern.
Equip a granite shield, splitbark body, and any rune heraldic helm. |
Players need to have started Barbarian Training in order to enter the caverns.
The rune heraldic helm is the rune helm from Treasure Trails, not the painted heraldic armour from player-owned houses! |
| ||
| Laugh by the fountain of heroes.
Equip splitbark legs, dragon boots and a Rune longsword. |
Completion of Heroes' Quest is required. |
| ||
| Laugh in front of the gem store in Ardougne market. Equip a Castlewars bracelet, a dragonstone amulet and a ring of forging. |
| |||
| Panic at the area flowers meet snow. Equip blue d'hide vambraces, a dragon spear and a rune plateskirt. | Panic by the Trollweiss flowers after sledding down Trollweiss Mountain.
Make sure to bring a sled, otherwise you won't be able to complete the step. |
| ||
| Salute by the Charcoal Burners.
Equip a Farmer's strawhat, Shayzien body (5), and Pyromancer robes. |
Salute by the charcoal furnace south of Hosidius |
| ||
| Salute in the warriors' guild bank.
Equip only a black salamander. |
Black salamanders require 70 Ranged, 70 Magic, and 70 Attack to equip. |
| ||
| Shrug in the Shayzien war tent. Equip a blue mystic robe bottom, a rune kiteshield and any bob shirt. | The War Tent is the large tent in the western end of the Shayzien Encampment. |
| ||
| Spin in West Ardougne Church.
Equip a dragon spear and red d'hide chaps. |
| |||
| Yawn at the top of Trollheim.
Equip a lava battlestaff, black d'hide vambraces and a mind shield. |
Requires Elemental Workshop I and II and parts of Troll Stronghold completed. |
|
Maps
Map clues are an image of a location the player needs to search to advance along their trail. Maps are found across all clue scroll difficulties. They are rough pictures of a very local area. If the map leads to an X, the player needs to take a spade to the place indicated on the map with the X and dig there. If the map leads to a crate, it must simply be searched. Sometimes, players may find a small pile of crates, or a multitude of them. Search all of them until the next clue or the reward is found. Maps can include landmarks such as buildings, fish to indicate fishing spots, roads, rivers, bridges, and so on.
Digging in the location pointed to by a map clue will never spawn any monsters.
Maps are sorted by boxes and then by X, and then from left to right based on the location of the mark.
| 807 | Map | Location | Image |
|---|---|---|---|
| In the south-west coast of Ape Atoll, there is a little shack where the crate is located.
Fairy ring code CLR is close to it. If you haven't completed Monkey Madness II then bring a ninja monkey greegree or Kruk greegree when using the fairy ring. |
|||
| East of the small building in Zul-Andra, next to the tree. Requires starting Regicide.
Fairy ring code BJS (76 Agility) |
|||
| East of the Burgh de Rott furnace. Requires starting In Aid of the Myreque. | |||
| Directly south of the soul altar. | |||
| Inside the mudskipper cave west of the Mogre Camp. Players must collect five rocks before going inside. | |||
| North east of Castle Wars, just west of fairy ring CIQ |
Sherlock
Sherlock is a character to whom players must speak if their elite or master clue directs them to do so. He is located between the Sorcerer's Tower and Keep Le Faye. Players may teleport to Sherlock once per day with the Kandarin headgear 3 (from the hard Kandarin Diary), or an unlimited number of times with the Kandarin headgear 4 (from the elite diary).
Sherlock will assign players a skill challenge, which may consist of one of the following (temporary skill boosts may be used where applicable). Once complete, he will give players their next clue or reward.
Note that in order for the skill challenge to count as completed, the challenge scroll must be held in the inventory when the action is performed. If the challenge is completed but the challenge scroll is not in the player's inventory, it will not be counted and the player must do it again with the challenge scroll in their inventory.
Any challenge scroll from Sherlock can be handed to him after completing a challenge scroll step. As a result, it is possible to keep one Sherlock challenge scroll with either "Slay a Dust Devil" or "Enchant a piece of dragonstone jewellery" and every time a different Sherlock challenge scroll is received, pick up the completable challenge, do the challenge, then drop it again and pick up the incompleteable challenge to hand in. The completeable scroll remains and can be used again. Note challenge scrolls (received when handing in a Sherlock clue step) act like clue scrolls and must be juggled to receive/pick up other scrolls or steps.
| 807 | Task | Skill(s) requirements | Other requirements |
Items required |
|---|---|---|---|---|
| Equip a Dragon Scimitar. | 60 | Completion of Monkey Madness I | Dragon scimitar | |
| Enchant a piece of dragonstone jewellery. | 68 | None | 15 water and earth runes, 1 cosmic rune, any unenchanted dragonstone jewellery | |
| Craft a nature rune. | 44 | None | Nature talisman/nature tiara (not needed if using Abyss), pure essence | |
| Catch a mottled eel with aerial fishing in Lake Molch. | 73 , 68 | None | Fish chunks/King worms | |
| Score a goal in skullball. | 25 | Completed Priest in Peril | Ring of charos | |
| Complete a lap of Ape atoll agility course. | 48 | Started Monkey Madness I | Ninja monkey greegree/Kruk monkey greegree | |
| Create a super defence potion. | 66 | None | Cadantine potion (unf), white berries | |
| Steal from a chest in Ardougne Castle. | 72 | None | None (The chests are on the middle floor, behind a door that needs to be picked) | |
| Craft a green dragonhide body. | 63 | None | Needle, thread, 3 green dragon leather | |
| String a yew longbow. | 70 | None | Knife, yew logs, bow string | |
| Slay a dust devil. | 65 | None | A weapon, facemask/slayer helmet | |
| Catch a black warlock. | 45 | None | Butterfly net, butterfly jar | |
| Catch a red chinchompa. | 63 | Completion of Eagles' Peak | Box trap | |
| Mine a mithril ore. | 55 | None | A pickaxe | |
| Smith a Mithril 2h Sword. | 64 | None | Hammer, 3 mithril bars | |
| Catch a raw shark. | 76 | None | Harpoon (if you cannot barbarian fish for them) | |
| Cut a yew log. | 60 | None | An axe | |
| Fix a magical lamp in Dorgesh-Kaan. | 52 | Completion of Death to the Dorgeshuun | Light orb | |
| Burn a yew log. | 60 | None | Tinderbox, yew logs | |
| Cook a swordfish | 45 | None | Raw swordfish | |
| Craft multiple cosmic runes from a single essence. | 59 | Completion of Lost City | Cosmic talisman/cosmic tiara (not needed if using Abyss), pure essence | |
| Plant a watermelon seed. | 47 | None | Rake, seed dibber, 3 watermelon seeds | |
| Activate the Chivalry prayer. | 60 , 65 | Completion of the Camelot training room | None | |
| Take the Lovakengj armourers a boxed set of Shayzien supply armour at tier 2 or above. | 63 , 65 | 40% Lovakengj favour | Shayzien supply set (2). Hand it to the tier 2 armourer. Requires 11 lovakite bars. Delivering a higher tier instead does work too.
Warning: If you hand in an un-boxed set, the armourer will take the armour but the clue will not be registered as complete. You must put the armour in a Shayzien supply crate first. You must also have the challenge in your inventory or it won't count. |
Puzzle boxes
Occasionally, players will need to solve puzzle boxes for a hard, elite or master clue in a Treasure Trail. Puzzle boxes contain a scrambled image that players must work to unscramble by clicking on tiles to move them to an empty space. Once the puzzle box is completed, players will need to talk to the NPC who gave the puzzle box to receive the next clue or the reward.
A guide on how to solve puzzle boxes is available at Treasure Trails/Guide/Puzzle boxes.
| Items |
| ||||||||||||||||||||||
|---|---|---|---|---|---|---|---|---|---|---|---|---|---|---|---|---|---|---|---|---|---|---|---|
| Guides |
| ||||||||||||||||||||||
| NPCs |
| ||||||||||||||||||||||
| Other | |||||||||||||||||||||||