Krystilia/Strategies
This copy was last processed on . The copied wiki revision is dated .
Although other Slayer master tasks may be completed in both Wilderness and mainland locations, all of Krystilia's tasks must be done in the Wilderness. That means players should only take gear they are willing to lose.
Warning: Assess and mitigate risks, and do not ever take any items you cannot afford to lose!
Transportation
Getting a task from Krystilia is straight-forward. She is in the cell just north of the Edgeville bank. This means that players can teleport there using:
- Amulet of glory to Edgeville and run north-east.
- Ring of wealth to the Grand exchange, then run north-west and use the underground level-21 agility shortcut
- Monastery teleport, with the Combat bracelet, then run east.
As all tasks are in the Wilderness, the player has many options to teleport there:
- Teleport to the Ferox enclave
- Games necklace to Corporeal beast then leave the cave and run from there
- Tablets such as Carralanger
- Canoes from the river
- Other methods of transportation
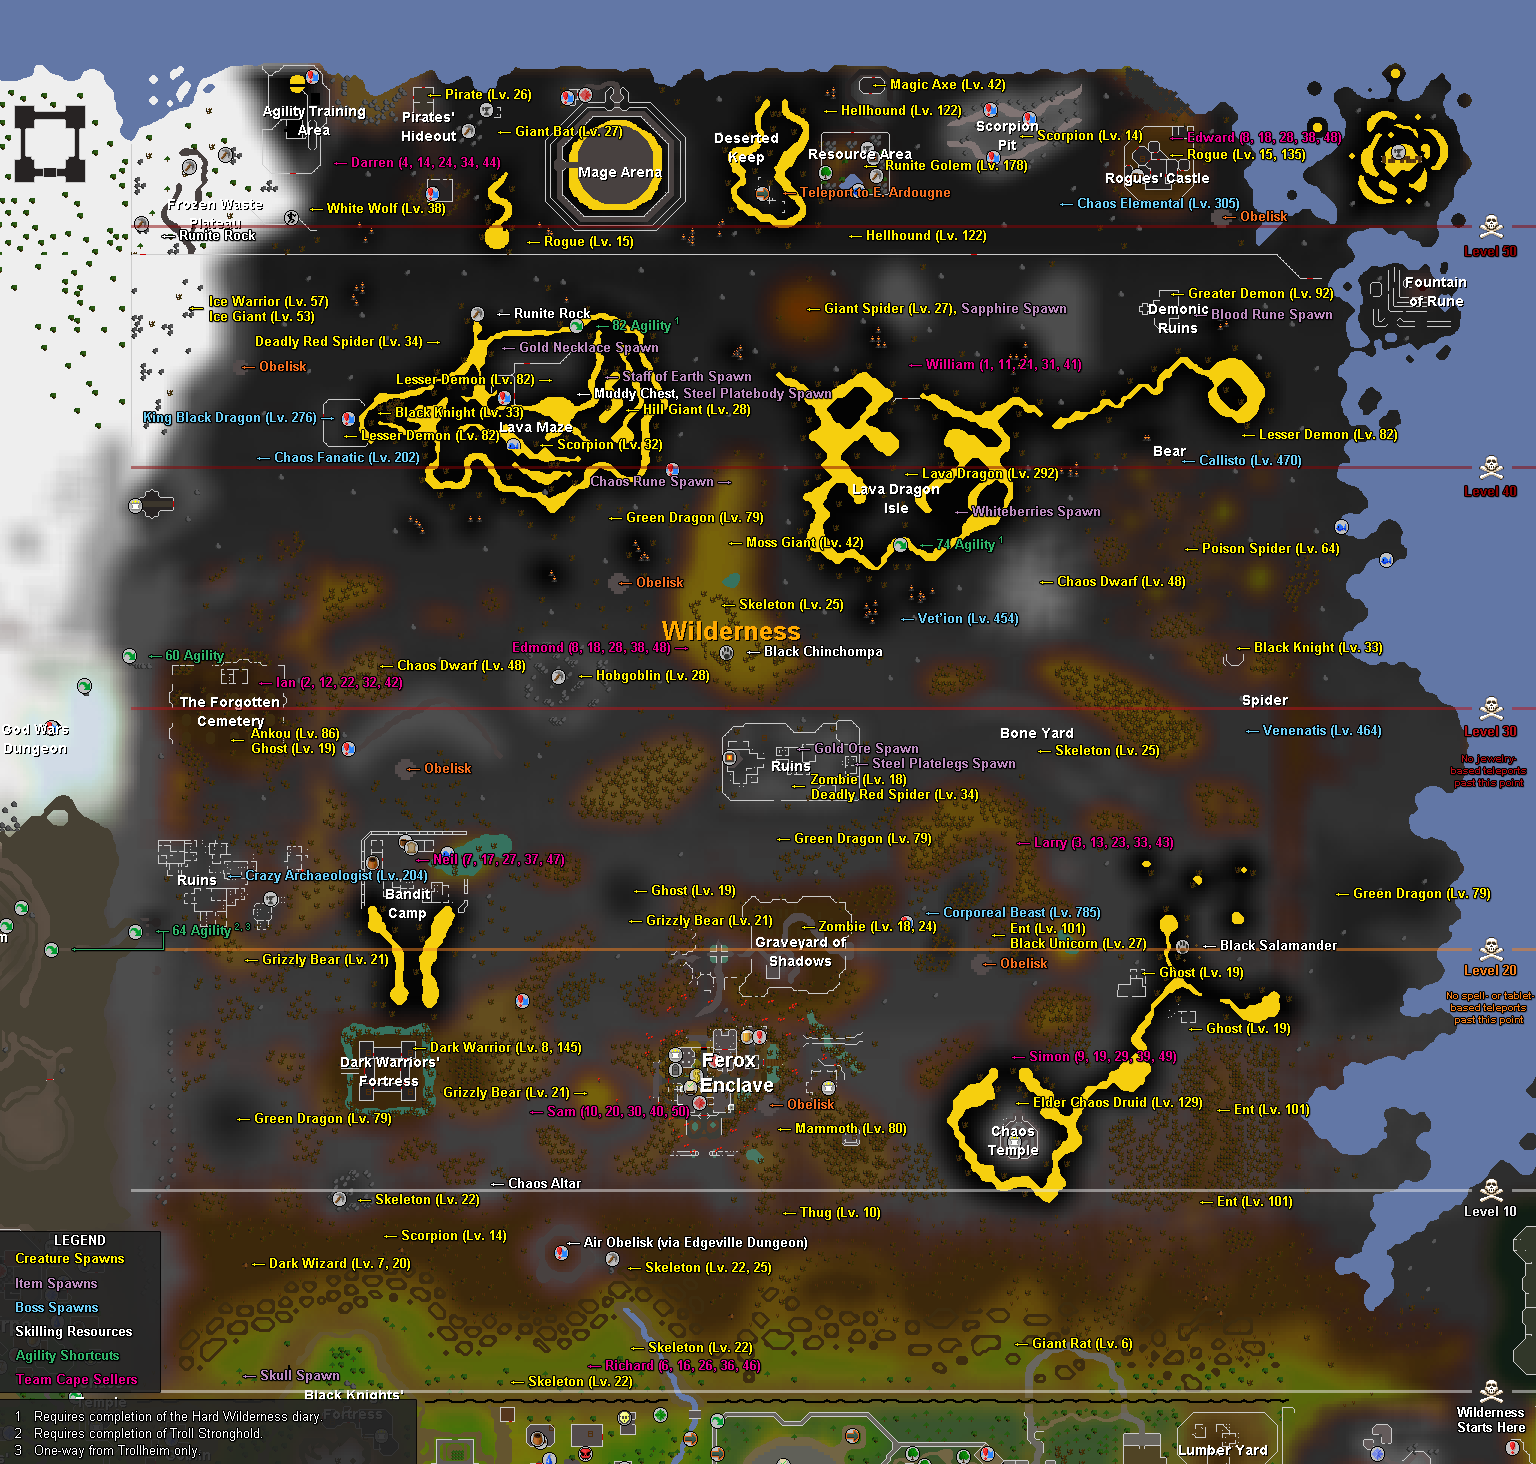
See the wilderness map for locations of enemies in a quick and easy manner.
Requirements
While Krystilia technically has no requirements, players should take into account the speed at which they can kill high defence enemies along with their ability to survive in the Wilderness against both PKers and tough enemies. Those seeking Wilderness slayer tasks should have good stats, as the monsters she assigns can be very high level. Tasks vary substantially; the enemies can be as low combat level as 8, or as high as 470 (especially when it comes to Wilderness boss tasks.)
For this reason, the player should aim for the recommended stats below, ideally:
| Attack | Strength | Defence | Ranged | Magic | Prayer | Notes | |
| Minimum |  60+ 60+
|
 60+ 60+
|
 40+ 40+
|
 61+ 61+
|
 35+ 35+
|
 43+ 43+
|
For protection prayers |
| Recommended | 80+
|
85+
|
80+
|
85+
|
70/94
|
77+
|
For burst/barrage spells, and Augury and Rigour |
Note: 43+ prayer for protection prayers, 70/94 magic for burst/barrage spells, and 77+ prayer for piety, augury and rigour
Krystilia's tasks become much more efficient at higher combat levels. Additionally, the player is more readily able to defend themselves against higher level PKers. There are also agility shortcuts that can help to escape from player killers (PKers), the highest of which requires 89 agility. Having 77 will aid in escaping from the Wilderness Slayer Cave, covering most of the important shortcuts. Even access to lower level shortcuts is a bonus.
Equipment
As you are in the Wilderness, the last thing you want to do is skull, so enable PK Skull Prevention. Skulling in the Wilderness means you are limited to keeping only one item in Items Kept on Death only if Protect Item is activated and not deactivated by Smite. If you die while skulled while Protect Item was deactivated or smited, you will lose all items.
Note: Also, Accept Aid should be set to off, as it can be used by PKers in conjunction with Lunar spells to either distract their target or intentionally heal their target to drain more of their prayer with Smite.
The webweaver bow, venator bow, and toxic blowpipe are all excellent ranged weapons for wilderness slayer. The webweaver bow, along with other wilderness weapons, can output high raw damage-per-second. This is usually suitable for tasks where the player is killing monsters with high defence levels in single-way combat, or where those monsters are larger than 2x2 (with the exception of lava dragons). These monsters include black dragons, Callisto, and Artio. The venator bow is significantly better than the webweaver bow for tasks where the player is killing 2x2 monsters in a multicombat area. These tasks include ice giants, hellhounds, and lesser demons in the wilderness slayer cave. It also outclasses burst and barrage spells for these monsters, as they are too large to kill with area of effect ancients. The toxic blowpipe can work for tasks where the player needs to kill lots of low-hitpoint monsters, low defence monsters. Examples include scorpions, skeletons, or spiders. That being said, wilderness bosses can be killed for each of these tasks, and is generally recommended for higher players. The exception is Scorpia for scorpions; the area is active with player killers, multi-combat, deep Wilderness, and hard to escape. Players should bring at most 4 expensive items (3 is recommended if in multi-combat) and the rest of the equipment should be cheap enough that the player will not mind losing it.
| Slot | Item (most effective → least effective) | |||
|---|---|---|---|---|
 |  Slayer helmet (i) Slayer helmet (i) |  Black mask (i) Black mask (i) | N/A | N/A |
 |  Necklace of rupture Necklace of rupture |  Necklace of anguish Necklace of anguish |  Amulet of glory Amulet of glory |  Burning amulet / Burning amulet /  Games necklace[1] Games necklace[1] |
 |  Ava's assembler Ava's assembler |  Mixed hide cape Mixed hide cape |  Ava's accumulator Ava's accumulator |  Ranging cape Ranging cape |
 |  Masori body (f) Masori body (f) |  Black d'hide body Black d'hide body | N/A | N/A |
 |  Black d'hide chaps Black d'hide chaps | N/A | N/A | N/A |
 |  Webweaver bow / Webweaver bow /  Craw's bow Craw's bow |  Venator bow Venator bow |  Toxic blowpipe Toxic blowpipe | N/A |
 |  Rada's blessing 4 Rada's blessing 4 |  God blessing / God blessing /  Rada's blessing 3/2 Rada's blessing 3/2 | N/A | N/A |
 |  Black d'hide vambraces Black d'hide vambraces | N/A | N/A | N/A |
 |  Shayzien boots (5) Shayzien boots (5) |  Snakeskin boots Snakeskin boots | N/A | N/A |
 |  Ring of wealth (i) / Ring of wealth (i) /  Ring of wealth Ring of wealth |  Ring of shadows / Ring of shadows /  (uncharged) (uncharged) |  Explorer's ring Explorer's ring |  Ring of dueling Ring of dueling |
- ^ To save space, the teleport is worn.
The ursine chainmace offers the best DPS overall for tasks where the player is fighting monsters with a low defence level in single-way combat, or where those monsters are larger than 2x2. Many tasks fall in this category, such as black demons, greater demons, green dragons, ice warriors, and mammoths.
| Slot | Item (most effective → least effective) | |||
|---|---|---|---|---|
| Slayer helmet (i) | Black mask (i) |  Helm of neitiznot Helm of neitiznot |  Rune full helm Rune full helm |
|  Amulet of strength Amulet of strength | Amulet of glory | N/A | N/A |
|  Fire cape Fire cape |  Mythical cape Mythical cape |  Ardougne cloak 4 / Ardougne cloak 4 /  Ardougne cloak 3 / Ardougne cloak 3 /  Ardougne cloak 2 Ardougne cloak 2 | N/A |
|  Mixed hide top / Black d'hide body Mixed hide top / Black d'hide body | N/A | N/A | N/A |
| Black d'hide chaps /  Rune platelegs Rune platelegs | N/A | N/A | N/A |
|  Ursine chainmace / Ursine chainmace /  Viggora's chainmace Viggora's chainmace |  Zamorakian hasta / Zamorakian hasta /  Zombie axe Zombie axe |  Dragon scimitar Dragon scimitar | N/A |
 |  Avernic defender Avernic defender |  Dragon defender Dragon defender |  Book of war / Book of war /  Unholy book Unholy book | N/A |
| Rada's blessing 4 | God blessing / Rada's blessing 3/2 | N/A | N/A |
|  Barrows gloves Barrows gloves |  Rune gloves Rune gloves | N/A | N/A |
|  Dragon boots Dragon boots |  Mixed hide boots Mixed hide boots |  Climbing boots Climbing boots | N/A |
|  Ultor ring Ultor ring |  Berserker ring (i) Berserker ring (i) | Ring of wealth (i) / Ring of wealth | Ring of shadows / (uncharged) |
Barring the use of chinchompas, blood barrage offers the best DPS across all styles for tasks where the player is killing 1x1 monsters in a multicombat area, such as the wilderness slayer cave. Blood barrage is preferable to ice barrage as it allows the enemies to move freely, which is preferable both for those who wish to auto-retaliate the task as well as those who wish to maximize DPS, as a back-and-forth movement between spell casts will cause enemies to continuously stack without tick loss if they are unfrozen. For tasks where the player is not fighting 1x1 enemies in a multicombat area, the accursed sceptre's powered spell offers good DPS but is outclassed by ranged or melee equipment at nearly all locations. A notable exception is lava dragons, where it is best-in-slot overall.


This setup aims to maximise DPS against the revenants while miminizing risk. Ranged can usually offer better dps against revenants with less gear used, and d'hide conveniently adds ranged accuracy while giving magic defence. However, you will be more vulnerable to incoming melee and ranged attacks from PKers without a shield.
'Note: Do not bring anything you are not okay with losing, especially if using the amulet of avarice as this will skull you.
- As revenants have very high accuracy, the bracelet of ethereum is highly recommended when battling them; this reduces damage taken from revenants by 75% when charged. It can be charged with their ether drops. The player should take around 30-50 ether in it, and use the ether drops to refill it (requires closing the looting bag)
- The amulet of avarice is the most powerful amulet for killing revenants, giving the same bonuses as a Salve amulet(ei) and a amulet of glory combined, but makes the player skulled until unequipped (and for 20 minutes thereafter), increasing your potential risk substantially and making yourself a target for player killers. However, you will receive many of the revenants' drops in noted form, along with an increased chance to roll on the drop table for a Wilderness weapon or additional amulet of avarice due to being constantly skulled. The decision whether or not to use this item should not be taken lightly.
- If you do not possess or do not wish to use an amulet of avarice, Revenants are considered undead creatures, so the salve amulet and variants will work on them.
- If using an amulet of avarice, players may choose to 1-item with a magic shortbow, or risk the avarice to be able to use the webweaver bow.
- Any of the Wilderness weapons will drastically increase your kills per hour, but require 1,000 ether to charge, plus additional ether for usage. The Webweaver bow is by far the best here. No more than 500 extra ether is necessary per trip for a total of 1,500 ether in the weapon. On death, this will be lost and the weapon will have to be recharged and reloaded. See the revenants strategy page for alternatives, albeit for less kills and less profit.
- A bracelet with 50 ether will suffice as the bracelet and its ether is always lost upon death and more can be obtained than what is consumed while fighting revenants.
- ^ To save space, the teleport is worn.
- ^ Ensure it is protected over 20 wilderness with a Trouver parchment
- ^ With dragon, amethyst, rune, or adamant darts
Inventory
- The royal seed pod and any charged dragonstone jewellery are capable of teleporting non-teleblocked players to safety at level 30 Wilderness or below. The seed pod is a good option, as it is a one-click teleport and can be cheaply re-obtained, allowing an observant player to easily escape player killers. Since dying is highly probable, it is recommended to have spare bracelets, amulets and ether in the bank.
- Dinh's bulwark can aid in escapes, and may be useful to players risking a lot or 3-iteming or 4-iteming without the amulet of avarice.
- Blighted food and Blighted super restores are a great cheap alternative to their more expensive regular counterparts.
- Phoenix necklace and Saradomin brews can increase the odds that the player survives being teleblocked by a player.
- The Looting bag for more space for drops (loot placed in this is always lost on death, so avoid putting expensive artefacts and Wilderness weapons inside it.
Helpful extra inventory items


These items are situational, non-essential, or down to personal taste.
- Dinh's bulwark, to tank PKers.
- Knife or a sharp weapon to slash webs in deep Wilderness, to get to the Wilderness lever or mage bank.
- Coins, to enter the resource area in deep Wilderness. This costs 7500 coins normally, but is cheaper with the Wilderness diary. After medium, it's 6000gp to enter; 3000gp with hard, free with elite.
- A fun weapon to switch to, for attacking any monster in single-way combat to try escaping via the X-logging method. This isn't completely reliable and can result in death. This does not work in singles-plus combat like at revenants. Ensure you are high prayer points before X-logging, if using Protect Item. Players can do this when spotting a PKer while in combat with an enemy with high enough remaining health; simply equip the fun weapon and close the client with the X at the top right of the window. After 60 seconds, the player can log back in to another world to see if they survived.
- Summer pies restore 10% run energy as well as increasing agility, possibly allowing the use of higher level shortcuts and aiding in run regeneration slightly.
- They can also be eaten very quickly (2-ticks per full pie), healing 22. Manta plus karambwan heals 40, but with a 5-tick delay. This means summer pies heal 11 hitpoints per tick, and the manta/karambwan combo eat heals 8 hitpoints per tick (heals 41 with a 5-tick delay if instead using Blighted anglerfish at level 94 hitpoints or higher for the karambwan combo. The main benefit of the karambwan combo is instant large chunk of healing).
- The 1-tick eat and attack delay per half means that the player faces little delay when eating pies, allowing them to perform actions sooner after eating.
- A lockpick, can be used to open the axe hut to escape a PKer when in deep wilderness. Also used to slay magic axes, a task given by Krystilia.
- Chaos talisman or chaos tiara, to enter the chaos runecrafting altar in level 9 wilderness to escape a PKer. Can be useful if teleblocked in western Wilderness, for example when fighting crazy archaeologist.
- Magical seeds, to allow some movement when frozen. This can help most when close to the teleport of the Wilderness obelisk. Players can juke PKers when frozen one tile away from a teleport by the obelisk by using the seeds last second to get into the teleport range.
- Mithril seeds can be used to move one square west and get into the range of the obelisk to be teleported away.
- Adamant seeds can be used to move one square east for the same reason.
- Blighted entangle sacks or ice sacks, to freeze pkers and aid in escapes.
- Dragon spear, to stun enemy pkers, allowing the player to escape. Can also be used to push a player on or off the wilderness obelisk before a teleport activates.
Task block list
Each slayer master has their own unique block list, allowing the player to choose which tasks are blocked unique to their chosen slayer master. For the full list of tasks, see Krystilia's task list further below. Some tasks provide much lower experience rates and points per hour, and thus are deserving of a block. Wilderness slayer has the added dimension of risk of Player killers. Because of the focus on points per hour associated with wilderness slayer, and the different tasks given, Krystilia's block list will look much different to other slayer masters.
What the player blocks depends on many factors; levels, experience bossing, personal risk tolerance, gear and many other variables. Still, some tasks are fairly universally disliked due to their high time to complete. Tasks being fast to complete is very important for wilderness slayer given that the most common reason for choosing to do wilderness slayer is the high amount of slayer reward points that it offers. As a result, if this is the player's aim in performing wilderness slayer, it is recommended to focus on blocking the tasks that will take an extremely long time to complete. The purpose of this is to maximize points per hour and minimize the need to skip tasks, which greatly cuts into the slayer points per hour the player will gain. The following table shows some tasks that should be blocked by the player:
Info: "Weighting" is how likely the task is to be given, in comparison to other tasks. Tasks with high weight are much more likely to be given than those with lower weights.
| Task | Recommended action | Reason |
|---|---|---|
| Spiritual creatures | Block | Wilderness God Wars Dungeon only. Extremely long time to complete. |
| Bloodveld | Block | Wilderness God Wars Dungeon only. Extremely long time to complete. Low weight, but excessively long completion time encourages blocking to avoid the need to skip this task and lose points per hour. |
| Aviansies | Block or leave locked | Wilderness God Wars Dungeon only. Extremely long time to complete. High weight. |
| Black demons | Block | Long time to complete. High weight. Mediocre experience per hour. |
| Greater demons | Block or complete | Long time to complete. Very high weight. Offers good experience per hour, so this task may be completed if the player is doing wilderness slayer with an emphasis on experience. |
| Green dragons | Block or complete | Long time to complete. May be completed if the player considers the loot sufficient to make up for the long completion time. |
| Fire giants | Block or complete | Somewhat long time to complete. High weight. Deep Wilderness. |
| Revenants | Block or complete | Much slower to complete than many other tasks, so this should be blocked if the player primarily cares about slayer points. However, revenants do offer excellent loot, so if the player wishes, they may complete revenants tasks to obtain this loot and block other tasks instead. |
| Lava dragons | Block or complete | Long time to complete. Like revenants, however, lava dragons offer good loot. The player may choose to complete this task and block others instead if they consider the loot sufficient to make up for the slow completion time. |
| Ice warriors | Block or complete | Fairly long time to complete. High weight. Found in a high-traffic area for PKers. Offers no loot. |
| Ent | Block or complete | Somewhat long time to complete. Moderate weight. Offers no loot other than the logs gained when chopping its remains. |
| Magic axes | Block or complete | Somewhat long time to complete. High weight. Offers no loot. |
If the player is completing wilderness slayer tasks to quickly gain slayer points, it is generally recommended to avoid skipping tasks. This is because all wilderness slayer tasks are fairly completable once bloodveld, spiritual creatures, and aviansies are blocked, and skipping tasks greatly decreases the player's points gained per hour.
While some tasks may seem terrible at first glance, many have alternatives that can be killed that are superior.
- Pirates or Zombies: Zombie pirates at the Chaos Temple (Wilderness) are an incredibly good task, and very profitable. As they're undead, the player can use salve amulet (ei); this doesn't stack with the slayer helmet (i), and should therefore be used in place of the much more valuable helmet. They are found in low wilderness, and can be killed with area of effect attacks like cannons, venator bow, and burst/barrage spells. The permanent buffs from teleport anchoring scroll and Wilderness Medium make a massive difference here, and are practically essential.
- Bears, Spiders, Skeletons: Can kill the Wildernes bosses for each respective task (E.g. Spindel or Venenatis for a spider task). Excellent tasks for mid to higher leveled players.
- Hellhounds: Can kill Vet'ion or Calvar'ion, as they both summon four skeleton hellhounds, which count as both skeletons and hellhounds. Can also kill Wilderness slayer cave hellhounds, which can be killed with venator bow and cannon.
- Scorpions: Setting up a cannon inside of scorpia's lair allows this task to be completed within a matter of seconds.
What the player chooses to block is specific to them. Not having a cannon and venator bow will make some tasks much worse. It's ultimately up to each player to decide what is best for them.
Useful shortcuts
High agility is an advantage in the Wilderness. The energy restoration rate is useful, since you often need to travel longer distances on foot in the Wilderness. Furthermore, run energy may be important when fleeing player killers. Additionally, access to the following shortcuts may make both travel and fleeing easier:
- 46 (Narrow crevice in Deep Wilderness Dungeon)
- 60 (Rocky handholds leading to Wilderness from the God Wars Dungeon entrance)
- 64 (Rocks leading to Wilderness from Trollheim)
- 65 (Easy pillar jump in Revenant Caves)
- 74 (Stepping stone in Lava Dragon Isle)
- 75 (Medium pillar jump in Revenant Caves)
- 77 (Crevices in Wilderness Slayer Cave)
- 82 (Stepping stone to Lava Maze)
- 89 (Hard pillar jump in Revenant Caves)
Tips and tricks
- The Runelite plugin "Wilderness player alarm" is an excellent way to be notified that a player is nearby, flashing the screen and giving an audible alert.
- Because you will be slaying monsters instead of players, it's advised that you go to Options -> Controls and check the 'PK Skull Prevention'. Doing so negates the chances of being skull-tricked by PKers, as you can no longer accidentally attack players.
- Using the Arceuus spellbook with spare runes to cast the respective reanimation spell of the Slayer monster you are assigned to, provided it drops an ensouled head, can earn you some Prayer experience. This works only if you just recently received the drop, however.
- Along with blighted anglerfish, bringing a couple of saradomin brews, blighted super restore and Anti-venom can lengthen your chance at survival during player-killer encounters. Prayer-switching is essential against PKers with multiple combat styles. To aid in escapes, bringing Dinh's bulwark to wear along with Black dragonhide armour can increase survivability massively. Quick prayers set to defend against enemy PKers (Protect from Magic, Protect Item and your best offensive magic prayer) can increase the chance that they will splash against you, further assisting in an escape.
- If praying, the player may bring blighted super restore for prayer restoration if using fast-draining prayers, such as Piety. As food is crucial to have out in the Wilderness, some players may opt to forgo fast-draining prayers entirely in order to save space for more food. Smite can further increase the risk of overusing certain prayers, hence saving prayer points allows further use of protection prayers and protect item.
- Bank your Larran's keys if you gain multiple and feel as though you could die; they are always risked.
- At 84 Thieving, you can steal from the Chest (Rogues' Castle) to make the rogues aggressive towards you while also making some extra money.
- Aggro is good to have out in the Wilderness especially if you are being flanked by a PKer as it could buy you some time to escape. Also, you could try X-logging in single combat, which is clicking the red X on your screen or game client to close it, before killing a monster or while battling it, depending on how difficult the monster is to take down. Switching to a fun weapon (if brought), auto-attacking and then X-logging is a better tactic of escape when doing this. (Warning: X-logging does not work in a multi-combat area.)
- A clue box can be used to protect your clue scroll within the Wilderness.
- You can also use an imp-in-a-box or two to bank your emblems or other high-risk items, but 71 Hunter is required to catch imps, and it will not work if past level 30 Wilderness or if tele-blocked.
- Use an expeditious bracelet if you want to finish your task faster.
- Use a bracelet of slaughter if you want to extend your task as much as possible, useful if you are hunting for Larran's keys and get an easy task (Spiders, Skeletons, Scorpions for example).
- Players may opt to use a Dwarf multicannon to speed up kills. However, this does add additional risk if encountering Player-Killers. Also, if the player steps outside the Wilderness while the cannon continues to fire, accrued kills will NOT count toward their task. Leave the cannon on the ground if a PKer shows up, as a set up cannon is not lost on death, and even if it breaks and despawns a new set can be reobtained for free from Nulodion.
Possible tasks
- ^ Only assigned to players if they have completed the Priest in Peril quest and have at least 85 Slayer.
- ^ 2.0 2.1 2.2 2.3 Slayer task assignments of abyssal demons, dust devils, jellies, and nechryaels from Krystilia can be enabled or disabled for free.
- ^ 3.0 3.1 3.2 Only assigned to players who have either 60 Agility or
- ^ Only assigned to players who have unlocked Watch the birdie via spending 80 Slayer reward points.
- ^ Armadylean guards also count if fought in the Wilderness.
- ^ Callisto and Artio also count.
- ^ Kolodion's final form also counts.
- ^ The King Black Dragon and lava dragons do not count.
- ^ Only assigned to players if they have completed the quest Priest in Peril and have at least 50 Slayer.
- ^ Only assigned to players if they have completed the quest Desert Treasure I and have at least 65 Slayer.
- ^ (Greater) Skeleton Hellhounds also count.
- ^ Only assigned to players if they have at least 52 Slayer.
- ^ Only assigned to players if they have at least 80 Slayer.
- ^ Scorpia, her guardians, and her offspring also count.
- ^ Vet'ion, Calvar'ion, and their (Greater) Skeleton Hellhounds also count.
- ^ Venenatis and Spindel also count.
- ^ Only assigned to players if they have completed the Death Plateau quest and have at least 63 Slayer.
- ^ Only assigned to players who have unlocked Like a boss via spending 200 Slayer reward points.
- ^ Artio also counts.
- ^ Spindel also counts.
- ^ Calvar'ion also counts.
References


| Related | |
|---|---|