| Shooting Stars | |||||||||||||||||||
|---|---|---|---|---|---|---|---|---|---|---|---|---|---|---|---|---|---|---|---|
| Released | 17 March 2021 (Update) | ||||||||||||||||||
| Type | Distraction and Diversion | ||||||||||||||||||
| Members | No | ||||||||||||||||||
| Location | Global | ||||||||||||||||||
| League region |  General✓ General✓ | ||||||||||||||||||
| Skills | Mining | ||||||||||||||||||
| Reward currency | Stardust | ||||||||||||||||||
| Music | Varies on location of star | ||||||||||||||||||
| Map | |||||||||||||||||||
Shooting Stars is a Distraction and Diversion activity in which players mine crashed stars for stardust. A star will crash roughly every 90 minutes on each server (with a variation of up to 15 minutes), falling at a random spot selected from a predetermined list. The activity is notable for providing idle Mining training, only requiring input every 7 minutes while mining a star.
Stardust may be exchanged at Dusuri's Star Shop by the Mining Guild entrance in Falador for various rewards. Although the activity is available in Free-to-play, players will be unable to use the shop and receive half the experience points from mining the stars.
Locating
Members can use a telescope in a study room in a player-owned house to find the approximate area and time of the next landing. It is also possible to use telescopes in another player's house for this purpose.
- If the telescope is blocked by another room in the house, (not including outdoor rooms such as the Menagerie), or the room is underground, it will not work.
- Better telescopes provide a more accurate time window:
- Oak telescope - 24-minute window
- Teak telescope - 9-minute window
- Mahogany telescope - 2-minute window
- If a star has recently fallen, the following text appears:
- "You look through the telescope but you don't see anything interesting."
Join the Shooting Stars grouping chat via the grouping menu to share locations with other players.
There are also many websites available on the internet which list known star sites allowing players to quickly find stars meeting their criteria.
If a player is standing near the crash site where a shooting star is falling, they will hear a whistling sound as it falls from the sky and the crash as it impacts the ground.
Mining
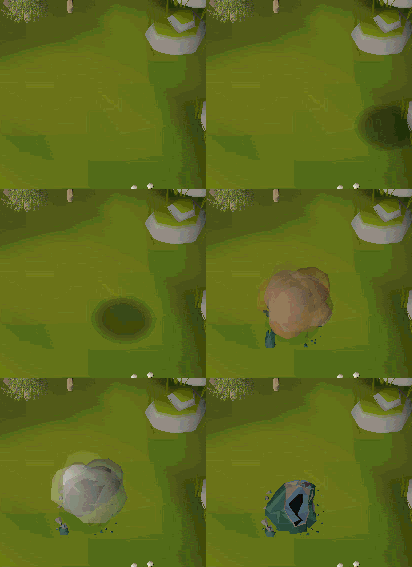
Crashed stars may be mined through a number of layers before they will be fully depleted. Each layer will always deplete at a fixed rate of 7 minutes, provided there is at least one player mining it. On first appearance, stars will range in size from 6 to 9 layers, and the star will crumble and disappear once the final layer has been mined. Only one star may be active at a time on any given world; the previous star will disappear if another star appears before it is fully depleted. [1]
Each layer has an associated Mining level requirement, decreasing with each layer that is mined through. Players can find out how large the star is by prospecting it, which will also reveal the percentage progress towards depleting the current layer.
| Size |  Level Level
|
Crash chance |
|---|---|---|
| 9 | 90 | 20% |
| 8 | 80 | 25% |
| 7 | 70 | 30% |
| 6 | 60 | 25% |
| 5 | 50 | N/A |
| 4 | 40 | N/A |
| 3 | 30 | N/A |
| 2 | 20 | N/A |
| 1 | 10 | N/A |
While mining the crashed star, a roll to receive stardust is performed regularly based on the player's Mining level, scaling from 29% to 46% at levels 1 to 99. Players will additionally receive 32 (32.8 with the full prospectors kit) experience each time a piece of stardust is mined (halved to 16 on Free-to-play worlds). Mining enhancers that multiply yield do not affect stars.
 |
Star of Your Own |
|
The jingle that plays upon discovering a crashed star.
| |
There is a star discovery bonus available to the first player that attempts to mine a crashed star, who will receive double stardust for the next 300 mined from any shooting star. Experience is not doubled. This bonus persists through logouts and server updates, and will reset to 300 if another star is discovered while the bonus is active. You do not need to meet the skill requirements for the layer to receive the bonus.
In addition to receiving this bonus, their name will be added to the Shooting Star Noticeboard in the reception room north of the Observatory, which records the last five players to discover stars on the server.
It is possible to receive the pet rock golem whilst mining, where the base chance is 1/521,550.
Mining Success Chance
{"type":"scatter","options":{"tooltips":{"intersect":false,"format":"skillingSuccess"},"datasetsPerGroup":3,"aspectRatio":1.35,"title":{"display":true,"font":{"size":18},"text":"Stardust mining chance","position":"top"},"scales":{"y":{"ticks":{"stepSize":0.1,"format":"percent"},"scaleLabel":{"display":true,"labelString":"Success rate"}},"x":{"ticks":{"stepSize":1},"scaleLabel":{"display":true,"labelString":"Level"}}},"maintainAspectRatio":false,"fill":false},"minWidth":"300px","resizable":true,"width":"min(540px, 100vw - 32px)","isChartObj":true,"height":"400px","isFinished":true,"minHeight":"300px","data":{"datasets":[{"fill":false,"borderCapStyle":"round","label":"Stardust ","showLine":true,"data":[{"y":0.3046875,"x":10}],"pointStyleImg":"Stardust_175.png","hoverBackgroundColor":"rgba(151,198,222,0.5)","backgroundColor":"rgba(166,206,227,0.3)","borderDash":[5,5],"borderColor":"rgba(166,206,227,1)","hoverBorderColor":"rgba(151,198,222,1)","pointRadius":0,"clip":5,"baseColor":"goldenrod"},{"pointRadius":0,"label":"Stardust ","showLine":true,"data":[{"y":0.3046875,"x":10},{"y":0.3046875,"x":11},{"y":0.30859375,"x":12},{"y":0.30859375,"x":13},{"y":0.3125,"x":14},{"y":0.3125,"x":15},{"y":0.31640625,"x":16},{"y":0.31640625,"x":17},{"y":0.3203125,"x":18},{"y":0.3203125,"x":19},{"y":0.32421875,"x":20},{"y":0.32421875,"x":21},{"y":0.32421875,"x":22},{"y":0.328125,"x":23},{"y":0.328125,"x":24},{"y":0.33203125,"x":25},{"y":0.33203125,"x":26},{"y":0.3359375,"x":27},{"y":0.3359375,"x":28},{"y":0.33984375,"x":29},{"y":0.33984375,"x":30},{"y":0.33984375,"x":31},{"y":0.34375,"x":32},{"y":0.34375,"x":33},{"y":0.34765625,"x":34},{"y":0.34765625,"x":35},{"y":0.3515625,"x":36},{"y":0.3515625,"x":37},{"y":0.35546875,"x":38},{"y":0.35546875,"x":39},{"y":0.359375,"x":40},{"y":0.359375,"x":41},{"y":0.359375,"x":42},{"y":0.36328125,"x":43},{"y":0.36328125,"x":44},{"y":0.3671875,"x":45},{"y":0.3671875,"x":46},{"y":0.37109375,"x":47},{"y":0.37109375,"x":48},{"y":0.375,"x":49},{"y":0.375,"x":50},{"y":0.375,"x":51},{"y":0.37890625,"x":52},{"y":0.37890625,"x":53},{"y":0.3828125,"x":54},{"y":0.3828125,"x":55},{"y":0.38671875,"x":56},{"y":0.38671875,"x":57},{"y":0.390625,"x":58},{"y":0.390625,"x":59},{"y":0.390625,"x":60},{"y":0.39453125,"x":61},{"y":0.39453125,"x":62},{"y":0.3984375,"x":63},{"y":0.3984375,"x":64},{"y":0.40234375,"x":65},{"y":0.40234375,"x":66},{"y":0.40625,"x":67},{"y":0.40625,"x":68},{"y":0.41015625,"x":69},{"y":0.41015625,"x":70},{"y":0.41015625,"x":71},{"y":0.4140625,"x":72},{"y":0.4140625,"x":73},{"y":0.41796875,"x":74},{"y":0.41796875,"x":75},{"y":0.421875,"x":76},{"y":0.421875,"x":77},{"y":0.42578125,"x":78},{"y":0.42578125,"x":79},{"y":0.42578125,"x":80},{"y":0.4296875,"x":81},{"y":0.4296875,"x":82},{"y":0.43359375,"x":83},{"y":0.43359375,"x":84},{"y":0.4375,"x":85},{"y":0.4375,"x":86},{"y":0.44140625,"x":87},{"y":0.44140625,"x":88},{"y":0.4453125,"x":89},{"y":0.4453125,"x":90},{"y":0.4453125,"x":91},{"y":0.44921875,"x":92},{"y":0.44921875,"x":93},{"y":0.453125,"x":94},{"y":0.453125,"x":95},{"y":0.45703125,"x":96},{"y":0.45703125,"x":97},{"y":0.4609375,"x":98},{"y":0.4609375,"x":99}],"fill":false,"hoverBackgroundColor":"rgba(29,114,171,0.5)","backgroundColor":"rgba(31,120,180,0.3)","borderDash":[],"borderColor":"rgba(31,120,180,1)","hoverBorderColor":"rgba(29,114,171,1)","borderCapStyle":"round","clip":5,"baseColor":"goldenrod"},{"borderCapStyle":"round","hoverBorderColor":"rgba(169,219,124,1)","showLine":true,"data":[{"y":0.4609375,"x":99}],"fill":false,"hoverBackgroundColor":"rgba(169,219,124,0.5)","borderDash":[],"borderColor":"rgba(178,223,138,1)","backgroundColor":"rgba(178,223,138,0.3)","pointRadius":5,"clip":5,"baseColor":"goldenrod"}]}}Notes
- The shooting star cycle will reset during a system update; stars on the ground before the update will vanish. Stars will begin landing again 20–50 minutes after the game goes back online, and then cycle as normal (every ~90 minutes)
- It is possible that the telescopes of two POH will show different timers. In such a case, the landing time can be narrowed down to the time when the timers overlap. For example, if one telescope says a star is 10-12 minutes from landing and another says 9-11 minutes, the star must be 10-11 minutes from landing.
- The adamant pickaxe's 4-tick cycle allows it to be used for tick manipulation while mining shooting stars, unlike other pickaxes.
- Gems are able to be obtained from mining stars. A charged amulet of glory will increase this rate. A gem bag or gem sack may be worth bringing, or a chisel to craft bolt tips.
- In Varlamore, crashed stars can reward the Loop half of key (moon key).
- When attempting to mine a star you do not have the required level for, it is possible to degrade the star by up to 1% even though you are unable to mine it for stardust. This may be done every 7 ticks, and is a result of the check for the remaining time on a star occuring earlier than the check for the required level. This is not affected by other players.
Money making
The following money making guide is available for Shooting Stars:
| Method | Hourly profit | Skills |
|---|---|---|
| Mining crashed stars | 72,581 |
10 (60+ recommended) |
Rewards
Stardust is obtained by mining the crashed star. Stardust is used as currency at Dusuri's Star Shop to purchase the celestial ring along with other rewards.
| Reward | Price sold at | Price bought at | |
|---|---|---|---|
 |
Celestial ring (uncharged) |  2,000 2,000
|
1,600
|
 |
Star fragment | 3,000
|
2,400
|
 |
Bag full of gems | 300
|
240
|
 |
Soft clay pack |  150 150
|
 120 120
|
Experience rates vary greatly based on level, the tier of pickaxe used, and time spent locating stars. If mining consistently with a Dragon pickaxe and 90+ mining, players can expect approximately 30,000 experience per hour.
Equipment
| Slot | Item (most effective → least effective) | ||
|---|---|---|---|
 |  Prospector helmet Prospector helmet | N/A | N/A |
 |  Amulet of glory (Charged)[a] Amulet of glory (Charged)[a] | N/A | N/A |
 |  Ardougne cloak Ardougne cloak | N/A | N/A |
 |  Prospector jacket / Prospector jacket /  Varrock armour 4[b] Varrock armour 4[b] | N/A | N/A |
 |  Prospector legs Prospector legs | N/A | N/A |
 |  Crystal pickaxe Crystal pickaxe |  Dragon pickaxe / Dragon pickaxe /  Infernal pickaxe[c] Infernal pickaxe[c] |  Rune pickaxe Rune pickaxe |
 |  Book of the dead Book of the dead |  Falador shield 4[d][e] Falador shield 4[d][e] |  God book[e] / God book[e] /  Broodoo shield[e] Broodoo shield[e]/  Antler guard[e] Antler guard[e] |
 |  Rada's blessing 4 Rada's blessing 4 |  Rada's blessing 3 Rada's blessing 3 |  Rada's blessing 2[e] / Rada's blessing 2[e] /  God blessings[e] God blessings[e] |
 |  Karamja gloves 4 / Karamja gloves 4 /  Karamja gloves 3 Karamja gloves 3 |  Holy wraps[e] Holy wraps[e] | N/A |
 |  Prospector boots Prospector boots | N/A | N/A |
 |  Celestial ring[f] Celestial ring[f] |  Lightbearer[g] Lightbearer[g] |  Ring of the gods (i)[e] Ring of the gods (i)[e] |
 | Crystal pickaxe / Dragon pickaxe / Infernal pickaxe[c] | N/A | N/A |
Inventory
 |  |  |  |
 |  |  |  |
 |  |  |  |
 |  |  |  |
 | |||
 |  |  |
- Dramen Staff / Elite Lumbridge & Draynor Diary
- Teleport jewellery
- Royal seed pod
- Master scroll book
- Morytania legs 3 or above
- Chronicle
- Teleport crystal / Eternal teleport crystal
- Teleport to house (tablet) / construct. cape / max cape
- Quetzal whistle
- Mythical cape after DS2 quest
- Max POH with Portal nexus and rejuvenation pool
- Coins for charter ships
- Gem bag or gem sack
- Rune pouch with teleport runes
- Brown apron to gain access inside the Crafting Guild
Landing sites
Members may make use of a telescope to reveal the general area in which the star will fall, wherein there are a number of set locations in which the star may land. A star will not land in the same spot twice in a row.[2]
The only way to locate the actual crash site is to search each possible crash site in the given area until the crashed star is found; this process, as well as the mining process, can be greatly expedited with the assistance of other players.
There are a total of 82 possible landing sites, 21 of which are located in free-to-play areas. Stars may land in members areas on free-to-play worlds.
Some crash site areas contain aggressive mobs; low level players should take care when selecting a star location to mine at, especially if they do not intend to pay attention while mining. Star locations contained within cities are typically safe.
Asgarnia
| Location | Fastest way to get there | Map |
|---|---|---|
| Dwarven Mine northern entrance | ||
| Mining Guild entrance | ||
| West Falador mine |
|
|
| Taverley (White Wolf Tunnel entrance) |
|
|
| Crafting Guild | ||
| Rimmington mine |
|
Crandor and Karamja
| Location | Fastest way to get there | Map |
|---|---|---|
| South Crandor mine |
|
|
| North Crandor mine |
|
|
| North Brimhaven mine |
|
|
| South Brimhaven mine |
|
|
| Karamja Jungle mine (Nature Altar) |
|
|
| Shilo Village mine |
|
Feldip Hills and the Isle of Souls
| Location | Fastest way to get there | Map |
|---|---|---|
| Feldip Hunter area |
|
|
| Rantz's cave |
|
|
| Corsair Cove |
|
|
| Corsair Cove Resource Area |
|
|
| Myths' Guild | ||
| Isle of Souls mine |
|
Fossil Island and Mos Le'Harmless
| Location | Fastest way to get there | Map |
|---|---|---|
| Fossil Island mine |
|
|
| Volcanic Mine entrance | ||
| Mos Le'Harmless |
Fremennik Lands and Lunar Isle
| Location | Fastest way to get there | Map |
|---|---|---|
| Rellekka mine |
|
|
| Keldagrim entrance mine |
|
|
| Miscellania mine |
|
|
| Jatizso mine entrance |
|
|
| Central Fremennik Isles mine |
|
|
| Lunar Isle mine entrance |
Great Kourend
| Location | Fastest way to get there | Map |
|---|---|---|
| Hosidius mine |
|
|
| Shayzien mine |
|
|
| Port Piscarilius mine |
|
|
| Dense essence mine |
|
|
| Lovakite mine |
|
|
| Lovakengj (bank) |
|
Kandarin
| Location | Fastest way to get there | Map |
|---|---|---|
| Catherby bank | ||
| Yanille bank |
|
|
| Port Khazard mine | ||
| Legends' Guild mine |
|
|
| Coal Trucks |
|
|
| South-east Ardougne mine (monastery) |
|
Kebos Lowlands
| Location | Fastest way to get there | Map |
|---|---|---|
| Kebos Lowlands mine (Kebos Swamp) |
|
|
| Mount Karuulm mine |
|
|
| Mount Karuulm (bank) |
|
|
| Mount Quidamortem (bank) |
|
Kharidian Desert
| Location | Fastest way to get there | Map |
|---|---|---|
| Al Kharid mine | ||
| Al Kharid (bank) |
|
|
| Uzer mine |
|
|
| Desert quarry |
|
|
| Agility Pyramid mine |
|
|
| Nardah |
|
|
| Emir's Arena |
|
Misthalin
| Location | Fastest way to get there | Map |
|---|---|---|
| East Lumbridge Swamp mine | ||
| West Lumbridge Swamp mine |
|
|
| Draynor Village | ||
| Varrock (East bank) | ||
| South-east Varrock mine |
|
|
| South-west Varrock mine |
|
Morytania
| Location | Fastest way to get there | Map |
|---|---|---|
| Canifis (bank) |
|
|
| Burgh de Rott (bank) | ||
| Abandoned Mine | ||
| Ver Sinhaza (bank) |
|
|
| Daeyalt essence mine entrance |
|
Piscatoris and the Gnome Stronghold
| Location | Fastest way to get there | Map |
|---|---|---|
| Piscatoris mine |
|
|
| Grand Tree |
|
|
| Tree Gnome Stronghold bank |
|
Tirannwn
| Location | Fastest way to get there | Map |
|---|---|---|
| Isafdar mine | ||
| Arandar mine | ||
| Lletya |
|
|
| Trahaearn mine entrance |
|
|
| Mynydd mine |
|
Varlamore
| Location | Fastest way to get there | Map |
|---|---|---|
| Civitas illa Fortis (east bank) |
|
|
| Stonecutter Outpost (Varlamore South East mine) |
|
|
| Ralos' Rise mining site (south-east of mountain) |
|
|
| Mistrock mine |
|
|
| Salvager Overlook mine |
|
|
| Custodia Mountains mine |
|
Wilderness
| Location | Fastest way to get there | Map |
|---|---|---|
| South Wilderness mine (Mage of Zamorak) | ||
| South-west Wilderness mine (South of Dark Warriors' Fortress) | ||
| Bandit Camp mine (Hobgoblins) |
|
|
| Lava Maze runite mine |
|
|
| Resource Area |
|
|
| Mage Arena |
|
|
| Pirates' Hideout mine |
Changes
| Date | Changes |
|---|---|
| 25 October 2023 (Update) |
|
| 2 October 2023 |
Hotfix
Receiving clue geodes from crashed stars has been disabled in an effort to help server performance.[3] |
| 20 September 2023 (Update) |
|
| 10 November 2021 (Update) |
Shooting Stars now have a chance to land in Darkmeyer, as previously intended. |
| 30 June 2021 (Update | poll) |
Experience from mining crashed stars have been increased per stardust mined. |
| 24 March 2021 (Update) |
|
| 17 March 2021 |
Hotfix
Players with the Twisted, Hosidius, and Cosy Cabin house styles can now properly use the telescope. |
Historical
As a piece of content brought into Old School RuneScape via backporting, Shooting Stars were originally released on 2 September 2008 in RuneScape 3 as one of three Distractions and Diversions, alongside Balthazar Beauregard's Big Top Bonanza and Penguin Hide and Seek.
Like most content backported into Old School RuneScape, the Shooting Stars for Old School has a few differences which aim to better adapt it for Old School RuneScape.
- RuneScape 3 has 44 possible landing sites; Old School RuneScape has 82.
- Originally, Shooting Stars were only available for members. This was changed on 9 October 2017 in RuneScape 3.
- On free-to-play worlds, Shooting Stars may crash in a members area, rendering it out of reach.
- Mining experience on free-to-play servers is half that of on members servers.
- There is no additional experience given for the first player to mine the fallen star.
- Players receive a reduced amount of experience per stardust.
- In RuneScape 3, players could hold only up to 200 stardust, and could only exchange it once per day. Old School RuneScape does not have either of these limits.
- Star Sprites do not exist in Old School RuneScape; rewards are exchanged for stardust via a shop run by Dusuri instead.
Developers
References
| NPCs |
| ||||||
|---|---|---|---|---|---|---|---|
| Dusuri's Star Shop |
| ||||||
| Objects | |||||||


 Minigames Minigames |
| ||||||||||
|---|---|---|---|---|---|---|---|---|---|---|---|
 Raids Raids | |||||||||||
 Distractions and Diversions Distractions and Diversions | |||||||||||
| Other | |||||||||||