Thieving training
This copy was last processed on . The copied wiki revision is dated .
This is a guide for training the Thieving skill.
For maximum theoretical experience rates for certain Thieving training methods, see this page.
General information and tips
Tip for pickpocketing: Go to the options menu, go to the game controller at the top right, and select "Hidden" under "NPC 'Attack' options". This will turn the 'Pickpocket' option into a left-click, rather than a right-click. Also, one may pickpocket more than once in a single animation, so spam-clicking will maximise experience.
Ardougne Diary
Different tiers of the Ardougne Diary increase the chance of successfully pickpocketing various NPCs. The medium Ardougne Diary increases the player's chance of success when pickpocketing by 10% only within Ardougne. The hard Ardougne Diary extends this bonus to all of Gielinor. Having the Ardougne cloak equipped or in the inventory is not required to get this benefit.[1]
Additionally, each tier of the diary increases the maximum amount of coin pouches that can be held before needing to open them:
- None/Easy: 28
- Medium: 56
- Hard: 84
- Elite: 140
As a result of both of these benefits, it is beneficial to have at least the hard tier of the diary done, as this gives the player both a buff to their chances at pickpocketing along with allowing them to pickpocket for longer before needing to open coin pouches. This increases experience rates and allows for less attention needed when pickpocketing, respectively.
Rogue equipment
While wearing components of the rogue equipment, there is a chance of pickpocketing twice the loot from an NPC. Wearing the full set guarantees double loot. Experience drops remain unaffected, however.
The set consists of the rogue mask, rogue top, rogue trousers, rogue gloves and rogue boots. Items from the outfit can be found while looting the wall safe at the end of the Rogues' Den minigame, which can be accessed at 50 Thieving, with 80 Thieving granting an additional shortcut to make it faster.
Dodgy necklace
Dodgy necklace gives the wearer a 25% chance to not be stunned and damaged when failing to pickpocket an NPC. This will increase experience rates if the player can fail to pickpocket the NPC. The necklace has 10 charges until it crumbles to dust.
Shadow Veil
While under the effects of the Shadow Veil spell, players have a 15% chance to avoid being stunned and damaged while pickpocketing NPCs. This stacks multiplicatively with the dodgy necklace, for a total of 36.25% chance to not take damage from a failed pickpocket[2].
Gloves of silence
Gloves of silence increase players' success rate while pickpocketing by 5% while they are equipped. Wearing them requires level 54 Hunter. Gloves of silence can be bought from the Grand Exchange for 1,623 each or created at the Fancy Clothes Store in Varrock from 2 dark kebbit furs for a cost of 600.
The Ardougne Diary perks override the gloves of silence 5% success rate. Therefore, the gloves of silence become obsolete within Ardougne after completing the medium Ardougne Diary, or completely obsolete after completing the hard Ardougne Diary.
Gloves of silence are damaged each time that the player is unsuccessful in a pickpocketing attempt. They are destroyed after 62 failures, if counted from when they are new. If a player has multiple gloves of silence then they will all display the same status when their condition is checked. However, if the gloves of silence currently being used do fall apart, then any other pairs that the player owns are reset to the "new" condition. The condition of the gloves is only relevant to the player owning them, and is not a property of the gloves themselves. Players with at least level 64 Crafting can restore their gloves of silence to "new" condition by using 1 dark kebbit fur, costing 143, and thread, costing 6, on the gloves.
Fastest experience
Levels 1–42: Questing
Early levels can be skipped by completing quests that give Thieving experience. Completing Biohazard, Hazeel Cult, Fight Arena, Tower of Life, and Tribal Totem grants a total of 7,200 experience, which will get the player from level 1 to 24. These quests can be easily done at a low level and they have minimal requirements, however some of them involve some sort of combat.
Furthermore, completing The Queen of Thieves, The Giant Dwarf, Death to the Dorgeshuun, The Golem, Creature of Fenkenstrain, Twilight's Promise, Ethically Acquired Antiquities, The Feud, and Death on the Isle grants a total additional 41,500 experience, which will get the player up to level 42.
Levels 1–36/45: Chambers of Xeric thieving room
From level 1 to 45, you can train Thieving in the Chambers of Xeric raid atop Mount Quidamortem in the Kebos Lowlands. Bring a lockpick (can obtain from a Scavenger inside the raid), then reload the raid until the first room is a thieving room. Steal from 4 chests in a circular motion and you can expect experience rates of up to 30,000–50,000 experience an hour. Simply pick the locks until you get the prompt that you can't carry anymore grubs, drop the grubs, then continue picking locks -- do not place the grubs in the trough, as doing so will complete the room and lock you out of further Thieving experience for the rest of the raid. The easiest way to get to the Chambers of Xeric on a fresh account is by taking a minecart to Mount Quidamortem from Port Piscarilius for 20 coins.
Experience rates can be improved by scaling the raid to up to 100 players, which significantly reduces the chest respawn time. In certain room layouts, it’s possible to rotate between just two chests due to the fast respawn rate. Some players position their camera and character in a specific way to allow near-continuous clicking between the two chests without moving, improving both experience per hour and ease of use.
It only requires about one hour of raid time to level from 1-40.
Levels 36–45: Chests in Aldarin Villas
Stealing from chests in Aldarin villas offers the fastest experience from level 36 until 45. Each chest gives 200 experience per successful unlock. There is a chance on failure to be teleported outside. Bring a lockpick and some stamina or super energy potions. The chest in the western villa offers the shortest run back from the teleport location after failing.
Up to 60,000 experience can be earned per hour even at lower levels, but 40,000–50,000 is more likely. Without a lockpick or energy potions, only rates up to 40,000 experience can be expected. At level 60 Thieving, approximately 400 chests can be successfully opened per hour, yielding 80,000 Thieving experience.
Notable drops from the chest include uncut gems, herb seeds, medium clue scrolls, and blessed bone shards. There is some time during the runs back for fletching bolts or other downtime activities.
Levels 45–49, 65–84/91/99: Blackjacking

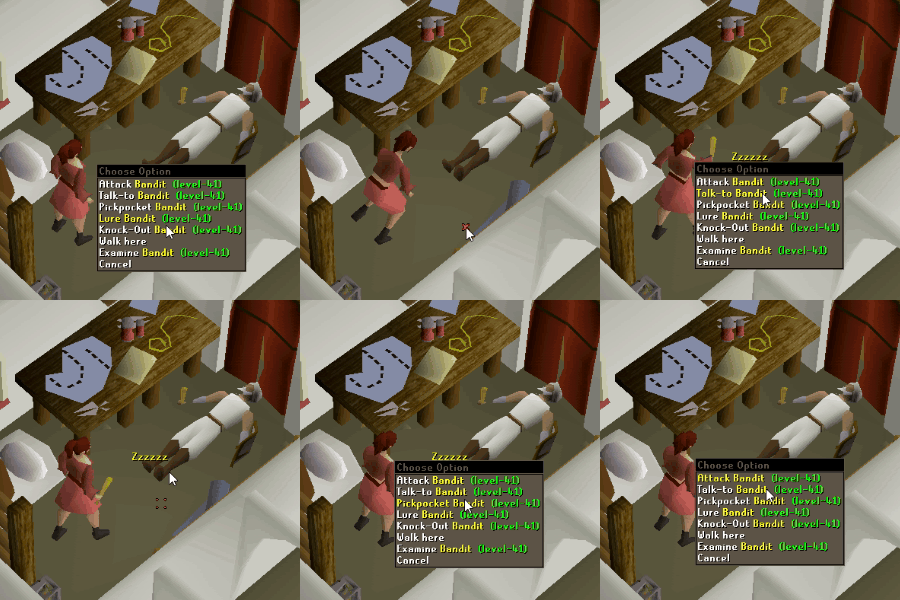
Blackjacking bandits in Pollnivneach offers the fastest experience from level 45 to 49, and then from level 65 to 84. To blackjack, lure a bandit to an empty house where the other bandits cannot see them. Knock out the bandit and pickpocket them twice while they are unconscious. The timing is right when the player receives experience drops every two ticks. When failing a knock-out, quickly knock out the bandit again or pickpocket them with a full inventory to avoid entering into combat. If the bandit starts attacking, equip a different weapon and attempt to knock out the bandit to cancel combat.
There are three different types of bandits that can be blackjacked, but the method is the same for all of them.
- From level 45 to 55, blackjack level 41 Bearded Pollnivnian bandits who are wielding a blackjack.
- From level 55 to 65, blackjack level 56 Pollnivnian bandits who do not have a beard and are wielding a scimitar.
- From level 65 onwards, blackjack Menaphite Thugs located in the southern part of Pollnivneach.
Blackjacking requires level 45 Thieving, partial completion of The Feud, and a blackjack of any kind. The type of blackjack does not matter for blackjacking. Wearing full rogue equipment is recommended for double loot per pickpocket, though this does not give extra experience. Use Saradomin brews or other inventory-blocking food (such as pies or curry) for healing. Bring the food in banknotes and unnote it at the Banknote Exchange Merchant next to the general store. Alternatively, buy jugs of wine from Faisal at the bar to the south.
The experience rates in the table below assume having good practice and include resupply time. The Saradomin brew rates assume unnoting the brews at the Banknote Exchange Merchant, and the wine rates buying the wines from the nearby bar. Expect lower rates when learning. At maximum efficiency, it is possible to gain up to 270,000–275,000 experience per hour at level 99.
 Level Level
|
XP/h (brews) | XP/h (wines) |
|---|---|---|
| 45 | 99,000 | 86,000 |
| 50 | 103,000 | 90,000 |
| 55 | 136,000 | 121,000 |
| 60 | 140,000 | 126,000 |
| 65 | 230,000 | 209,000 |
| 70 | 236,000 | 218,000 |
| 75 | 242,000 | 226,000 |
| 80 | 247,000 | 233,000 |
| 85 | 252,000 | 241,000 |
| 90 | 257,000 | 248,000 |
| 95 | 261,000 | 255,000 |
| 99 | 265,000 | 261,000 |
Stealing artefacts offers faster experience from level 49 to 65, and the Pyramid Plunder minigame offers faster experience past level 91, but this method remains viable up to level 99. This method is fairly click-intensive however, so consider alternative methods listed below.
If using this method from level 45 to 91, the player will make ~2,500,000 coins, or ~5,000,000 coins when wearing full rogue equipment. Rogue equipment is locked until level 50.
Resetting aggressiveness
Failing to knock out a bandit will make them aggressive. When this happens, avoid pickpocketing a conscious bandit (without a full inventory) as getting stunned will lower experience rates. With quick enough reactions, it is possible to avoid getting into combat by doing the following:
- Keep trying to knock them out again. This is the best option but requires quick reactions.
- Pickpocket the bandit with a full inventory. The player will not actually pickpocket, but selecting the dialogue prompt will reset aggressiveness. You can attempt to knock-out again immediately after the dialogue prompt, even though you will appear stunned.
If the bandit starts attacking the player, the bandit cannot be pickpocketed or knocked out while in combat. To quickly get out of combat, unequip the blackjack or switch to a different weapon, and attempt to knock out the bandit. This will make the bandit stop attacking the player. Wait a few seconds before re-equipping the blackjack, and continue blackjacking.
More information and tips
To minimise mouse movement (similarly to training Construction), set NPC 'Attack' Options to "Hidden". Use resizable mode and zoom in. Set the camera angle so that when right-clicking on a bandit, the mouse cursor is on the "Pickpocket" option.
- On the RuneLite client, use the Menu Entry Swapper plugin to swap the Pickpocket option (on the unconscious bandit NPC) as left-click. Set the camera angle so that when right-clicking on a bandit, the mouse cursor is on the "Knock-Out" option. This way, the player can right-click knock out and left-click pickpocket the bandit without moving the mouse at all.
Lure a bandit to a spot where he gets trapped and cannot move elsewhere. Make sure the bandit is not able to walk through you; this can be done by knocking out the bandit, quickly running away from the bandit and going back in front of him. The bandit will not teleport to its respawn location as long as you keep blackjacking.
For bearded or regular Pollnivnian bandits, use Ali the Dyer's house in the northern part of Pollnivneach. It is very small and has a ladder which can be used to quickly reset aggressiveness if needed. A Menaphite Thug can be lured into the southern part of the house just next to the bar.
Use inventory blocking food (such as Saradomin brews, pies, or jugs of wine) to always have a full inventory. With a full inventory, the player cannot get coin pouches and thus cannot actually pickpocket a conscious bandit. If the player fails a knock-out, quickly attempt to pickpocket a conscious bandit. This will cancel initial aggressiveness and minimises resets from entering combat, which will increase experience rates. Immediately knocking out the bandit is faster, so only use this as a backup tactic.
In addition, having a full inventory minimises the chance of getting stunned by accidentally pickpocketing a conscious bandit, which will also save time. If using Saradomin brews, disable automatic vial smashing to get an empty vial after drinking the potion.
Alternatively, have a maximum stack of coin pouches for the same effect. This is generally worse than using inventory-blocking food however, because getting a maximum stack of coin pouches takes a notable amount of time.
Levels 49–65/99: Stealing artefacts
         |
 |  100K 100K |  100K 100K |  |
 | | | |
| | | |
| | | |
| | | |
|  |  1000K 1000K |  |
 10000 10000 |  10000 10000 |  10000 10000 |  10000 10000 |
Stealing artefacts in Port Piscarilius offers the fastest experience from level 49 to 65. This method remains as a feasible alternative for players who prefer something less click-intensive, or for players who want to train Thieving while doing actions that can be done while moving. Such actions include fletching ammo, casting High Level Alchemy, burning logs, cutting gems, making certain potions, and baking pies with the Bake Pie spell.
To begin, lure two guards so that the bridges can be passed without being spotted. See this page for details. Once the guards have been set up, this method goes as follows:
- Talk to Captain Khaled to be assigned a house to steal from.
- Use the book of the dead/Kharedst's memoirs teleport to the Fisher's Flute, and steal the artefact from drawers inside the assigned house. A lockpick is required for this.
- Smuggle the artefact without getting caught by the guards.
- Bring the stolen artefact to Captain Khaled, and repeat. Recharge the book of the dead at the Old Memorial and restore run energy whenever needed.
Each successful heist yields Thieving experience and 500–1,000 coins. Getting caught will lower experience rates fairly notably, so it is usually better to wait for an opportune moment to sneak past the patrollers than risk getting caught.
The experience rates in the table below assume using stamina potions, the book of the dead, and guard lures. With good practice, it is possible to gain up to 270,000–280,000 experience per hour at level 99.
| level
|
XP/hour |
|---|---|
| 49 | 150,000 |
| 55 | 163,000 |
| 60 | 174,000 |
| 65 | 186,000 |
| 70 | 197,000 |
| 75 | 208,000 |
| 80 | 219,000 |
| 85 | 230,000 |
| 90 | 241,000 |
| 95 | 252,000 |
| 99 | 261,000 |
Levels 84–99: Stealing from Rogues' Castle chests
Stealing from Rogues' Castle chests in the Wilderness offers the fastest Thieving experience from level 84 onwards. Because the chests are located in the deep Wilderness in a multi-combat zone, it is recommended to minimise the risk to player killers.
For this method, only bring things you are willing to lose. If you have completed the hard Wilderness Diary, the quickest way to get to Rogues' Castle is by using a Wilderness Obelisk to Level 50 Wilderness. Alternatively, bring a Knife and use the Ardougne or Edgeville lever to teleport into Deep Wilderness and slash the web north of the teleport location, then walk east till you encounter the castle. Be careful getting there, as you can encounter the Chaos Elemental, which can kill you if you are not cautious. When you reach the castle, watch out for other players, as this is a hot spot for both PKers and players doing Wilderness Slayer. The chest can be found near the north wall of the castle.
Once you are at the chest, search for traps. If you do not search for traps, you will take damage instead. When you loot the chest, rogues will become aggressive and start attacking you, so make sure you use your Protect From Melee prayer before opening the chest. Doing this will net you about 2,450,000–2,500,000 coins per hour. A looting bag is not necessary, but it is recommended.
The best strategy to avoid dying to PKers is to bring yourself to a low amount of HP by either trying to loot the chest without checking for traps or using a locator orb to damage yourself. When a PKer logs in or appears on your map, you can simply switch off your prayer and die to the Rogues instead of the PKer. Your items will be sent to your gravestone, and the PKer will not be able to take your loot. Alternatively, you can try running from the PKer by using the staircase in the castle and hopping between floors to give you enough time to log out.
Experience rates and profit varies depending on player killers. Players can gain up to around 280,000–290,000 experience per hour when including occasional deaths and not banking the loot. Banking the loot will lower the rate to around 260,000–270,000 experience per hour. When uninterrupted, it is possible to gain up to 300,000 experience per hour.
Levels 91–99: Pyramid Plunder
The Pyramid Plunder minigame offers the fastest Thieving experience outside of the Wilderness from level 91 onwards. The strategy for Thieving experience is to loot the golden chest and all the urns in the last room, the golden chests along the way, and some urns in the second-to-last room if there is time. Players can begin training at Pyramid Plunder at level 71 or 81 as an alternative method to blackjacking or stealing artefacts, however, the experience rates are much lower before level 91.
Players will need to have access to Sophanem by having started the quest Icthlarin's Little Helper, or using a pharaoh's sceptre teleport to Jalsavrah. High-healing food (such as Saradomin brews), some stamina potions, and some form of antipoison (preferably araxyte venom sacs to save inventory space) are needed inside the pyramid. For the highest experience rates, players will also need a charged pharaoh's sceptre for a direct teleport to the guardian mummy and noted artefacts for recharging it. Completing task sets in the Desert Diary will increase the amount of charges the pharaoh's sceptre can hold. Should the player not be able to get a pharaoh's sceptre, completing Contact! is recommended to access the bank near the pyramid. Otherwise, the player would have to travel back to a bank far from Sophanem every time they need more supplies.
While training, players may loot a pharaoh's sceptre from the golden chests. It can be sold for profit or kept for use. Banking the artefacts is not recommended as this would greatly lower experience rates, and the artefacts are not very valuable. However, the golden artefacts can recharge the pharaoh's sceptre.
The experience rates in the table below assume soloing and using the pharaoh's sceptre teleport. Higher rates can be achieved by having a duo partner or an alternative account. It takes approximately 335 games to get from 91 to 99 in Pyramid Plunder.
| levels
|
XP/hour |
|---|---|
| 71–80 | 125,000 |
| 81–90 | 190,000 |
| 91+ | 270,000 |
Other methods
Levels 1–5: Men/Women
From level 1 to 5, pickpocket men or women around Gielinor. Players who have their respawn point in Lumbridge can do so around Lumbridge Castle and simply die to regain Hitpoints. Alternatively, a man by the Draynor Village Agility Course start can be trapped inside the house so that he will stay in place. Reaching level 5 takes 49 successful pickpockets.
Levels 5–25: Bakery stalls
From level 5 to 25, steal from the eastern bakery stall in East Ardougne market. Stand under the baker to avoid getting caught by the guards, and drop the loot. Players can gain up to 19,200 experience per hour. Tea and silk stalls offer worse experience rates than bakery stalls due to slower respawns.
Levels 25–50: Fruit stalls
From level 25 to 50, steal from fruit stalls in Hosidius. The best place to do this is in the easternmost house near the beach (see the map), which has 2 stalls close to each other and no guard dogs patrolling nearby. Steal from both stalls as fast as possible and drop the fruit while running between them. Eat the strange fruits or use stamina potions to restore run energy. Players can gain up to 42,750 experience per hour, or 34,200 experience per hour if stealing only from one stall.
If banking the fruits, steal from the stall at the Hosidius market. Bring 15–20 baskets and fill them to fit more fruits per trip. The guard dogs can be corner-trapped by luring them slightly north and then standing directly south of the stall (see the image). However, if only banking the golovanova fruit tops, using the two stalls east of the market is recommended for faster experience rates.
Levels 50–99: Stealing valuables in Varlamore
Stealing valuables in Civitas illa Fortis is a low-effort alternative to the faster methods, allowing for significant AFK time. This method requires level 50 Thieving and completion of Children of the Sun. A chisel is optional to break down some of the loot.
To begin, pickpocket wealthy citizens at the bazaar for house keys. A street urchin will occasionally distract a wealthy citizen, which guarantees successful pickpockets and the player will automatically pickpocket them for around 20 seconds. This method alone can give 65,000 experience per hour with minimal effort (due to pickpocketing happening automatically for those 20 seconds followed by a wait period), or up to 95,000 experience per hour when hopping worlds with higher effort. Players with at least 75 thieving may also steal from the nearby Gem Stalls in between cycles to gain up to approximately 100,000 experience per hour. Players should collect approximately 20 keys for every 1 hour of burglary they anticipate, which will take around 30 minutes with minimal effort, or 15 minutes if wearing a full set of rogue equipment which doubles the house keys stolen.
Now enter one of the three houses available to be burgled. The burglable house is indicated by a closed door and the absence of the owner. Each cycle lasts around 3 minutes, beginning with a homeowner leaving the house and ending with their return. Steal from the furniture (chests, jewellery cases, and wardrobes) for 45 Thieving experience per steal, and to obtain valuables and other loot. Valuables stack in the inventory and will continue to be looted automatically for about 1 minute.
A flashing arrow will occasionally appear above one of the objects. Searching this furniture grants 14 valuables and 630 Thieving experience, and then the player will continue to loot it with normal rates. If not searched within about 8 seconds, the opportunity will vanish.
When the homeowner is returning (signaled by an urchin whistling), exit the house through the open window. If caught by the homeowner after they unlock their door, the player will lose most of the looted valuables from that house and be teleported a short distance away.
Estimated experience rates for stealing valuables are shown in the table below; these rates do not take into account the time spent collecting the keys. Players can expect to gain around 110,000 per hour from trading in the valuables to Oriana, plus an additional 6,000 in jewellery and around 3 blessed bone statuettes which can be chiseled into 125 blessed bone shards each for some passive Prayer experience. Getting the gladiator rank at the Fortis Colosseum increases the profit from the valuables to around 130,000 per hour. Rogue equipment will not increase the valuables obtained.
| level
|
XP/hour |
|---|---|
| 50 | 72,000 |
| 60 | 80,000 |
| 70 | 93,000 |
| 80 | 95,000 |
| 90 | 100,000 |
| 99 | 105,000 |
Levels 25/85–99: Underwater
With the completion of Bone Voyage and access to the Fossil Island, underwater thieving (also known as "swimming") becomes available.
Unlike most other training methods, it focuses on training two skills at once, Thieving and Agility, and while it is slower Thieving experience than other listed methods, the rate at which both skills are trained makes it efficient overall at some levels. Due to the rate scaling per level, both Thieving and Agility levels play a part in whether the method is worth it over alternatives. However, it tends to become consistently efficient from level 85 Thieving onwards. Alternatively, the experience can be gained in either Thieving or Agility rather than both, but this is generally inefficient due to the scaling used.
Levels 55–99: Knights of Ardougne
Pickpocketing Knights of Ardougne is a slower but more straightforward alternative to the faster training methods. A knight can be lured so that the player can continuously pickpocket them without moving the mouse. The player will occasionally need to open the coin pouches to continue pickpocketing.
Completing the medium Ardougne Diary is strongly recommended for a 10% higher success rate of pickpocketing. Use dodgy necklaces to have a 25% chance to resist being stunned and taking damage, which increases experience rates slightly. Wearing full rogue equipment grants double loot per pickpocket, though no extra experience is given. With completion of A Kingdom Divided, Shadow Veil can be used for an extra chance to resist the stun, stacking with dodgy necklaces for a total of 36.25%, though shadow veil starts to lose value around level 90. If using shadow veil, players should bring a lava staff and a stack of cosmic runes.
The experience rates in the table below assume the player has completed the medium Ardougne Diary and is using dodgy necklaces. The rates also assume some time is spent on mistakes and opening the coin pouches. Players stop failing to pickpocket Knights of Ardougne at level 95 with the medium diary perk, from which point onwards the tick-perfect rate is 252,900 experience per hour.
| level
|
XP/hour |
|---|---|
| 55 | 86,000 |
| 60 | 98,000 |
| 65 | 109,000 |
| 70 | 124,000 |
| 75 | 141,000 |
| 80 | 159,000 |
| 85 | 182,000 |
| 90 | 209,000 |
| 95 | 240,000 |
Training from level 55 to level 99 on Knights of Ardougne would yield around 7,630,000 without rogue equipment, and roughly 15,260,000 with the full set. Players can expect to use roughly 200 dodgy necklaces and need to heal 16,000 hitpoints worth of damage (with natural regeneration taken into account at 1x hitpoints restore rate) from level 55 to 95.
Lure north of the market
Attack the knight located in the south-eastern part of the Ardougne marketplace. Specifically the knight that re spawns 5 tiles west of the Ardougne agility course starting point. Lure her towards the building to the north of the marketplace. Stand in the doorway of that building so that the knight is standing on the tile south of the player. Run two squares west so the knight should stand one tile east of the player. Then run into the square south of the doorway so the knight will stand on the doorway. Use the dragon spear's special attacks on the knight, and quickly run inside and close the door before the knight is able to walk back outside. If the player does not have a dragon spear, it is possible to walk under the knight to force it to walk backwards but it may take a few attempts for it to walk the right direction. After waiting a while, the knight will move to the southern most two tiles of the house. She will only be able to move between those two tiles. If she is able to move elsewhere, the wrong knight has been lured.
Players can also simply hop worlds until they find one where the knight has already been lured.
After the knight has been lured correctly, stand north of her. Turn your camera to face west, lower it all the way down, and zoom in. This way you are able to spam-click the same spot (around the chest) to pickpocket. It is important to not stand on either of the two tiles she is able to walk on, as she will stop moving causing her to despawn after 5 minutes of stationary activity.
Splashing
Another option is to use a splashing account to keep a knight into place. This can be done anywhere if the splashing account simply tanks the knight, but this requires having high Defence and wearing good defensive armour along with the Hitpoints cape and regen bracelet. Alternatively, lure a knight to a spot where the splasher is able to safespot the knight, such as in the south-eastern bank of Ardougne where it is possible to use the fences as blockades. The knight will not despawn as long as he is aggressive towards the splasher, and the splashing account stays logged in if it is attacking or tanking the knight. Splashing is performed on "sticky knights," a term to describe a knight that moves a lot less as it has been forced out of its natural wander range. This will always be a female knight for the south bank.
Players can also bring a stack of law runes and a staff giving unlimited water runes instead of food to make the process more simple. After death two law runes and the staff will be kept, enabling the player to quickly teleport back to the Ardougne marketplace. Pick up your coins and stack of law runes off the ground and continue pickpocketing. Enabling Rapid Heal can help extend trips longer.
Players can often find someone splashing a knight in the south bank on one of the following worlds, with many players taking part in pickpocketing the targeted knight. Because it may be difficult to restart splashing after a six hour log, the splasher may indicate which world to switch to next. Check all three worlds as there is sometimes only one splasher active at a time.
| World | Location | Members | Activity |
|---|---|---|---|
| 343 |  Germany Germany
|
1 |
Yama |
| 355 |  United States (west) United States (west)
|
1 |
Blast Furnace |
| 461 | Germany
|
1 |
N/A |
Zero mouse movement strategy
Position the coin pouches over the knight and then open the inventory with the assigned F‑key, click on the coin pouches to open them, and then close the inventory again with the F‑key. This drastically reduces the mouse movement required for pickpocketing.
Moving the inventory can be done by using Resizable – Classic layout or the Resizable – Modern layout and moving the inventory by holding Alt and dragging it over the Knight with your mouse. This can also be achieved by adjusting the inventory position through a combination of window resizing, camera zoom, and camera angle.
This strategy also works for the Shadow Veil spell by using the Filters option in your spellbook. Unselect all the spell filters except for Show Utility spells. Then use the F-key assigned to the spellbook to open it, click on shadow veil to activate it, and finally close the spellbook again by using the assigned F-key.
Levels 78–99: Dorgesh-Kaan rich chests
Stealing from the rich chests in Dorgesh-Kaan is a fairly low-effort alternative that offers decent experience. Enter one of the two houses in Dorgesh-Kaan that contain two rich chests. Open both chests with a lockpick for Thieving experience and loot, and hop worlds. Drop or bank the loot for more inventory space when needed. The chest loot will respawn after 5 minutes, which equates to roughly 13–15 world hops.
To access Dorgesh-Kaan, players must have completed Death to the Dorgeshuun. A lockpick is required to open the chests. If banking the loot, bring the gem bag if available and some form of run energy restoration.
Without banking, players can expect to gain up to 210,000–230,000 experience per hour providing there are not many other players hopping between worlds (assuming 340 chests per hour; 170 worlds). When banking the loot, players can expect to gain around 190,000 experience and 300,000 coins per hour.
Levels 1–99: Sorceress's Garden
The Sorceress's Garden minigame consists of navigating through a maze while avoiding guardians to pick fruit and squeeze them into juice. A pestle and mortar is used to squeeze the fruit into juice and a beer glass is used to hold the squeezed juice. Beer glasses can be bought from the Grand Exchange, or found by searching the shelves in the Sorceress's house before you teleport into the garden. Only one sq'irk can be obtained per trip through a garden.
To unlock access to the Sorceress’s garden, talk to Osman in front of the palace about sq'irk juice. He is also the one to whom you trade your glasses of sq'irk juice in return for Thieving experience.
Experience rates are unknown for some of the lower level gardens. Sorceress's Summer Garden (requiring 65 Thieving) provides a maximum of 150,000 per hour, however 'realistic' experience rates are closer to 140,000 experience per hour, given the need to bank the sq'irk once inventory is full.
Other potential benefits of this method include a modest amount of passive Farming experience, and a minimal amount of passive Cooking experience. Additionally, if using a "one-click" method to traverse the summer garden, there is a considerable amount of running time between actions which can either be used to AFK, or (for a minimal loss in Thieving experience rate) to "zero-time" train another skill such as Magic or Fletching.
| levels
|
Garden | Notes |
|---|---|---|
| 1–25 | Winter | Requiring 5 sq'irks to make one glass of juice, each glass of winter sq'irkjuice turned in rewards 350 Thieving experience. |
| 25–45 | Spring | Requiring 4 sq'irks to make one glass of juice, each glass of spring sq'irkjuice turned in rewards 1,350 Thieving experience. |
| 45–65 | Autumn | Requiring 3 sq'irks to make one glass of juice, each glass of autumn sq'irkjuice turned in rewards 2,350 Thieving experience. |
| 65–99 | Summer | Requiring only 2 sq'irks to make one glass of juice, each glass of summer sq'irkjuice turned in rewards 3,000 Thieving experience. At level 65, 4,196 glasses of juice are required to make it to level 99. This translates to 8,392 trips through the Summer Garden. |
Level 82–99: Pickpocketing vyres
Pickpocketing vyres at level 82 with rogue equipment, dodgy necklaces, and the hard Ardougne Diary completed will get 120,000–180,000 experience per hour and profit 2,540,042 coins per hour, depending on Thieving level. This will require completion of the Sins of the Father.
As an alternative to using food, players may opt to use prayer regeneration potions in conjunction with the Redemption prayer. As the vyres inflict a flat 5 health points worth of damage, the prayer should be activated by at least 6 health points.
Level 85–99: Pickpocketing elves
Pickpocketing elves in Prifddinas is a slower but profitable alternative after completing Song of the Elves. The elves in Prifddinas yield enhanced crystal teleport seeds which can be sold for high profit.
At level 99 players can gain around 150,000 experience per hour and 4,399,635.96 coins per hour assuming that players use dodgy necklaces, and full rogue equipment.
Level 20–99: Stealing from Port Roberts stalls
With 50 Sailing, players can steal from the stalls in Port Roberts. Unlike regular stalls, these stalls do not deplete when players steal from them, and as such will be stolen from repeatedly when clicked once. At the same time, market guards patrol with set timings and will send the player to jail if the player steals from a stall which a guard is looking at.
The goal is to steal 4 times from the primary stall (the highest level stall available) and 2 times from the secondary stall (the second-highest level stall available) in a set cycle.
The setup to move in sync with the guards is as follows:
- Find your primary and secondary stall.
- Locate the tile near the primary stall that the guards stand on when they are guarding the primary stall.
- Stand on that exact tile, and wait for a guard to go onto it.
- The guard will disappear under you. As soon as you see them again (as they leave the tile), click the primary stall.
- Steal 4 times from the primary stall, and then click the secondary stall.
- Steal 2 times from the secondary stall, and then click the primary stall again. From this point on, you should never have to worry about the guards. The 4-2 pattern will be in sync with the guards without major mistakes.
If you make a mistake and fear the guards may catch you, wait on the primary stall tile and repeat from step 4 again. If arrested, pick the lock to the jail cell (lockpick not required) or bribe the guard with 500 coins. Alternatively, you can use the Sailors' amulet to teleport right back near the stalls.
There is a Bank Deposit Box directly north of the market for banking your goods. You may also use storage items like the Fish barrel, Gem bag, or Coal bag for longer trips between deposits, or using Superheat Item to combine ores without losing ticks.
Experience rates shown in the table below assume no mistakes. With some practice, it is possible to consistently get the listed rates.
The Watchdog config below, is set up to give you a overhead counter on how many times you've stolen, and when to move, which is useful if you get distracted or are 2nd-monitoring it. Remember to expand the Watchdog group, and enable the the level-range you're in.
| Importable Watchdog config |
|---|
{
"type": "AlertGroup",
"alerts": [
{
"type": "AlertGroup",
"alerts": [
{
"type": "XPDropAlert",
"skill": "THIEVING",
"gainedAmount": 223,
"gainedComparator": "EQUALS",
"enabled": true,
"name": "Cannonball Primary",
"debounceTime": 10000,
"randomNotifications": false,
"notifications": [
{
"type": "Overhead",
"displayTime": 3,
"message": "1",
"fireWhenFocused": true,
"fireWhenAFK": false,
"fireWhenAFKForSeconds": 5,
"delayMilliseconds": 0
},
{
"type": "Overhead",
"displayTime": 3,
"message": "2",
"fireWhenFocused": true,
"fireWhenAFK": false,
"fireWhenAFKForSeconds": 5,
"delayMilliseconds": 3000
},
{
"type": "Overhead",
"displayTime": 3,
"message": "3",
"fireWhenFocused": true,
"fireWhenAFK": false,
"fireWhenAFKForSeconds": 5,
"delayMilliseconds": 3000
},
{
"type": "Overhead",
"displayTime": 2,
"message": "4 - Move",
"fireWhenFocused": true,
"fireWhenAFK": false,
"fireWhenAFKForSeconds": 5,
"delayMilliseconds": 3000
}
]
},
{
"type": "XPDropAlert",
"skill": "THIEVING",
"gainedAmount": 191,
"gainedComparator": "EQUALS",
"enabled": true,
"name": "Ore Secondary",
"debounceTime": 10000,
"randomNotifications": false,
"notifications": [
{
"type": "Overhead",
"displayTime": 3,
"message": "1",
"fireWhenFocused": true,
"fireWhenAFK": false,
"fireWhenAFKForSeconds": 5,
"delayMilliseconds": 0
},
{
"type": "Overhead",
"displayTime": 2,
"message": "2 - Move",
"fireWhenFocused": true,
"fireWhenAFK": false,
"fireWhenAFKForSeconds": 5,
"delayMilliseconds": 3000
}
]
}
],
"enabled": false,
"name": "87-99",
"debounceTime": 0,
"randomNotifications": false
},
{
"type": "AlertGroup",
"alerts": [
{
"type": "XPDropAlert",
"skill": "THIEVING",
"gainedAmount": 191,
"gainedComparator": "EQUALS",
"enabled": true,
"name": "Ore Primary",
"debounceTime": 10000,
"randomNotifications": false,
"notifications": [
{
"type": "Overhead",
"displayTime": 3,
"message": "1",
"fireWhenFocused": true,
"fireWhenAFK": false,
"fireWhenAFKForSeconds": 5,
"delayMilliseconds": 0
},
{
"type": "Overhead",
"displayTime": 3,
"message": "2",
"fireWhenFocused": true,
"fireWhenAFK": false,
"fireWhenAFKForSeconds": 5,
"delayMilliseconds": 3000
},
{
"type": "Overhead",
"displayTime": 3,
"message": "3",
"fireWhenFocused": true,
"fireWhenAFK": false,
"fireWhenAFKForSeconds": 5,
"delayMilliseconds": 3000
},
{
"type": "Overhead",
"displayTime": 2,
"message": "4 - Move",
"fireWhenFocused": true,
"fireWhenAFK": false,
"fireWhenAFKForSeconds": 5,
"delayMilliseconds": 3000
}
]
},
{
"type": "XPDropAlert",
"skill": "THIEVING",
"gainedAmount": 131,
"gainedComparator": "LESS_THAN",
"enabled": true,
"name": "Gem Secondary",
"debounceTime": 10000,
"randomNotifications": false,
"notifications": [
{
"type": "Overhead",
"displayTime": 3,
"message": "1",
"fireWhenFocused": true,
"fireWhenAFK": false,
"fireWhenAFKForSeconds": 5,
"delayMilliseconds": 0
},
{
"type": "Overhead",
"displayTime": 2,
"message": "2 - Move",
"fireWhenFocused": true,
"fireWhenAFK": false,
"fireWhenAFKForSeconds": 5,
"delayMilliseconds": 3000
}
]
}
],
"enabled": false,
"name": "82-86",
"debounceTime": 0,
"randomNotifications": false
},
{
"type": "AlertGroup",
"alerts": [
{
"type": "XPDropAlert",
"skill": "THIEVING",
"gainedAmount": 129,
"gainedComparator": "GREATER_THAN_OR_EQUALS",
"enabled": true,
"name": "Gem Primary",
"debounceTime": 10000,
"randomNotifications": false,
"notifications": [
{
"type": "Overhead",
"displayTime": 3,
"message": "1",
"fireWhenFocused": true,
"fireWhenAFK": false,
"fireWhenAFKForSeconds": 5,
"delayMilliseconds": 0
},
{
"type": "Overhead",
"displayTime": 3,
"message": "2",
"fireWhenFocused": true,
"fireWhenAFK": false,
"fireWhenAFKForSeconds": 5,
"delayMilliseconds": 3000
},
{
"type": "Overhead",
"displayTime": 3,
"message": "3",
"fireWhenFocused": true,
"fireWhenAFK": false,
"fireWhenAFKForSeconds": 5,
"delayMilliseconds": 3000
},
{
"type": "Overhead",
"displayTime": 2,
"message": "4 - Move",
"fireWhenFocused": true,
"fireWhenAFK": false,
"fireWhenAFKForSeconds": 5,
"delayMilliseconds": 3000
}
]
},
{
"type": "XPDropAlert",
"skill": "THIEVING",
"gainedAmount": 110,
"gainedComparator": "EQUALS",
"enabled": true,
"name": "Spice Secondary",
"debounceTime": 10000,
"randomNotifications": false,
"notifications": [
{
"type": "Overhead",
"displayTime": 3,
"message": "1",
"fireWhenFocused": true,
"fireWhenAFK": false,
"fireWhenAFKForSeconds": 5,
"delayMilliseconds": 0
},
{
"type": "Overhead",
"displayTime": 2,
"message": "2 - Move",
"fireWhenFocused": true,
"fireWhenAFK": false,
"fireWhenAFKForSeconds": 5,
"delayMilliseconds": 3000
}
]
}
],
"enabled": false,
"name": "75-81",
"debounceTime": 0,
"randomNotifications": false
},
{
"type": "AlertGroup",
"alerts": [
{
"type": "XPDropAlert",
"skill": "THIEVING",
"gainedAmount": 110,
"gainedComparator": "EQUALS",
"enabled": true,
"name": "Spice Primary",
"debounceTime": 10000,
"randomNotifications": false,
"notifications": [
{
"type": "Overhead",
"displayTime": 3,
"message": "1",
"fireWhenFocused": true,
"fireWhenAFK": false,
"fireWhenAFKForSeconds": 5,
"delayMilliseconds": 0
},
{
"type": "Overhead",
"displayTime": 3,
"message": "2",
"fireWhenFocused": true,
"fireWhenAFK": false,
"fireWhenAFKForSeconds": 5,
"delayMilliseconds": 3000
},
{
"type": "Overhead",
"displayTime": 3,
"message": "3",
"fireWhenFocused": true,
"fireWhenAFK": false,
"fireWhenAFKForSeconds": 5,
"delayMilliseconds": 3000
},
{
"type": "Overhead",
"displayTime": 2,
"message": "4 - Move",
"fireWhenFocused": true,
"fireWhenAFK": false,
"fireWhenAFKForSeconds": 5,
"delayMilliseconds": 3000
}
]
},
{
"type": "XPDropAlert",
"skill": "THIEVING",
"gainedAmount": 80,
"gainedComparator": "EQUALS",
"enabled": true,
"name": "Silver Secondary",
"debounceTime": 10000,
"randomNotifications": false,
"notifications": [
{
"type": "Overhead",
"displayTime": 3,
"message": "1",
"fireWhenFocused": true,
"fireWhenAFK": false,
"fireWhenAFKForSeconds": 5,
"delayMilliseconds": 0
},
{
"type": "Overhead",
"displayTime": 2,
"message": "2 - Move",
"fireWhenFocused": true,
"fireWhenAFK": false,
"fireWhenAFKForSeconds": 5,
"delayMilliseconds": 3000
}
]
}
],
"enabled": false,
"name": "65-74",
"debounceTime": 0,
"randomNotifications": false
},
{
"type": "AlertGroup",
"alerts": [
{
"type": "XPDropAlert",
"skill": "THIEVING",
"gainedAmount": 80,
"gainedComparator": "EQUALS",
"enabled": true,
"name": "Silver Primary",
"debounceTime": 10000,
"randomNotifications": false,
"notifications": [
{
"type": "Overhead",
"displayTime": 3,
"message": "1",
"fireWhenFocused": true,
"fireWhenAFK": false,
"fireWhenAFKForSeconds": 5,
"delayMilliseconds": 0
},
{
"type": "Overhead",
"displayTime": 3,
"message": "2",
"fireWhenFocused": true,
"fireWhenAFK": false,
"fireWhenAFKForSeconds": 5,
"delayMilliseconds": 3000
},
{
"type": "Overhead",
"displayTime": 3,
"message": "3",
"fireWhenFocused": true,
"fireWhenAFK": false,
"fireWhenAFKForSeconds": 5,
"delayMilliseconds": 3000
},
{
"type": "Overhead",
"displayTime": 2,
"message": "4 - Move",
"fireWhenFocused": true,
"fireWhenAFK": false,
"fireWhenAFKForSeconds": 5,
"delayMilliseconds": 3000
}
]
},
{
"type": "XPDropAlert",
"skill": "THIEVING",
"gainedAmount": 50,
"gainedComparator": "LESS_THAN_OR_EQUALS",
"enabled": true,
"name": "Fish Secondary",
"debounceTime": 10000,
"randomNotifications": false,
"notifications": [
{
"type": "Overhead",
"displayTime": 3,
"message": "1",
"fireWhenFocused": true,
"fireWhenAFK": false,
"fireWhenAFKForSeconds": 5,
"delayMilliseconds": 0
},
{
"type": "Overhead",
"displayTime": 2,
"message": "2 - Move",
"fireWhenFocused": true,
"fireWhenAFK": false,
"fireWhenAFKForSeconds": 5,
"delayMilliseconds": 3000
}
]
}
],
"enabled": false,
"name": "50-64",
"debounceTime": 0,
"randomNotifications": false
},
{
"type": "AlertGroup",
"alerts": [
{
"type": "XPDropAlert",
"skill": "THIEVING",
"gainedAmount": 49,
"gainedComparator": "GREATER_THAN_OR_EQUALS",
"enabled": true,
"name": "Fish Primary",
"debounceTime": 10000,
"randomNotifications": false,
"notifications": [
{
"type": "Overhead",
"displayTime": 3,
"message": "1",
"fireWhenFocused": true,
"fireWhenAFK": false,
"fireWhenAFKForSeconds": 5,
"delayMilliseconds": 0
},
{
"type": "Overhead",
"displayTime": 3,
"message": "2",
"fireWhenFocused": true,
"fireWhenAFK": false,
"fireWhenAFKForSeconds": 5,
"delayMilliseconds": 3000
},
{
"type": "Overhead",
"displayTime": 3,
"message": "3",
"fireWhenFocused": true,
"fireWhenAFK": false,
"fireWhenAFKForSeconds": 5,
"delayMilliseconds": 3000
},
{
"type": "Overhead",
"displayTime": 2,
"message": "4 - Move",
"fireWhenFocused": true,
"fireWhenAFK": false,
"fireWhenAFKForSeconds": 5,
"delayMilliseconds": 3000
}
]
},
{
"type": "XPDropAlert",
"skill": "THIEVING",
"gainedAmount": 39,
"gainedComparator": "LESS_THAN_OR_EQUALS",
"enabled": true,
"name": "Fur Secondary",
"debounceTime": 10000,
"randomNotifications": false,
"notifications": [
{
"type": "Overhead",
"displayTime": 3,
"message": "1",
"fireWhenFocused": true,
"fireWhenAFK": false,
"fireWhenAFKForSeconds": 5,
"delayMilliseconds": 0
},
{
"type": "Overhead",
"displayTime": 2,
"message": "2 - Move",
"fireWhenFocused": true,
"fireWhenAFK": false,
"fireWhenAFKForSeconds": 5,
"delayMilliseconds": 3000
}
]
}
],
"enabled": false,
"name": "42-49",
"debounceTime": 0,
"randomNotifications": false
},
{
"type": "AlertGroup",
"alerts": [
{
"type": "XPDropAlert",
"skill": "THIEVING",
"gainedAmount": 38,
"gainedComparator": "GREATER_THAN_OR_EQUALS",
"enabled": true,
"name": "Fur Primary",
"debounceTime": 10000,
"randomNotifications": false,
"notifications": [
{
"type": "Overhead",
"displayTime": 3,
"message": "1",
"fireWhenFocused": true,
"fireWhenAFK": false,
"fireWhenAFKForSeconds": 5,
"delayMilliseconds": 0
},
{
"type": "Overhead",
"displayTime": 3,
"message": "2",
"fireWhenFocused": true,
"fireWhenAFK": false,
"fireWhenAFKForSeconds": 5,
"delayMilliseconds": 3000
},
{
"type": "Overhead",
"displayTime": 3,
"message": "3",
"fireWhenFocused": true,
"fireWhenAFK": false,
"fireWhenAFKForSeconds": 5,
"delayMilliseconds": 3000
},
{
"type": "Overhead",
"displayTime": 2,
"message": "4 - Move",
"fireWhenFocused": true,
"fireWhenAFK": false,
"fireWhenAFKForSeconds": 5,
"delayMilliseconds": 3000
}
]
},
{
"type": "XPDropAlert",
"skill": "THIEVING",
"gainedAmount": 24,
"gainedComparator": "EQUALS",
"enabled": true,
"name": "Silk Secondary",
"debounceTime": 10000,
"randomNotifications": false,
"notifications": [
{
"type": "Overhead",
"displayTime": 3,
"message": "1",
"fireWhenFocused": true,
"fireWhenAFK": false,
"fireWhenAFKForSeconds": 5,
"delayMilliseconds": 0
},
{
"type": "Overhead",
"displayTime": 2,
"message": "2 - Move",
"fireWhenFocused": true,
"fireWhenAFK": false,
"fireWhenAFKForSeconds": 5,
"delayMilliseconds": 3000
}
]
}
],
"enabled": false,
"name": "35-41",
"debounceTime": 0,
"randomNotifications": false
},
{
"type": "AlertGroup",
"alerts": [
{
"type": "XPDropAlert",
"skill": "THIEVING",
"gainedAmount": 24,
"gainedComparator": "EQUALS",
"enabled": true,
"name": "Silk Primary",
"debounceTime": 10000,
"randomNotifications": false,
"notifications": [
{
"type": "Overhead",
"displayTime": 3,
"message": "1",
"fireWhenFocused": true,
"fireWhenAFK": false,
"fireWhenAFKForSeconds": 5,
"delayMilliseconds": 0
},
{
"type": "Overhead",
"displayTime": 3,
"message": "2",
"fireWhenFocused": true,
"fireWhenAFK": false,
"fireWhenAFKForSeconds": 5,
"delayMilliseconds": 3000
},
{
"type": "Overhead",
"displayTime": 3,
"message": "3",
"fireWhenFocused": true,
"fireWhenAFK": false,
"fireWhenAFKForSeconds": 5,
"delayMilliseconds": 3000
},
{
"type": "Overhead",
"displayTime": 2,
"message": "4 - Move",
"fireWhenFocused": true,
"fireWhenAFK": false,
"fireWhenAFKForSeconds": 5,
"delayMilliseconds": 3000
}
]
},
{
"type": "XPDropAlert",
"skill": "THIEVING",
"gainedAmount": 5,
"gainedComparator": "EQUALS",
"enabled": true,
"name": "Veg Secondary",
"debounceTime": 10000,
"randomNotifications": false,
"notifications": [
{
"type": "Overhead",
"displayTime": 3,
"message": "1",
"fireWhenFocused": true,
"fireWhenAFK": false,
"fireWhenAFKForSeconds": 5,
"delayMilliseconds": 0
},
{
"type": "Overhead",
"displayTime": 2,
"message": "2 - Move",
"fireWhenFocused": true,
"fireWhenAFK": false,
"fireWhenAFKForSeconds": 5,
"delayMilliseconds": 3000
}
]
}
],
"enabled": false,
"name": "20-34",
"debounceTime": 0,
"randomNotifications": false
}
],
"enabled": true,
"name": "Roberts Thieving",
"debounceTime": 0,
"randomNotifications": false
}
|
| levels
|
Primary
stall |
Secondary
stall |
4-2-stealing
XP/h |
Primary-only
XP/h |
|---|---|---|---|---|
| 20–34 | Silk | Veg | 6,015 | 4,010 |
| 35–41 | Fur | Silk | 40,501 | 30,877 |
| 42–49 | Fish | Fur | 54,736 | 39,298 |
| 50–64 | Silver | Fish | 83,809 | 64,160 |
| 65–74 | Spice | Silver | 120,300 | 88,220 |
| 75–81 | Gem | Spice | 148,370 | 104,260 |
| 82–86 | Ore | Gem | 205,312 | 153,182 |
| 87–99 | Cannonball | Ore | 255,437 | 178,846 |
Levels 94–99: Master Farmers
At level 94 and after completing the hard Ardougne Diary, players can pickpocket Master Farmers at 100% success rate. They yield ranarr and snapdragon seeds, which can be sold for significant profit. The rates for ranarr, snapdragon, and torstol seeds scales with the Farming level, up to level 85. Having at least level 75 Farming is recommended. Even though Master Farmers become available at level 38 Thieving, pickpocketing them at lower levels offers poor experience rates and profit due to high fail rates.
The best location to pickpocket a Master Farmer is in the house east of the Outer Fortis General Store, south-east of Civitas illa Fortis. Talk to the Master Farmer inside to keep her in place, or lure her to a tile where she cannot move elsewhere.
Players can gain up to 115,000–120,000 experience per hour.
Level 99+: TzHaar-Hur
         |
Pickpocketing TzHaar-Hur in the inner part of Mor Ul Rek is a viable option past level 99. Similarly to Knights of Ardougne, TzHaar-Hur can be lured into a spot where they cannot move on more than two tiles, allowing the player to repeatedly left-click to pickpocket them. As their loot does not include coins, the only other required interaction is healing and optionally replacing the dodgy necklace. This makes pickpocketing TzHaar-Hur much less attention-demanding than Knights of Ardougne, although with higher requirements.
For this method, players will need to wear the Thieving cape and have completed the hard Ardougne Diary for increased pickpocket chance. The Thieving cape and the hard Ardougne Diary perks stack, which makes this method viable. Even though this method becomes available at level 90, it is generally not worth doing without the Thieving cape bonus, as this would lower experience rates significantly.
Accessing the inner part of Mor Ul Rek requires having a fire cape. Players must wear ice gloves to be able to pickpocket the TzHaar-Hur. Wearing a dodgy necklace is also strongly recommended. Bring Saradomin brews and spare dodgy necklaces to extend trips. Wearing rogue equipment (excluding the gloves) is recommended for increased Tokkul and gems.
If banking the gems, having a gem bag is strongly recommended, as gems are automatically stored there if it is open. Otherwise, they will fall to the floor if the inventory is full. Players are advised to take 3 dodgy necklaces and 3–4 Saradomin brews for each trip when banking the gems. A trip will last around 45 minutes.
At level 99 Thieving, players can gain up to around 250,000–260,000 experience per hour. Banking the gems would lower the rate to around 240,000 experience per hour.
References
| Free-to-play guides | |
|---|---|
| Members' guides | |
| Ironman guides | |
| Ultimate Ironman guides | |
| General guidelines | |


