Abyssal Sire/Strategies
This copy was last processed on . The copied wiki revision is dated .
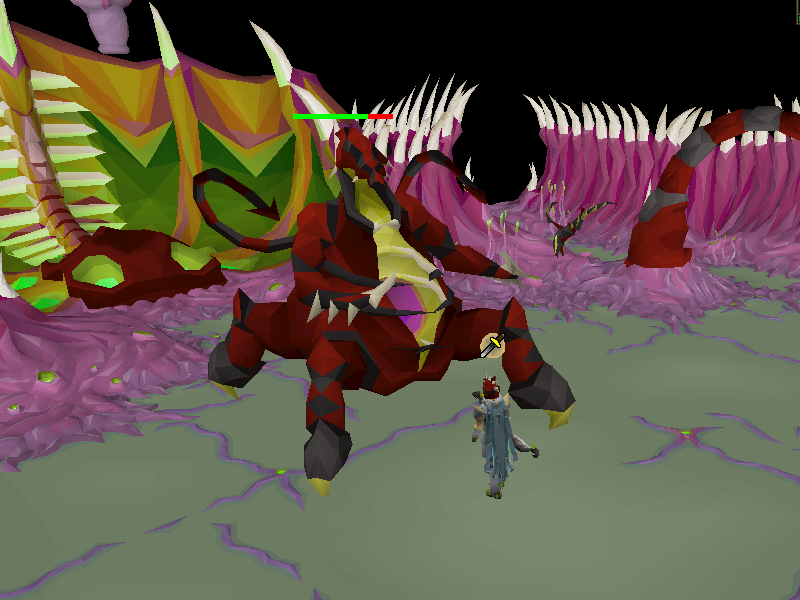

The Abyssal Sire is a level 350 Slayer boss that can only be killed when assigned Abyssal demons or the Sire itself with the required Slayer level of 85.
It is mainly killed for its unsired drops, which can be used at the Font of Consumption to obtain valuable rewards such as the abyssal dagger, parts of the abyssal bludgeon, or the abyssal orphan pet.
Note that while the Sire is a boss residing in a multicombat area, it can only be fought by one player at any given time. If the attacker does not fight the Sire in ~20 seconds from their last attack, another player may attack it.
Requirements
85 with an Abyssal demon slayer task
- Access to Fairy rings or partial completion of the Enter the Abyss miniquest to access the Abyssal Nexus
Recommendations
- High combat stats. Although not required, see the skill levels below for an indication of the advised stats:
90 or higher
90 or higher
90 or higher
90 or higher
90 or higher
92 or higher
70+ for Piety
Transportation
The Sire is located in the Abyssal Nexus, which can be easily accessed by fairy ring code DIP. Players without partial completion of Fairytale II - Cure a Queen will instead have to enter the Abyss via the Mage of Zamorak and go through the one-way passage on the south side. This requires running briefly through the Wilderness, Skulling, and will drain all of your prayer points so it is not recommended.
There are four Sires in each world, in the north-east, north-west, south-east and south-western areas of the Nexus. There are four eyes near the Font of Consumption; interacting with them will tell you if there is another player in that chamber.
Mechanics
Respiratory systems, tentacles, and stunning
During Phase 1 the player will need to kill all four respiratory systems. They are protected by six immobile tentacles which, when active, prevent almost all damage to the respiratory systems and attack nearby players for up to 30 damage (reduced slightly by Protect from Melee). Players will always hit at least 50% of their weapon's maximum hit on the respiratory systems, meaning all four can be taken down in 2 attacks each with a non-demonbane weapon that has a max hit of at least 50, assuming the player does not miss either attack. Demonbane weapons (other than holy water) will always destroy the respiratory systems in one hit regardless of the player's stats.
The Sire and its tentacles can be stunned for 30 seconds by one of the following methods, leaving the respiratory systems open to attack:
- Deal 75 damage to the Sire with ranged/magic
- Cast a Shadow spell on the Sire (effect applies even if it splashes):
- Shadow Rush: 25% chance to stun
- Shadow Burst: 50% chance to stun
- Shadow Blitz: 75% chance to stun
- Shadow Barrage: 100% chance to stun
The tentacles are inactive during Phase 2 but become active again in Phase 3.
The fastest way to handle Phase 1 is to attack the Sire with any ranged or magic weapon/spell that is not a shadow spell to wake it up, then manually cast Shadow Barrage on the Sire to stun it for 27 seconds. This allows you to begin attacking the 4 respiratory vents around the edge of the room instantly. While it is possible to initiate the fight by casting Shadow Barrage on an inactive Sire, the stun will not be applied for 10 game ticks after being cast (due to the Sire having to perform its waking up animation before the stun applies), meaning a player who does this may be attacked by the tentacles if they move in to kill the respiratory systems too fast.
Standard attacks
During phase 2, the Sire uses three types of melee attacks; a swipe from its right arm, a flick from its right tendril, or a flick from both tendrils. These can hit moderately high, with the exception of the double flick attack, which can deal up to 66 damage. Using Protect from Melee will reduce the damage from these attacks to 6, 6 and 26 respectively.
Miasma Pools

In all phases of the fight (though it won't be used in Phase 1 if stunning correctly), the Sire can summon a pool of miasma under the player's position. The pool causes damage in a 3x3 area, dealing 10-30 poison damage per tick if on the central tile or 2-8 per tick on the outer tiles. This damage cannot be mitigated by any type of poison protection, and can also poison the player starting at 8 damage. There is enough time upon seeing the pool appear to avoid all damage by running 2 tiles away.
In Phases 1 and 2 the attack is indicated by the Sire clenching both its claws towards its stomach, along with a dark-green spiral energy appearing above it. There is no animation for the attack in Phase 3.
After the Sire explodes in Phase 3, it uses this attack a minimum of three more times then stops if all 15 minions are alive.
Minions
In all phases of the fight the Sire can create spawns. They randomly attack with ranged for up to 9 damage and melee for up to 4. They have 15 hitpoints and low accuracy.
The spawns in phase 1 and 2 are indicated with the spawn being thrown out of the Sire's mouth, after which they will land in a random tile in front of/around it (phase 1/2) before attacking the player.
If the spawn is not killed within 15 seconds, it will mature into a scion, which has 60 hitpoints and has higher accuracy. Spawns and scions attack randomly with ranged for up to 16 damage and melee for up to 10. They will close the gap for melee, but will not use ranged unless they decide to change styles. Because the ranged attacks are much more damaging and accurate than their melee attacks, it is highly recommended to keep Protect from Missiles on at all times, as numerous minions using ranged can quickly kill a player in seconds regardless of their defence bonuses. If they are unable to attack the player for ~35 or so seconds (including the morph into a scion), they will automatically die off in a manner similar to Zulrah's snakelings.
Demonbane attacks will always land as successful hits against them regardless of the player's bonuses, but will not guarantee a max hit.
When the Sire is killed, all scions and spawns will die alongside it.
-
A spawn.
-
A scion.
-
A spawn transforming into a scion.


Forced Teleport and Explosion
During Phase 2, if the player attempts to safespot the Sire, it will forcibly teleport them next to it before discharging a blast of energy from the portal in its stomach, dealing up to 60 damage if the player doesn't run away in time.
During Phase 3, when the Sire goes under 140 health, it will teleport the player next to itself and trigger a highly damaging explosion; the damage can be avoided by running directly away from the Sire as soon as the player is teleported.
Strategy
Note: Make sure that Auto Retaliate is off when killing the Sire.
| Tile markers |
|---|
[{"regionX":27,"z":0,"regionId":11850,"regionY":36,"color":"#B310342F"},{"regionX":31,"z":0,"regionId":11850,"regionY":36,"color":"#B310342F"},{"regionX":28,"z":0,"regionId":11850,"regionY":40,"color":"#B310342F"},{"regionX":24,"z":0,"regionId":11850,"regionY":40,"color":"#B310342F"},{"regionX":27,"z":0,"regionId":11850,"regionY":44,"color":"#B310342F"},{"regionX":21,"z":0,"regionId":11850,"regionY":42,"color":"#B310342F"},{"regionX":35,"z":0,"regionId":11850,"regionY":22,"color":"#B310342F"},{"regionX":27,"z":0,"regionId":11850,"regionY":34,"color":"#B310342F"},{"regionX":25,"z":0,"regionId":11850,"label":"Row 1","regionY":44,"color":"#B310342F"},{"regionX":25,"z":0,"regionId":11850,"regionY":21,"color":"#B310342F"},{"regionX":25,"z":0,"regionId":11850,"label":"Row 2","regionY":36,"color":"#B310342F"},{"regionX":25,"z":0,"regionId":11850,"label":"Row 3","regionY":34,"color":"#B310342F"},{"regionX":31,"z":0,"regionId":11851,"regionY":42,"color":"#B310342F"},{"regionX":34,"z":0,"regionId":11851,"regionY":40,"color":"#B310342F"},{"regionX":38,"z":0,"regionId":11851,"regionY":40,"color":"#B310342F"},{"regionX":37,"z":0,"regionId":11851,"regionY":34,"color":"#B310342F"},{"regionX":37,"z":0,"regionId":11851,"regionY":44,"color":"#B310342F"},{"regionX":41,"z":0,"regionId":11851,"regionY":36,"color":"#B310342F"},{"regionX":35,"z":0,"regionId":11851,"regionY":21,"color":"#B310342F"},{"regionX":45,"z":0,"regionId":11851,"regionY":22,"color":"#B310342F"},{"regionX":35,"z":0,"regionId":11851,"label":"Row 1","regionY":44,"color":"#B310342F"},{"regionX":35,"z":0,"regionId":11851,"label":"Row 2","regionY":36,"color":"#B310342F"},{"regionX":35,"z":0,"regionId":11851,"label":"Row 3","regionY":34,"color":"#B310342F"},{"regionX":37,"z":0,"regionId":11851,"regionY":36,"color":"#B310342F"},{"regionX":32,"z":0,"regionId":12363,"regionY":21,"color":"#B310342F"},{"regionX":42,"z":0,"regionId":12363,"regionY":22,"color":"#B310342F"},{"regionX":34,"z":0,"regionId":12363,"regionY":36,"color":"#B310342F"},{"regionX":34,"z":0,"regionId":12363,"regionY":34,"color":"#B310342F"},{"regionX":32,"z":0,"regionId":12363,"label":"Row 3","regionY":34,"color":"#B310342F"},{"regionX":32,"z":0,"regionId":12363,"label":"Row 2","regionY":36,"color":"#B310342F"},{"regionX":38,"z":0,"regionId":12363,"regionY":36,"color":"#B310342F"},{"regionX":31,"z":0,"regionId":12363,"regionY":40,"color":"#B310342F"},{"regionX":28,"z":0,"regionId":12363,"regionY":42,"color":"#B310342F"},{"regionX":35,"z":0,"regionId":12363,"regionY":40,"color":"#B310342F"},{"regionX":34,"z":0,"regionId":12363,"regionY":44,"color":"#B310342F"},{"regionX":32,"z":0,"regionId":12363,"label":"Row 1","regionY":44,"color":"#B310342F"},{"regionX":37,"z":0,"regionId":12362,"regionY":21,"color":"#B310342F"},{"regionX":47,"z":0,"regionId":12362,"regionY":22,"color":"#B310342F"},{"regionX":39,"z":0,"regionId":12362,"regionY":36,"color":"#B310342F"},{"regionX":39,"z":0,"regionId":12362,"regionY":34,"color":"#B310342F"},{"regionX":37,"z":0,"regionId":12362,"label":"Row 2","regionY":36,"color":"#B310342F"},{"regionX":37,"z":0,"regionId":12362,"label":"Row 3","regionY":34,"color":"#B310342F"},{"regionX":43,"z":0,"regionId":12362,"regionY":36,"color":"#B310342F"},{"regionX":39,"z":0,"regionId":12362,"regionY":44,"color":"#B310342F"},{"regionX":37,"z":0,"regionId":12362,"label":"Row 1","regionY":44,"color":"#B310342F"},{"regionX":33,"z":0,"regionId":12362,"regionY":42,"color":"#B310342F"},{"regionX":36,"z":0,"regionId":12362,"regionY":40,"color":"#B310342F"},{"regionX":40,"z":0,"regionId":12362,"regionY":40,"color":"#B310342F"}] |
| Tile markers guide • Data |
Phase 1
The Sire wakes up and begins the fight when attacked. If not stunned, it will summon miasma pools under the player and create spawns. The six tentacles will also awaken. These tentacles are static, but attack with typeless crush that can deal up to 30 damage, slightly reduced with Protect from Melee.
If the Sire is attacked by a player but that player stops attacking it for some reason, the Sire can be attacked by another player after ~20 or so seconds pass.
The player needs to kill all four respiratory systems to progress. However, with the Sire awake, the tentacles will protect the respiratory systems from attacks, and any attacks dealt to them while the boss is awake will be reduced to 0-3 damage regardless of the experience drop given.
In order to remove the protection provided by the tentacles, the Sire must be disoriented. This can be done in one of two ways; dealing 75 damage with ranged or magic (as the boss is not accessible with melee), or using a shadow spell against it. Shadow spells, if they successfully disorient the Sire, will do so for 30 seconds. The chance of this occurring is dependent on the tier of shadow spell; Shadow Rush has a 25% chance, Shadow Burst 50%, Shadow Blitz 75% and Shadow Barrage guarantees it. While casting a shadow spell on an inactive Sire will both wake it up and potentially stun it, the stun from this spell will not be applied for 10 game ticks after being cast. A shadow spell cast on an awoken Sire will be applied instantly.
When stunned, the respiratory systems should be killed with ranged or magic, depending on what the player prefers. Upon a successful hit, demonbane weapons and spells (other than holy water) will destroy them instantly regardless of the player's bonuses. It is highly recommended players bring a scorching bow and bronze arrows, since these are cheap and readily available, and the bow has high accuracy even when not bringing ranged armour switches.
If a non-demonbane weapon is used, the player will deal anywhere from 50%-100% of their maximum hit as damage. Bringing a weapon that has a max hit of 50 or higher will be sufficient enough to destroy the respiratory systems in two hits.
Within 30 seconds, the player will be easily able to destroy all of the respiratory systems in one cycle with demonbane. Without demonbane, it is possible to do so if they can be two hit; three hits will likely require a second stun. Despite the 30 second stun timer, it is actually 27 seconds, as the tentacles will awaken at this mark and immediately protect the systems.


Overall, the optimal strategy for this phase is as follows:
- Switch to your ranged or mage gear and attack the Sire with any ranged or magic weapon/spell that is not a shadow spell to wake it up.
- Cast Shadow Barrage on the Sire to stun it.
- Begin killing respiratory systems. Focus on killing the systems on either the east or west side, re-stun the Sire with Shadow Barrage if needed, then finish off the remaining systems.
Any damage dealt to the Sire during this phase will only count for the purposes of disorientation; if the Sire has taken any damage, it will be restored back to full health until the end of the phase.
After the last respiratory system is killed, head back to the centre and attack the Sire as soon as it steps out into the main arena (or in transit if range/mage). While damage is reduced by 50%, the amount of time the Sire takes to begin the next phase is usually significant enough to deal some damage. If the Sire somehow reaches 0 health before the next phase starts, it will begin the next phase with 40% of its health.
Phase 2
Stay on Row 1 during this phase, as attacking it from outside melee distance will cause the Sire to teleport you to itself and discharge a damaging blast of energy.
At this point, if the Sire is not in combat for ~1 minute, it will despawn, resetting the fight.
The Sire will use melee attacks that can hit up to 26 through prayer. Watch for miasma pools underneath the player; when they appear run to the other marked tile on Row 1. Ignore spawns unless killing the Sire at low levels with low DPS (in which case long kill times may make removing minions desirable). If reducing the Sire's defence, use one special attack now, otherwise save all special attack energy for phase 3.
Once the Sire is damaged below 50% of its health (212 health or less) it will start walking south. Run to Row 2 and activate Protect from Missiles. Advanced techniques can be used to pull the Sire south while attacking it, reducing the amount of time spent waiting for the Sire.
If the Sire reaches 0 health before the next phase starts, it will begin the next phase with 20% of its health.
Phase 3
Stage I
The Sire will latch onto the floor and summon four spawns to assist it in battle. This will occur before the pools appear. It will no longer attack with melee, but instead launch miasma pools as its "attacks". The tentacles will reawaken, limiting the amount of space allowed to attack the boss.
Once the Sire is damaged below 35% of its health (around 143 or so health), it will teleport the player, beginning the final stage. In the event of multi-hit weapons triggering the transition (e.g scythe of vitur dealing 66 damage (over 3 hits such as a 44-21-3)) against a Sire with 150 health, the first hit would trigger the transition, while the remaining two hits will apply once the second stage starts.
Stage II

The Sire teleports the player to the western tile of Row 2. Two ticks later it explodes, dealing up to 96 damage if the player is within the blast radius. This damage can be recoiled with Vengeance, but this requires either a spellbook switch beforehand via Magic cape, Spellbook Swap, or a second player to assist with Vengeance Other and Heal Other. As soon as the teleport occurs, spam-click on Row 3 to avoid the attack. Then return to melee distance to finish the fight.
After the explosion the Sire creates a huge number of spawns, after which the remainder will spawn either underneath or around the boss. It will use its miasma pool attack a minimum of three more times, then stop as long as 15 minions are left alive. This means you should not kill any minions, but should run back and forth on Row 2 while attacking until it has made three miasma pools, after which it is safe to stop moving. Use any remaining specs and watch your health, as the scions can do a lot of damage. If the player's health drops below 40, they should run away for a brief respite.
It is possible to safespot the minions and heal off them with Blood Burst/Blood Barrage; their low magic defence should ensure all spells hit. This is primarily done for players with lower stats or are doing prolonged trips at the boss, as it is uncommon for a player even with good gear to take longer than expected or take more damage than usual from the minions.
When the Sire is killed, all minions will die alongside it. If they were tagged by the player, this will activate Death Charge, maintaining special attack energy at all times but can make trips slower due to the lack of ancients for the first phase.
Attacks made by minions before the Sire dies (including those that spawn on the same tick as its death) will roll as normal, meaning a player can potentially die after the Sire does; although somewhat unlikely, it is possible and players with lower combat stats should be aware of this.

Equipment
Phase 1
Note: This is only if the player is using melee for phase 2 and 3. The melee gear will be whatever you're using later in the fight. For phase 2 and 3, a melee weapon will be needed (if one handed, a shield slot item too).
The player brings a Scorching bow and arrows with full Melee gear in order to take out the respiratory system with the bow. This is because even with full melee gear, the bow is fairly accurate and usually oneshots the respiratory systems. The scorching bow allows the player to quickly dispose of the respiratory system without needing a full gear switch, making it possible to quickly move on to phase 2 so the player can melee the boss. At that stage, the weapon and shield slot can be switched out.
| Slot | Item (most effective → least effective) | |||
|---|---|---|---|---|
 |  Slayer helmet (i) Slayer helmet (i) |  Black mask (i) Black mask (i) | N/A | N/A |
 |  Amulet of rancour Amulet of rancour |  Amulet of torture Amulet of torture |  Amulet of fury Amulet of fury |  Amulet of glory Amulet of glory |
 |  Infernal cape Infernal cape |  Fire cape Fire cape |  Max cape / Max cape /  Hitpoints cape Hitpoints cape |  Mixed hide cape Mixed hide cape |
 |  Torva platebody Torva platebody |  Bandos chestplate Bandos chestplate |  Blood moon chestplate Blood moon chestplate |  Fighter torso Fighter torso |
 |  Torva platelegs Torva platelegs |  Bandos tassets Bandos tassets |  Blood moon tassets Blood moon tassets |  Obsidian platelegs Obsidian platelegs |
 |  Scorching bow[a] Scorching bow[a] | N/A | N/A | N/A |
 |  Amethyst arrow[b] Amethyst arrow[b] |  Arrows[c] Arrows[c] | N/A | N/A |
 |  Ferocious gloves Ferocious gloves |  Barrows gloves Barrows gloves | N/A | N/A |
 |  Avernic treads (max) Avernic treads (max) |  Primordial boots Primordial boots |  Dragon boots Dragon boots |  Rune boots Rune boots |
 |  Lightbearer Lightbearer |  Ultor ring Ultor ring |  Berserker ring (i) Berserker ring (i) | N/A |
Unless using a Tumeken's shadow, Magic is only used to kill the respiratory systems. Their magic defence is so low they can be hit when wearing full melee gear.
| Slot | Item (most effective → least effective) | ||||
|---|---|---|---|---|---|
| Slayer helmet (i) | Black mask (i) | N/A | N/A | N/A |
|  Occult necklace Occult necklace | N/A | N/A | N/A | N/A |
|  Imbued god cape Imbued god cape | N/A | N/A | N/A | N/A |
|  Ancestral robe top Ancestral robe top |  Virtus robe top Virtus robe top |  Bloodbark body[a] Bloodbark body[a] | N/A | N/A |
|  Ancestral robe bottom Ancestral robe bottom |  Virtus robe bottom Virtus robe bottom |  Bloodbark legs[a] Bloodbark legs[a] | N/A | N/A |
|  Tumeken's shadow Tumeken's shadow |  Sanguinesti staff Sanguinesti staff |  Trident of the swamp Trident of the swamp |  Trident of the seas Trident of the seas |  Blood ancient sceptre (for overheal) / Blood ancient sceptre (for overheal) /  Ancient sceptre Ancient sceptre |
 |  Elidinis' ward (f)[b] Elidinis' ward (f)[b] |  Elidinis' ward / Elidinis' ward /  Arcane spirit shield[b] Arcane spirit shield[b] |  Ancient wyvern shield / Ancient wyvern shield /  Malediction ward / Malediction ward /  Mage's book[b] Mage's book[b] | N/A | N/A |
|  Confliction gauntlets Confliction gauntlets |  Tormented bracelet Tormented bracelet |  Bloodbark gauntlets[c] Bloodbark gauntlets[c] | N/A | N/A |
Unless ranging the boss, Ranged is only used to kill the respiratory systems. Their defence is very low so high accuracy is unnecessary. The Scorching bow will one-shot the systems, even with bronze arrows. You do not need any switches other than the bow.
| Slot | Item (most effective → least effective) | ||||
|---|---|---|---|---|---|
| Slayer helmet (i) | Black mask (i) | N/A | N/A | N/A |
|  Necklace of rupture Necklace of rupture | Amulet of fury | Amulet of glory | N/A | N/A |
|  Dizana's quiver Dizana's quiver |  Ava's assembler (Or best Ava's device) Ava's assembler (Or best Ava's device) | N/A | N/A | N/A |
|  Masori body (f) Masori body (f) |  Crystal body [a] Crystal body [a] |  Hueycoatl hide body > Hueycoatl hide body >  Blessed body Blessed body |  Black d'hide body Black d'hide body | N/A |
|  Masori chaps (f) Masori chaps (f) |  Crystal legs [a] Crystal legs [a] |  Hueycoatl hide chaps > Hueycoatl hide chaps >  Blessed chaps Blessed chaps |  Black d'hide chaps Black d'hide chaps | N/A |
| Scorching bow |  Bow of faerdhinen Bow of faerdhinen |  Toxic blowpipe (with Toxic blowpipe (with  amethyst darts or better) amethyst darts or better) |  Webweaver bow / Webweaver bow /  Craw's bow Craw's bow | Crystal bow[b] |
| Seeking dragon arrow | Seeking amethyst arrow > Dragon arrow | Amethyst arrow | N/A | N/A |
| Zaryte vambraces | Barrows gloves | Blessed vambraces Black d'hide vambraces | N/A | N/A |
Melee is only viable for killing the respiratory systems if using a Noxious halberd, but is worse than both ranged and magic due to the extra distance the player must run.
| Slot | Item (most effective → least effective) | |||
|---|---|---|---|---|
| Slayer helmet (i) | Black mask (i) | N/A | N/A |
| Amulet of rancour | Amulet of torture | Amulet of fury | Amulet of glory |
| Infernal cape | Fire cape | Max cape / Hitpoints cape | Mixed hide cape |
| Torva platebody | Bandos chestplate | Blood moon chestplate | Fighter torso |
| Torva platelegs | Bandos tassets | Blood moon tassets | Obsidian platelegs |
| Noxious halberd | N/A | N/A | N/A |
| Rada's blessing 4 | God blessing | N/A | N/A |
| Ferocious gloves | Barrows gloves | N/A | N/A |
| Avernic treads (max) | Primordial boots | Dragon boots | Rune boots |
| Ultor ring | Berserker ring (i) | Lightbearer | N/A |
Phase 2 and Phase 3
The optimal strategy is to use Emberlight or Osmumten's fang, along with a Lightbearer. The high accuracy of these weapons makes reducing the Sire's defence unnecessary, so all special attack energy is saved for damage in Phase 3.
If the player can reduce the Sire's defence with an Elder maul or Dragon warhammer special attack, weapons such as the Scythe of vitur become considerably more effective. However, this approach is typically slower than using a highly accurate weapon and damaging special attacks.
With lower defence levels, players should consider prioritising ranged defence over melee strength to avoid being overwhelmed with damage from the spawns.
Magic is a viable method for killing the Abyssal Sire if using a Tumeken’s shadow as the primary weapon. With the best possible gear, Tumeken's shadow can offer excellent damage output against the Abyssal Sire, comparable to the best possible gear with melee. Important to keep in mind is the overall lower defence of a magic setup, so you should be careful with keeping your health up. The method is low effort as it reduces the amount of swaps; allowing you to bring more supplies. The Eldritch nightmare staff and Accursed sceptre can be used interchangeably. It is recommended to use the Accursed sceptre for faster kills as it reduces the boss's magic and defence levels regardless of hit.
| Slot | Item (most effective → least effective) | |||
|---|---|---|---|---|
| Slayer helmet (i) | Black mask (i) | N/A | N/A |
| Occult necklace | Amulet of fury | Amulet of glory | N/A |
| Imbued god cape | God capes | Max cape | Infernal cape |
| Ancestral robe top | Virtus robe top | N/A | N/A |
| Ancestral robe bottom | Virtus robe bottom | N/A | N/A |
| Tumeken's shadow | N/A | N/A | N/A |
| Elidinis' ward (f)[a] | Elidinis' ward [a] | Ancient wyvern shield / Malediction ward / Mage's book [a] | N/A |
| Rada's blessing 4 | N/A | N/A | N/A |
| Confliction gauntlets | Tormented bracelet | N/A | N/A |
| Avernic treads (max) | Eternal boots | Echo boots | Guardian boots |
| Magus ring / Lightbearer | Seers ring (i) | Brimstone ring | N/A |
| Eldritch nightmare staff | Accursed sceptre | N/A | N/A | |
Ranged generally performs worse than melee, and the reduced defence will shorten trips.
However, ranged can be used to deal additional damage before the start of Phase 2. Once all four respiratory systems are defeated, there is a brief window to attack the boss, despite it being out of melee range initially. Once the Abyssal Sire raises its arms, it becomes vulnerable to damage, including ranged attacks. During this window players can shoot the boss three times with the Scorching bow before it comes within melee range. Doing this can reduce its health by a good amount (up to 50% of your Scorching bow's max hit, multiplied by 3) before Phase 2 properly begins, making it a good strategy for players who want to optimize their kills.
Thus, it can be a good idea to bring a few ranged switches, to ensure the player doesn't hit any zeroes while killing the respiratory systems, and to also help with the few bonus hits the Phase 1 to Phase 2 transition provides.
| Slot | Item (most effective → least effective) | ||||
|---|---|---|---|---|---|
| Slayer helmet (i) | Black mask (i) | N/A | N/A | N/A |
| Necklace of rupture | Amulet of fury | Amulet of glory | N/A | N/A |
| Dizana's quiver | Ava's assembler (Or best Ava's device) | Max cape | Ranging cape | Infernal cape / Mythical cape (for special) |
| Masori body (f) | Armadyl chestplate | Crystal body | Blessed body | Karil's leathertop |
| Masori chaps (f) | Armadyl chainskirt | Crystal legs | Blessed chaps | Karil's leatherskirt |
| Scorching bow | Twisted bow | Toxic blowpipe (Dragon darts) | Bow of faerdhinen (With Crystal armour) | Toxic blowpipe (Amethyst or Rune darts) |
| Seeking dragon arrow | Seeking amethyst arrow > Dragon arrow | Amethyst arrow | N/A | N/A |
| Zaryte vambraces | Barrows gloves | Combat bracelet | N/A | N/A |
| Avernic treads (max) | Pegasian boots | Ranger boots | Blessed boots | Aranea boots |
| Venator ring | Archers ring (i) | Ring of suffering (i) | Tyrannical ring (i) (for special) | N/A |
| Elder maul / Bandos godsword | Toxic blowpipe | Dragon claws | N/A | N/A | |
Inventory recommendations
Melee and ranged
- Lunar/Dramen staff (if Elite Lumbridge & Draynor Diary not completed)
- 1 super combat potion (if going for long trips, use the divine variant otherwise)
- Bracelet of slaughter
- Scorching bow
- Special attack weapon of your choice
- A staff to autocast Ancient Magicks (for long trips); Blood ancient sceptre provides the best effects, allowing the player to overheal up to 108 hitpoints at level 99.
- A quick-teleport for fast banking
- Teleport to house (tablet) or Construction cape for pool and fairy ring back. A Desert amulet 4 and a Quest point cape can also be used.