Alchemical Hydra/Strategies
This copy was last processed on . The copied wiki revision is dated .
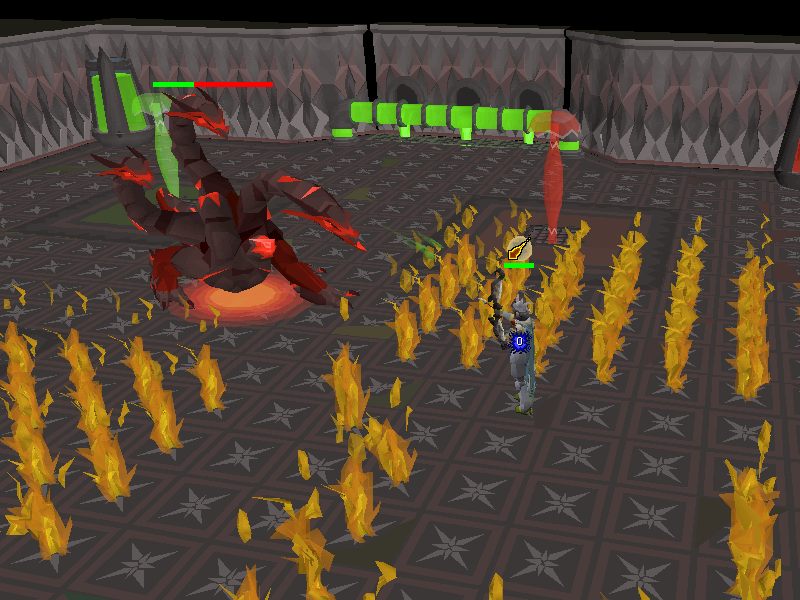
The Alchemical Hydra is a level 95 Slayer boss encountered in the Karuulm Slayer Dungeon. In order to fight it, players must be assigned a Hydra task.
To reach the boss, players must run north past the Tasakaal, then east past the Hydras. They will then reach the entrance to the lair by Orrvor quo Maten. Alternatively, players with level 88 Agility can reach it safely by using the mysterious pipe just behind Kaal-Ket-Jor.
Fight overview
The fight is instanced; if players die while fighting the Hydra, then they may reclaim their items from Orrvor quo Maten outside for 100,000 coins each time. Dying elsewhere with items still held by him will result in them being lost forever.
While the Hydra is in the room, players cannot leave through the doors, as they are jammed when this occurs. Teleports will still work, however. The Hydra has a respawn time of 20 seconds.
| Tile markers |
|---|
[{"regionX":33,"z":0,"regionId":5536,"label":"1","regionY":23,"color":"#FF30FF00"},{"regionX":27,"z":0,"regionId":5536,"label":"2","regionY":38,"color":"#FF006AFF"},{"regionX":14,"z":0,"regionId":5536,"label":"3","regionY":38,"color":"#FF006AFF"},{"regionX":13,"z":0,"regionId":5536,"label":"4","regionY":32,"color":"#FFFF0026"},{"regionX":26,"z":0,"regionId":5536,"label":"5","regionY":30,"color":"#FFFF0026"},{"regionX":15,"z":0,"regionId":5536,"regionY":38,"color":"#B310342F"},{"regionX":15,"z":0,"regionId":5536,"regionY":37,"color":"#B310342F"}] |
| Tile markers guide • Data |
The Hydra has four phases, each one beginning upon each 25% health threshold (~275 health). A head will fall off each time this occurs, as the Hydra roars and changes colour. At the start of each phase, the Hydra will perform three auto-attacks before performing a special attack.
The Hydra attacks with both Magic and Ranged. The Hydra will begin the fight with either combat style. For the first three phases, after every three basic attacks, the Hydra will sway its heads backwards as an indicator that it is changing combat styles.
During the first three phases, the Hydra reduces incoming damage by 75% until it is lured over and sprayed by the appropriate chemical vent. The Hydra will when hit by the correct vent. If Hydra is sprayed by an incorrect vent, the damage of its attacks increase, although protection prayers continue to block all damage regardless.
In the final phase, the Hydra attacks alternately with Magic and Ranged, choosing to start with the opposite of what it attacked with last. On the fourth attack, the Hydra instead throws poison splatters as in the first phase.
Poison
In this phase, the Hydra starts with a green carapace, and should be lured to the red chemical pool. After the first kill, the player should stand right next to the red chemical vat (to the east) so that the Hydra is automatically lured to the red chemical pool as soon as it spawns.
After the first three attacks, the Hydra will launch damaging poison blobs on and around the player's location which form poison pools on the ground, damaging the player in several ways:
- The blobs have a 3x3 splatter effect dealing up to 7 damage as thrown
- Standing on the poison pools will deal up to 12 poison damage per tick
- If damaged by the targetted blob, the player is poisoned for 6 damage, and otherwise poisoned for 4 damage
The best way to avoid this attack is by running north on the Hydra's fourth attack.
Once the Hydra reaches 75% of its health, the bottom-right head falls off and it changes its carapace to blue.
Lightning
Now with a blue carapace, the Hydra should be lured to the green chemical pool.
Throughout the phase, the Hydra will launch an electric ball in the centre of the room, which spawns four lightning currents in the four corners of the chamber, converging on the player's location. Getting hit by them will bind the player and deal up to 22 damage.
The easiest way to avoid their damage is by running west along the northern wall as the lightning approaches. It is also possible to trap the lightning by standing in the north-west corner, moving one tile diagonally south-east when the lightning is two tiles away from you, and instantly moving one tile north. This does not despawn the lightning, so if the player were to move off of the tile, the lightning will start following them again.
Once the Hydra reaches 50% of its health, the bottom-left head falls off and it changes its carapace to red.
Note: If the Hydra transitions to the next phase while there is lightning on the field, they will dissipate immediately.
Flame
Now with a red carapace, the Hydra should be lured to the blue chemical pool.
Throughout the phase, the Hydra will occasionally walk to the centre of the chamber and face the direction the player is at. Once it reaches the centre, it will inflict a stun on the player, but they can still attack it. If the player is underneath the Hydra, then it forces them out into a random direction. Upon reaching the centre, it breathes 5x5 layer of fire to the player's sides based on their location before staring down the middle and launching a tracking fire.
This tracking fire follows the player's movement, and travels significantly faster the further the player is (or if they start running). Turning off run and walking in a line as the fire trails is the best course of action. Getting hit by any of the fires will result in the player taking up to 25 damage, followed by a subsequent burn of 5 damage for 5 hits. The Hydra will not attack for roughly seven ticks after the tracking fire is launched.
Similarly to the lightning trap in the previous phase, the flames can be trapped in by standing on a specific tile adjacent to the green vents, seen in the demonstration to the right. This is mostly for melee players, since range can still attack over the fires without being dragged into one.
Once the Hydra reaches 25% of its health, the middle head falls off and it changes its carapace to grey.
Note: If the Hydra transitions to the next phase while performing this attack, it ends abruptly. This also includes the tracking fire, but any fires started before the phase transition will still persist as usual. For the duration of the side fires, the Hydra also becomes a solid NPC, meaning that it is not possible to walk under it.
Enraged
Now with a grey carapace, the Hydra no longer needs to be lured to any chemical pools for this phase, as its damage reduction ability does not reset. During this phase, the Hydra's attack speed will increase to every four ticks, and its enrage stack will increase to max, allowing it to deal up to 55 damage per hit.
The Hydra starts off this phase with the combat style opposite of what it used in the previous phase; if it attacked with magic, then it will start the phase with ranged. If the Hydra attacked with magic and changes to ranged as it transitions phases, it will still start with ranged attacks. These attacks will alternate after every single hit; e.g one magic attack is followed by a ranged attack and repeats. Continue to switch prayers with each basic attack for the remainder of the fight. The player can safely switch to the next prayer as soon as the Hydra starts its attack animation for the current attack.
After the first three auto-attacks, the Hydra will use the poison attack from phase 1, and will continue to use it after every nine subsequent auto-attacks. Unlike the first phase, there is a possibility of one poison blob being launched rather than five. This is mostly guaranteed if any fires from the previous phase are present.
If the Hydra is killed while queuing up an auto-attack, it will still be launched but deal no damage. Poison blobs will still deal damage and need to be avoided as these will fade as normal.
Players may choose to bring a bracelet of slaughter to extend their slayer tasks, and sometimes bring it as a switch so that gloves with offensive stats can be worn for the majority of the kill. If going with this option, remember to switch to the bracelet sometime during this final phase. It can be convenient to switch to the bracelet while dodging the poison special, as prayer does not have to be changed during this attack, though optimally the offensive gloves should be worn as long as possible.
Equipment
The Alchemical Hydra has a Defence level of 100. It is weakest to ranged attacks, possessing +45 global ranged resistance.
As it is considered draconic, Dragonbane weapons are effective against it. If using melee, use a dragon hunter lance on stab. The Hydra's stab defence is slightly higher than its ranged but still provides acceptable accuracy due to its lower Defence level. Magic is not recommended due to its Magic level of 260.


Prayer bonus is prioritised over ranged accuracy because of the boss's relatively low defensive stats and the minimal damage taken when dealing with the mechanics correctly. Alternatively, players may use gear that maximizes ranged accuracy if they are confident with prayer flicking, as it greatly reduces the need for prayer potions. With sufficient experience, barely any damage should be taken most kills; the only unavoidable damage players may take is the first hit at the start of kill, and self-inflicted damage from Divine potions or the special attack of Ruby bolts (e).
Inventory
 |  | | |
 |  | | |
| | | |
| | | |
 | | | |
| | |  |
 1000 1000 |  5000 5000 |  1000 1000 |  1000 1000 |
- About 4–20 prayer potions or super restores.
- More prayer potions allows for longer trips at the cost of not being able to bank hydra bones; however, banking the bones will lower overall kill rates due to time spent running to and from a bank, and is not recommended without Rada's blessing 4.
- About 4-10 food, preferrably Cooked moonlight antelope.
- As the player becomes more proficient at fighting this boss, they should take very little damage per kill, so excess food can be replaced with more prayer potions if doing long trips.
- Antidote++ if not bringing cooked moonlight antelope.
- Divine ranging potion, ranging potion, or bastion potion (the latter is largely superfluous, as all damage taken in the fight can be mitigated with prayer and good positioning once the player is experienced enough)
- House tablets or rings of dueling to restore stats and bank
- Rada's blessing 4 for fast teleport back, if using a bow of faerdhinen or toxic blowpipe.
- Zaryte crossbow with ruby dragon bolts (e) is best used for its special attack during the flame phase to maximise the chance of skipping its flame wall attack. Particularly powerful when combined with the Lightbearer.
- Toxic blowpipe for healing special attack if using a twisted bow or bow of faerdhinen
- Divine rune pouch with runes for High Level Alchemy and Teleport to house (or two open slots for rune drops if using tabs/ring of dueling)
- (Optional) Bracelet of slaughter to extend the task
- (Optional) Bonecrusher or bonecrusher necklace to auto-bury hydra bones. Bonecrusher necklace can also be equipped during boss death animation to restore an extra 8 prayer points per kill.
- (Optional) Noxious halberd can be used to cure poison as necessary at the cost of 50% special attack energy.


.png)
.png)
.png)
.png)


- Strength bonus is preferred over prayer bonus for melee.
- Melee setups often provide similar damage output to range setups, especially when a good special attack weapon is available, and typically have lower to no upkeep cost for weapons and armour.
- When meleeing Hydra, effectively luring it over the vents without missing attacks can be more complex than using a range setup.
- Despite having low defence, the Hydra has enough health that a small improvement in DPS from defence reduction adds up greatly over the course of the fight.
- On average, unless the ultor ring adds a max hit of 5 to a dragon hunter lance, lightbearer and a strong spec weapon will result in faster kill times.
- Damaging special attacks should be used during the flame phase to maximise the chance of phasing him before the flame wall attacks, except for when using burning claws, as this phase specifically is immune to burn damage.
- Learning to skip the flame phase will significantly speed up kill times and reduce the chance to take damage during the phase.
Inventory (If banking bones)
- 1 Divine super combat potion or Super combat potion.
- 4-5 Prayer potions, find what works for you. Each kill should take around 1:45-2:15 with close to max gear and stats. Prayer flicking can help make the most out of the potions, allowing for more efficient trips.
- Special attack weapon, or multiple if using lightbearer. Any defence reduction special to use at the start of kills, and then spare special attack energy can be used with the DPS special.
- Fill your inventory with the rest high healing food, such as manta rays or cooked moonlight antelope. The latter negates the need for bringing antipoison, as it will cure poison after being eaten, and its healing delay should not be an issue for skilled players. As you gain more experience, less or no food is necessary.
- 1 antidote++ or sanfew serum if not bringing cooked moonlight antelope.
- Divine rune pouch with runes for High Level Alchemy and Teleport to house (or two open slots for rune drops)
- House tablets or other teleport of choice to restore stats and bank if using divine pouch space to pick up rune drops.
- (Optional) Bracelet of slaughter to extend the task
- (Optional) Noxious halberd can be used to cure poison as necessary at the cost of 50% special attack energy.
Inventory (Long trips)
- 2-3 Divine super combat potions or Super combat potions.
- Special attack weapon, or multiple if using lightbearer. Any defence reduction special to use at the start of kills, and then spare special attack energy can be used with a DPS and/or Sustain special attack as needed.
- Fill your inventory with super restores or prayer potions, 1-2 prayer regeneration potions, and 1-2 sanfew serums for poison immunity. If less experienced with the boss, bring a few pieces of high healing food such as manta ray or cooked moonlight antelope. As you gain more experience, less or no food is necessary, especially if bringing saradomin godsword or amulet of blood fury.
- Holy wrench or prayer cape/max cape to increase prayer restored from potions.
- 1 antidote++ if not bringing cooked moonlight antelope or sanfews.
- Divine rune pouch with runes for Resurrect Greater Ghost, Death charge, and optionally Sinister Offering for more Prayer experience.
- (Optional) Bracelet of slaughter to extend the task.
- (Optional) Bonecrusher necklace to auto-bury hydra bones if not using Sinister Offering. It can also be equipped during boss death animation to restore an extra 8 prayer points per kill. This will restore 2 more points of Prayer than offering, but for much less exp.
- (Optional) Noxious halberd can be used to cure poison as necessary at the cost of 50% special attack energy.