Grotesque Guardians/Strategies
This copy was last processed on . The copied wiki revision is dated .
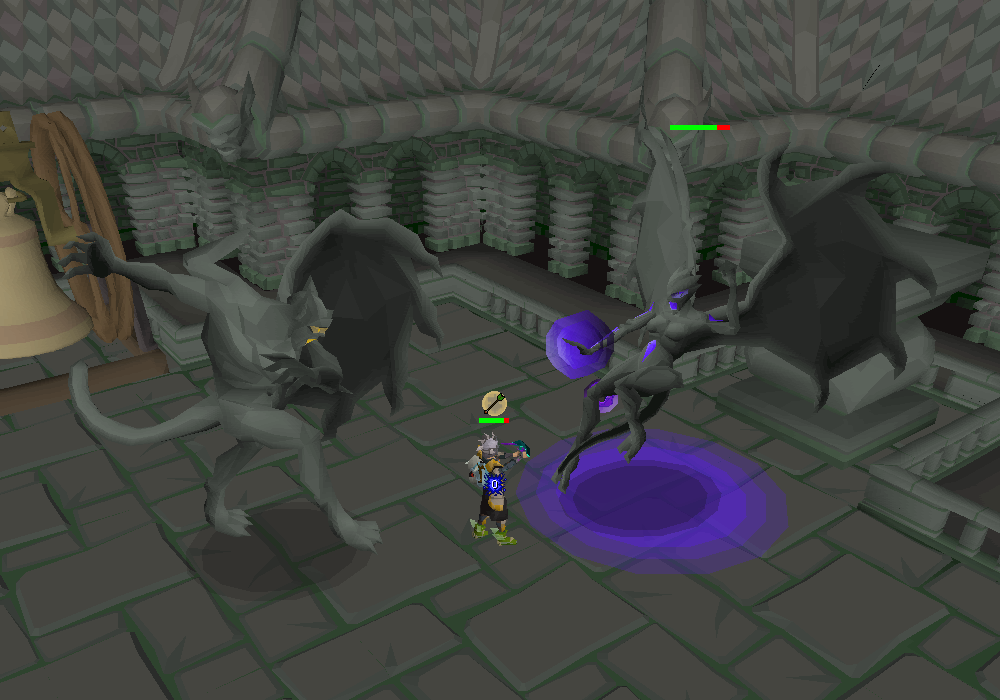
The Grotesque Guardians are a pair of gargoyle slayer bosses that reside at the roof of the Slayer Tower: the Guardian of Dusk and Guardian of Dawn. In order to access and fight them, players must first acquire a brittle key from regular gargoyles (or their superior variant). The key is only obtainable as a drop whilst assigned gargoyles as a slayer task, which is dropped at a rate of 1/150.
After obtaining the brittle key, players can unlock the tower's rooftop entrance on the 2nd floor (right next to the gargoyle area), permanently unlocking access. However, the player must additionally be assigned gargoyles or the Grotesque Guardians themselves as a slayer task or boss task respectively.
If the player dies while fighting the Grotesque Guardians, lost items are placed into the magical chest near the rooftop entrance, where players must pay a fee of 50,000 coins to reclaim their items. Note that dying an unsafe death before reclaiming lost items from the chest will result in permanent loss of all the items inside; as such, unless the player has level 81 Agility (can be boosted) to climb the Ivy agility shortcut found west of the slayer tower's entrance, which leads up to the start of the top floor, it is highly recommended to bring a nosepeg or equivalent item to protect from aberrant spectres on the way back.
As with all other gargoyles, players must bring a rock hammer, granite hammer, or rock thrownhammer to finish them off.
Note that unlike other instances, players are kicked out of their instance after five minutes of inactivity; players are warned when there is one minute remaining, and another when thirty seconds remain. Players can reset this timer by ringing the Cloister Bell.
Requirements
75 and a gargoyle slayer task
- Completion of
Priest in Peril to access Morytania
- A rock hammer or thrownhammer
- Unlocked the Slayer tower rooftop with a brittle key
- Melee equipment, plus Ranged or Magic if not using a halberd
Recommendations


Transportation
There are several ways to access the Slayer Tower:
- The slayer ring teleports players to the main entrance.
- The fairy ring code CKS is south of the Tower.
- Casting Salve Graveyard Teleport will also take players south of the Tower.
- Casting Kharyrll Teleport will take players to Canifis which is a short distance from the bank.
Players with level 61 Agility can climb up the spikey chain on the ground floor (marked by a 
Alternatively, players with 81 Agility can use the Ivy outside of the tower entrance to immediately get to the rooftop. This shortcut is recommended for players who find themselves dying multiple times to the Guardians; it removes the risk of dying a second time from aberrant spectres or other monsters on the way to the magical chest, and potentially losing valuable items.
Fight overview
The fight is started by ringing the Cloister Bell, which initiates a cutscene in which the Guardians awaken and face the player; upon reaching five kill count for the boss, the bell gains a "Quick-start" option to start the fight immediately.
During the first three phases, Dusk uses a slash-style attack that deals up to 15 damage; Protect from Melee will reduce the damage dealt by 80%. Meanwhile, Dawn uses a ranged attack that deals two separate hits, both with a max hit of 9. If within melee distance, she may also kick the player for up to 15 damage. The attacks are partially blocked by prayer; praying against melee reduces the max hit of the melee attacks to 2.
Phase 1
Dusk is immune to all damage during this phase, so the player must fight Dawn first. As she is airborne, the player must attack her with ranged, magic, or with a halberd; she is immune to non-halberd melee attacks.
Aside from her standard attacks, Dawn may launch a Stone Ball which has a 3x3 Area-of-Effect (1 tile from the centre). If struck, the player will become encased in stone, similar to the marble gargoyle's special attack, which acts as a stun for 10 ticks (6 seconds) and deals up to 15 damage.
You can minimise damage by starting the fight from the left-most tile next to the bell, as this will automatically off-tick the Guardians. Start with Protect from Missiles, switch to Protect from Melee when Dawn's attack animation starts, and switch back to Protect from Missiles immediately after Dusk's attack animation starts. For less effort you can use Protect from Melee and stand next to Dawn, which will cause her to occasionally use melee attacks. Players can also dance under Dusk and use Protect from Missiles if desired.
The optimal method to attack Dawn with ranged is to stack both her and Dusk on top of each other, then using the venator bow. When charged, it will ricochet the shots and hit Dawn twice. Players can use a toxic blowpipe to attack Dawn whilst waiting for Dusk to approach. If using melee, a noxious halberd is required, as all other halberds hit too slow.
Upon reaching 55% health, she will ascend to the sky, beginning the next phase of the fight.
Phase 2
Dusk becomes attackable during this phase. Dusk's armour protects him from both magic and ranged attacks, so players must use melee on him. Additionally, burn damage has no effect against him. Dusk has -1 flat armour, encouraging the use of multi-hit weapons, although his abysmal Defence and bonuses make any weapon viable to use.
After attacking once, he will start to charge his blinding attack, indicated by his missing wing starting to glow; simply move one tile away from Dusk to avoid the attack. Otherwise, the player will be knocked back and dealt damage in the high 20s. The player will be able to attack three times with any four or five tick weapon before needing to back away.
The knockback animation will only occur if players are right next to or under him. The timeframe to get hit by this attack is relatively short; it is safe to return back and attack Dusk once his wings cover his face, though running back to him just as he expands his wings will result in getting hit.
Throughout this phase, Dawn will also occasionally use a rockfall attack, throwing down 9-10 pieces of debris into the roof at four different speeds, indicated with looming shadows over the targeted tiles. Like Stone Ball, these rockfalls have a 3x3 AoE. Getting caught in the edges can deal up to 22 damage, while being caught directly in one will also knock the player out, stunning them for 10 ticks (6 seconds).
Lastly, standing under Dusk during this phase can result in him trampling the player for up to 40 damage and should be avoided at all costs.
When Dusk reaches 55% of his health, Dawn will descend, beginning the third phase of the fight.
Phase 3
Dusk will quickly fly over to the west, then the pair will begin to charge up a lightning attack, discharging bolts of lightning that deal 5-10 damage per tick if the player is standing on or adjacent to the vortices. The vortices spawn anywhere on the rooftop, with one always targeting the tile the player is standing on. They do not stack on each other, although up to three circles may be in close proximity to each other.
There is a one-second warning frame indicated with a vortex of the respective colour before the player starts taking damage. Stand in a spot clear of any vortices; although some vortices appear later than others, they will all expire once the pair become attackable.
Once the attack ends, Dawn becomes attackable whilst Dusk returns to being invulnerable. She will start off by launching three energy spheres across the rooftop in an attempt to heal herself. There are three charge stages for these spheres, each advancing to the next after a few seconds. The player can absorb these spheres at any time without penalty; if Dawn absorbs them once they fully charge, they will each heal 90 hitpoints.
Dawn will use the same attacks as she did in phase 1. Players can pray against both attacks by being one tile west from the eastern wall (not under or next to Dawn) right after the lightning AoE. Start by praying melee, then ranged and so on. If you notice you don't have enough DPS to skip the orbs, prioritise absorbing those, then finish the kill by standing next to Dawn and praying melee.
Once Dawn reaches less than 10 health, use the rock hammer on her (unless the Gargoyle smasher ability is unlocked). Dusk will absorb the remnants of her essence, empowering himself in the process, and initiate the final phase of the fight.
Players with 90+ Ranged or 90+ melee stats should be able to "orb skip", or kill Dawn before she has a chance to absorb any orbs. To do this with ranged, either a toxic blowpipe or venator bow, coupled with amethyst ammo or better, should be used on Dawn. The blowpipe has a ~75% chance of an orb skip, while the venator bow has a ~80-85% chance of an orb skip. When using melee, a noxious halberd is still required, though a crystal halberd can be used as a finisher. With a lightbearer, players should not worry too much about special attack; Death Charge can also be used, but this will likely shorten trips due to the rune equipment drops the boss frequently drops.
Phase 4
As Dawn shatters into bits, Dusk will absorb the leftover remains of her essence. Dusk's Attack level increases to 300, with Strength, Magic, and Ranged increased to 250, Defence to 150, and add one flat armour. Upon transforming, he will immediately use his prison attack, dragging the player somewhere within the arena and trapping them in a barrier of blue flames. One of the flames is missing, which is the first tile the player can stand on to avoid damage. If the player does not escape from the 3x3 "cell" within 5 ticks, they will take up to 65 damage, and the damage dealt by this attack will heal Dusk. Dusk's size is additionally increased from a 5x5 to a 6x6 monster.
Sometimes, Dusk may drag the player to the edges, then create a barrier where the exit cannot be used because there is no space to escape. In this case, simply running into the missing fire tile will prevent Dusk from damaging the player and healing himself. When he first uses this attack, he is invulnerable, but he can still be attacked in subsequent drag attacks. In these cases, the player can simply attack Dusk to path out of the prison, though it is still encouraged to click on a safe tile first.
As with the previous phases, Dusk is immune to magic and ranged attacks and his trample attack is reactivated. Be careful not to click on Dusk until his prison attack animation is fully complete or you may accidentally run under him and be trampled.
Dusk's attacks are improved upon, now using both melee and ranged much like Dawn did. The melee attack can deal up to 26 damage, while the ranged attack hits twice, with a max hit of 15 each for a total of up to 30 damage.
The ranged attack has a unique form of damage calculation. If Dusk succeeds the ranged accuracy check, the first orb will always hit for 60% of his max hit, or half of that number if the player is praying correctly.[1] The second orb meanwhile will carry out a random damage roll upon succeeding the accuracy check, yet goes on to make a second damage roll ranging between 0 and the damage value rolled directly prior.[2]
Prayer reduces the strength of Dusk's melee attack by roughly 80%, and ranged by 55%, which in turn reduces the max hits to around ~4 and 14 (7 x 2) respectively. For his first attack at the start of the phase, there is a 2/3 chance Dusk will use the opposite attack style of the one the player is praying against.[3] Afterward, he has a 1/6 chance to alternate attack styles every time he attacks; if using the matching protection prayer, he will instead have a 1/3 chance to switch attack styles.[4] For simplicity, as it is hard to predict Dusk's attacks when in melee range, it is best to pray against the style of the attack he previously used.
When Dusk attacks the player, halberd using players are encouraged to stand one tile away from him when possible. Dusk will stay still if he attacks with ranged and will close the distance when using melee.
When Dusk reaches less than 10 health, use the rock hammer on him (unless the Gargoyle smasher ability is unlocked). It is possible for Dusk's second phase special attack to happen as/shortly after Dusk is killed with a rock hammer, the player can still take damage from the special attack after Dusk dies. Additionally, if the player is inside the barrier and Dusk is at low enough health to be smashed with the Gargoyle smasher ability, the player may path directly to Dusk instead of trying to exit the barrier first, or may not move at all.
Equipment
During the fight, players will need a rock hammer, granite hammer, or rock thrownhammer to deal the final blow. Magic is not recommended as Dawn is more resistant to magic than the other forms of damage she is susceptible to: Ranged and melee with halberds. An eternal slayer ring is highly recommended for fairly quick banking and access to the bosses.


Inventory
A form of sustain, such as a blood fury, full guthans, or a saradomin godsword with a lightbearer can be brought over food, as it is very easy to heal due to the bosses' incredibly low defence. Alternatively, the bosses commonly drop mushroom potatoes which can extend trips, although this is not guaranteed.
If no sustains are used, super restores are recommended over prayer potions to make use of saradomin brews, though these are not always dropped alongside combat potions and will require the player to boost it back up if the brews are drunk. However, the bosses can drop (regular, not divine) 2-dose super combat and ranging potions.
- Ranged switches
- Special attack weapons
- Super restores
- 4+ pieces of food or saradomin brews
- Divine super combat potion
- Divine ranging potion
- Surge potion
- Rock hammer (if not using the granite hammer)
- Slayer ring (can be used as a teleport to the Slayer tower, and to the Stronghold Slayer Cave which is near a bank)
- Divine rune pouch and book of the dead with runes for death charge and thralls.
- Alternatively, High Level Alchemy and Teleport to House for more inventory space.
- As Dawn is immune to Melee and Dusk to Magic and Ranged, four thralls total must be summoned per fight for permanent uptime.
- Explorer's ring 4 for access to High Level Alchemy if not on the standard spellbook
- Ranged switches
- Super restores
- 5+ pieces of food or saradomin brews
- Divine super combat potion
- Divine ranging potion
- Rock hammer (if not using the granite hammer)
- Slayer ring
- Divine rune pouch with runes for High Level Alchemy and Teleport to House
- The eclipse atlatl scales off high strength values and can be paired easily with melee sets without extensive switching.
- 10+ super restores
- 5+ pieces of food or saradomin brews
- Divine super combat potion
- Divine ranging potion
- Rock hammer (if not using the granite hammer)
- Slayer ring
- Divine rune pouch with runes for High Level Alchemy and Teleport to House
- Melee-only requires using the noxious halberd to attack Dawn, as other halberds are too slow
- No ranged switches allows more room for restores and food
- Crystal halberd should be brought as a powerful special attack for Dawn. Use the special attack at around 65% health or lower to finish the first phase, then use it again when she is below 100 health. With high hits from the special attacks, the player can skip absorbing orbs.
- Torva/Oathplate can be downgraded to Bandos/Bloodmoon, and amulet of rancour to amulet of torture, and still reach two minute kills
- Divine rune pouch with runes for Death Charge
- High Level Alchemy and Teleport to House can be used for more inventory space if the player is below level 80 Magic for Death Charge.
References
| Bosses | |||||
|---|---|---|---|---|---|
| Unique drops |
| ||||
| Other | |||||