The Blood Moon Rises/Quick guide
This copy was last processed on . The copied wiki revision is dated .

Details
| Start point |  Talk to Sarius Guile in the Icyene Graveyard. Show on map Talk to Sarius Guile in the Icyene Graveyard. Show on map |
|---|---|
| Official difficulty | Grandmaster |
| Official length | Very Long |
| Description | Long ago, before the vampyres were united as one, they lived in disparate clans in their ancestral home of Vampyrium. For the Drakan clan, strength ruled above all else. Clan leaders were selected during a brutal festival of combat known as the Night of the Blood Moon. Along with leadership of the clan, the victor of this festival was granted a title: they became known as the Blood Moon.
Now, thousands of years later, Lord Lowerniel Drakan, the last Blood Moon has returned. He has but one goal: to return his people to the old ways and reclaim his former title, even if he has to sacrifice every life in Morytania to do it. For Drakan, this is the endgame. Failure is not an option and he does not intend to let anyone stand in his way. No matter what, the Blood Moon will rise once more. |
| Requirements |
|
| Items required |
|
| Recommended |
|
| Enemies to defeat |
|
| League notes | N/A |


Walkthrough
Starting off
Items recommended: Drakan's medallion and 40,000 to buy the blisterwood flail, if needed.
- Head to the Icyene Graveyard, accessed via the boat in either southern Burgh de Rott, Meiyerditch, or Slepe. Players can also use the Drakan's medallion teleport to Ver Sinhaza, exit into Meiyerditch, then run to the boat in the south-western corner of the area.
- Bring 40,000 coins with you if you do not have a flail already.
- Speak to Sarius Guile. (
)…
1 Yes. - Head to the hideout under Old Man Ral's house in Meiyerditch Via the Trap Door Located In the House. (Show map)
- Search the nearby chest to obtain a vyre noble outfit if you forgot to bring it.
- Wear the vyre noble outfit, then inspect the makeshift shrine for a cutscene.
- Talk to Ivan Strom. (
1 So you're ready to go to Darkmeyer? 1 I'm ready. - Prepare for a fight. The fight is a battle of endurance, you are required to protect yourself and Ivan from multiple vyrewatch and vyrewatch sentinels for several minutes.
- Pray Protect from Melee, and attack all the vyrewatch to keep them from damaging Ivan.
- You can heal Ivan with food when he is low health.
- Acidic bloodveld will spawn which you must kill before they reach Ivan.
- You will initially be attacked by 3 vyrewatch. If you kill one, another will spawn. As the fight progresses, a magic-using vyrewatch sentinel will spawn, with two further sentinels spawning throughout the encounter.
- Talk to Ivan afterwards, and he'll tell you to meet up at the church in Slepe.
The Truth Hurtz
Items recommended: Drakan's medallion, Stamina Potion, Dramen Staff, Fairy Ring Teleport / Teleport To House
Those with lower stats should consider bringing a method of stat restoration such as a Super Restore Potion as the Monks of Zamorak below will lower your stats temporarily. Leave six inventory spaces free and make sure you do not have a pet out.
- Travel to Slepe, either via Drakan's medallion teleport to Slepe, or if that is not unlocked, teleport to Ver Sinhaza and run north to Slepe.
- Talk to Ivan Strom in Slepe, just west of the church. (
1 Let's get going. - Go into the Slepe pub and ask the bartender Roy about a friend. (
2 We're looking for a friend of ours. - Enter the Sisterhood Sanctuary through the stairs south of the church's graveyard.
- Head north until reaching Kroy's laboratory, then climb the ladder to enter Crombwick Manor.
- Help Veliaf Hurtz kill the five vyrewatches.
- Talk to Veliaf.
- Make your way to Drezel in Paterdomus Temple, which can be quickly reached via fairy ring (CKS).
- Talk to Ivan, read the squire's journal, then talk to Ivan again.
- Head west through the mausoleum and up to the temple, then kill all the monks of Zamorak.
- Head upstairs and talk to Ivan.
- Search through the bookcases for six books. Place them books on the plinths in the following order (from north to south):
- Talk to Ivan to obtain Ivandis' writings, then read it.
- Talk with him again to return to the mausoleum.
- Stock up on supplies for a fight with multiple vyrewatches and sentinels.
- When ready, return to Paterdomus and talk to Ivan or Veliaf. (
1 Lead the way. - Mine away the blockage immediately south of Ivan. (If you do not have a pickaxe, talk to Ivan for a bronze pickaxe.
1 Yes. - Enter the blockage and head north-east through the tunnel.
- There will be a few vyrewatches and vyrewatch sentinels to defeat inside. Focus on the sentinels first while praying protect from magic. They will occasionally spawn a blood orb that will do passive damage.
- You can lure the vyrewatches into the blood orb to deal massive damage. Be sure to stay at least two tiles away from the orbs, or you will take damage as well.
- If you die or teleport out of the fight, you can find it again by going into the Myreque Hideout, south of Canifis, then going through the closest hole after the hidden door. If you die, the grave is in Ivandis' Tomb.
- Talk to Ivan.
- Head north through the entry.
- Head north-west and climb up either of the stairs.
- Head east and pray to the shrine to unlock a teleport back here with Drakan's medallion.
- Enter the portal at the centre of the room.


Escape from Castle Drakan
During your time in Vampyrium, you will have access to unique supplies. Some of the supplies can be found as individual spawns or by searching chests in the castle.
Players can obtain:
- Mysterious jerky, a high-healing food.
- Smelly kebab, a fast food.
- Foul chunky potions, a mix of super restore and prayer regeneration potions.
- Putrid sticky potions, the equivalent of stamina potions.
- Rank frothy potions, the equivalent of super combat potion.
- Rancid slimy potions, similar to a Saradomin brew but drains the same stats by 1 instead.
- Jars of congealed blood, which immediately restores all Hitpoints and Prayer. Although only one of these may be taken from the supply chest at a time, more can be picked up throughout the castle regardless of how many you already have.
These supplies can only be used within Vampyrium and cannot be banked.
Additionally before each major fight there is an object, e.g. a tent or table, which can be looted for an unlimited number of the supplies. These supply locations are usually located near where you spawn following a death. During fights with Drakan, players are supplied with unlimited quantities of the aforementioned Vampyrium combat supplies, allowing indefinite attempts at defeating him without needing to leave Vampyrium for supply runs.
Death also differs here in that you will respawn at predetermined checkpoints with all your items kept. However, hardcore ironmen will still lose their status if they die at any point during the quest.
The world map icon will be replaced with one of the castle, which shows the rooms you've visited, unlocked doors, and puzzles left to solve.
Fixing the clocks
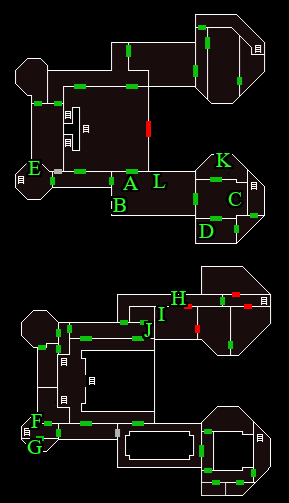
- With (A) as the starting point on the map, Pick up and read the poem scroll on the table just south (B).
- Go through the east door and then search the throne (C), which will reveal four levers in the busts to the east.
- From north to south, pull the 3rd, 4th, 1st, and 2nd busts in that order
- Search the throne again for the half moon key.
- Go through the south door, then search the shelves (D) to the south-west to find the small clock hand.
- Go through the doors to the north, then west, to return to the dining room.
- Go through the west door using the half moon key to arrive in a corridor. Walk around the traps to avoid them.
- Optionally, search the crate in the corridor to find mysterious jerky.
- Go through the west door. Quickly search the crate for a tinderbox (E), then climb up the stairs.
- Take the explosive barrel (F), then enter the south door. Search the crate for a Drakan emblem (G), then exit the room.
- Go through the east door, then through the north door.
- From the 1st floor of the main entrance hall, go through either of the north doors.
- Go through the north unmarked door (not the crescent moon door), then head to the south door (next to empty receptacle) while avoiding traps.
- Place the Drakan emblem on the receptacle (H), then enter. Search the crate in the north-west corner for a large clock hand (I).
- Exit the room, then return through the western door while avoiding traps.
- To the east of the crescent moon door is a lever (J); pull it to open a portal.
- Enter the portal which will teleport you to (K), then use the south door, then the west door, to return to the dining room fireplace (L)
- Place the small hand on the western grandfather clock. Set the big hand to 11, and the small hand to 9.
- Place the large hand on the eastern grandfather clock. Set the big hand to 12, and the small hand to 4.
- Inspect the fireplace and select "search" to receive a second Drakan emblem.
Crescent moon key
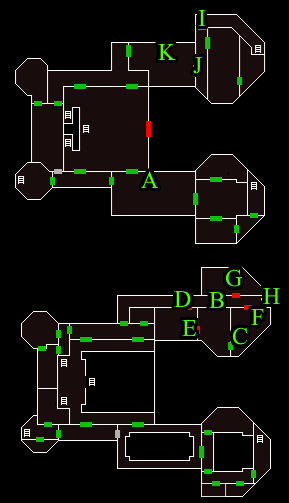
- Starting from (A), go through the west door, then north door, then up the stairs, then enter either north door.
- Go through the north door next to the crescent moon door, then enter the south door (D).
- Place the Drakan emblem on the receptacle next to the east door (E).
- Enter the east door, then use the explosive barrel on the cracked wall to the south-east (C) to open a hole.
- Enter the hole, run past or kill the venator.
- Take the emblem out from the receptacle by the north door (F).
- Use the hole in wall again.
- Use the west door. Take the emblem out from the door you just exited (E).
- Enter the north door, and take the emblem out from the door you just exited (D). You should have three emblems.
- Place a Drakan emblem on the receptacle next to the east door (B), then enter.
- Place a Drakan emblem on the door to the north, then enter.
- Take the ornate skull off the table (G). Leave, and remove the emblem from the receptacle.
- Climb down the stairs (H).
- While avoiding the trap in the corridor, place a Drakan emblem on the receptacle next to the only door in the corridor (I), then enter.
- Place a Drakan emblem on the receptacle next to the west door (J), then enter to find Veliaf. Talk to him.
- Search the chest on the northern wall (K) and enter the code: right, down, right, left, left. Unlocking the chest gives the crescent moon key, which can be used to unlock crescent moon doors.
- The code to the chest is based on the order of the vampyres listed on the southern plaque, and the direction each is pointing in their respective painting.
New moon key
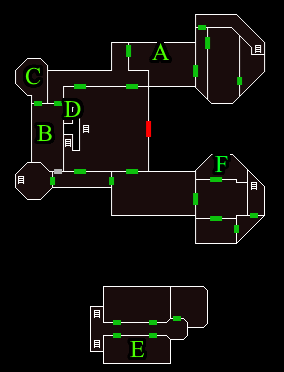
- From the chest room (A), go through the west door, then the south-westernmost door to enter a laboratory (B). Kill all the sanguidae.
- Take the syringe barrel from the table.
- Search the crate to the south-east for a venator stomach.
- Inspect the sink to the west, and remove the sink plug.
- Enter the north-west door (C). Use the sink plug on the sink, then turn the tap on when prompted.
- Take the broken pipe from the sink. Use it on the nearby cabinet to receive a sharp knife.
- Search the crate near the sink for the syringe plunger.
- Return to the laboratory (B) through the south door.
- Use the sharp knife on the venator corpse to receive a pair of tongs.
- Use the tongs on the sink for a syringe needle. Use one of the syringe parts on another to assemble an empty syringe.
- Use the empty syringe on the venator stomach to receive a full syringe.
- Use the full syringe on the chest to receive a left crest half.
- From the laboratory, exit through the north-east crescent moon door, then go through the nearest door to return to the main hall.
- Climb down the stairs (D), then enter the first door on the south side (E). Deal with the venator; pray Protect from Melee or Missiles depending on distance, and turn it off when it is about to screech to avoid damage.
- Search the weapons rack at the east end of the room.
- The statues must be mirrored on the north and south sides of the rooms. From east to west, they should be holding battleaxes, spears, maces, and swords.
- Search the chest to receive a right crest half. Combine it with the left to create the full crest.
- Exit the basement through the north-west door, then up the stairs to the west, then from the portal room, go through the doors to the south-east, east, then north.
- Use the full crest on the fireplace. Inspect the fireplace and select "search" to receive a new moon key.
Gilded key
- From the fireplace, return to the main hall by going through the south, west, then north doors.
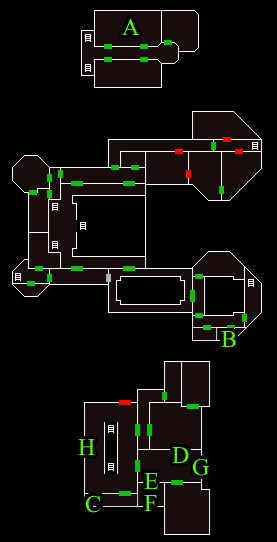
- Climb down the stairs to the basement, then enter the either of the doors on the north side (A) to initiate a cutscene where you free Safalaan and Vanescula.
- Pick up the gibbous moon key.
- Leave the jail room through either south door, climb up the stairs to the main hall, then climb up the stairs again to the 1st floor.
- Enter the south-east door (the gibbous moon door).
- Go through the east, south, then south-east doors. Search the crate for an ornate knife (B).
- Pull the lever on the western wall. Enter the portal, teleporting to (C). Then go through the north door.
- Enter the south-east gibbous moon door. Kill the venator to prevent being disrupted from solving the room puzzle or just run past it.
- Light the fireplace, then search the chest (D) just east for a lockbox.
- Open the lockbox with the code (from left to right): the ⠿, the ᴟ, and symbol that looks like ⁘, to get a fancy gem.
- The hint for this is obtained by inspecting the venator head for the code "426". The 4 banners in the room have the first symbol. The 2 shields have the second symbol. Lastly, the 6 braziers have the third symbol.
- Enter the south-west door (E) by inputting the passcode "SPEAR".
- The hint for the south-west door's passcode is obtained by inspecting the ancestral dagger and reading the grid note, both of which are in the room.
- One of the bookcases (F) will be searchable; do so for a mysterious book.
- Open the book for another fancy gem, then leave the room.
- Use both fancy gems on the mounted venator head to the east (G).
- Search the head for an ornate hourglass, then go through the west door.
- Use the ornate skull, hourglass, and knife on the display case to the west (H). The order does not matter.
- Search the display case for a gilded key.
Full moon key
- From the display case, climb down the staircase, then through the north door - beware of Sanguidae, quickly go through the west door after entering.
- After this west door (the gilded door), go through the north-west door.
- Kill the venator in the room, then talk to Ivan.
- Search the northern bookcase for a gilded book.
- Search the south-eastern bookcase for a vampyre book.
- Use the gilded book on the western gilded bookcase, then inspect the books when prompted.
- Rearrange the symbols of the Vampyric Houses in alphabetical order.
- Enter the secret passage to the south. Take the full moon key from the table.
Solid key
- Enter the east door, then the east gilded door.
- Enter the unmarked north door.
- Enter the easternmost door, while avoiding the traps.
- Climb down the stairs, then run west and enter the door.
- Enter the east full moon door. Kill the webbed-winged crows if necessary.
- Search the north-west shelves and take one of each potion: cloudy grey, weightless black, thick red, and cold bluish-white.
- Based on the inscriptions on the basin, place the potions in the following basins:
- Cloudy grey: south-west (To rise without wings and choke all who are there.)
- Weightless black: north-east (To be a faithful follower that flees the light.)
- Thick red: north-west (To be a river that runs through the body's land.)
- Cold bluish-white: south-east (To crack with no voice and slip with no legs.)
- Search the altar for an ancient symbol.
- Enter the east door, then pull the lever in the north-west corner.
- Enter the portal, then go through the south door.
- Go through the east, east, south-east, then north doors.
- Search the crate by the window for an ancient shield.
- Combine the shield and symbol to create the shield with symbol.
- Go through the south, west, and north doors, then head upstairs.
- Go through the south-east (the southern door on the eastern wall) gibbous moon door, then through the south-east full moon door.
- Use the shield on the empty mount at the southern wall, then search it for a solid key.
Destroying the stockpile
- Go through the north and west doors, then go through the east full moon door.
- Enter the solid door directly across to reach a laboratory.
- Search the shelves to the north-west. Take 2 vials of water, 3 vials of blood, and 3 pure essence.
- Follow the next steps to place a chemical vial onto the basin until the panel reads 53 HP (haemalchemic potential).
- Use a vial of blood and pure essence on the refiner to receive a chemical vial measuring 17 HP. Do this twice.
- Use a vial of blood and vial of water on the refiner for a vial measuring 13 HP.
- Use a pure essence and vial of water on the refiner for a vial measuring 6 HP.
- Use all four chemical vials on the basin.
- Go through the unlocked north door and destroy the blood stockpile.
Blood Hunt
If you leave the area, you can re-enter the portal in Castle Drakan, appearing near Ivan and the group.
- Pick up the crank wheel in the small building 3 houses east of the prayer altar.
- Go to the building north of the altar and operate the crank base located just outside the house. After you operate the crank, Drakan will start chasing you. Click the crank several times to unlock the door.
- Enter the house and search the bookshelf for a dusty book, then read it to retrieve the Vitur key.
- Exit and head to the north-easternmost house with the Vitur door.
- Search the shed input the passcode "TOOLS" for a pair of bolt cutters.
- Head to the building east of the altar to and pick up the tooth half of key from the table.
- Head to the building directly south of the well. Use the bolt cutters on the chained doors on the north side.
- Pick up the loop half of key.
- Use the loop and tooth halves together to obtain a Myrmel key.
- Use the Myrmel key to enter the building north-east of the well (
map icon), and take the Bucket in the back left corner. Use the use Bucket on the well, then go back inside the Myrmel house and use the Bucket of water on the Northern barrel to get the Shadum key.
- Use the Shadum key on the house south-west of Ivan and the group, then pick up the trapdoor key on the crate.
- Enter the bank and operate the crank (spam click the crank) to open the gate.
- Enter the trapdoor to arrive in the house with the altar.
- Open the chest to the west with the passcode "35158" to receive the Jovkai key.
- Enter the house with the Jovkai door (
map icon) to find the old cog on a crate.
- Once you leave this house, Drakan will start pursuing the player at running speed, so wait until he is as far from you as possible before rushing back to Ivan and the group. If you teleport out, you'll need to get the old cog again.
- Take some supplies from Ivan if needed, as you'll be facing Drakan.
- Talk to Veliaf or Vanescula to initiate a cutscene.
Fleeing Through the Woods
- After the cutscene, you will be fighting Drakan. You will be assisted by both her and Veliaf, but don't expect them to deal a lot of damage.
- Alongside melee attacks, Drakan will frequently use spear lunges that are preceded by a visual cue. The timing of this is precise and so requires tick perfect movements to avoid damage.
- For a detailed breakdown of the fight, see here.
- You must continue dodging his attacks until you are finally able to damage him.
- Resupply at the tent if needed after your encounter with Drakan. You must use the escape option to access this tent. You can always escape and return here, and you'll respawn in this area if you die.
- Two ancient feral vyres will spawn and attack with melee. When fighting multiple of them at once, one will swap places with the other and begin healing, whilst forcing you to attack the vyre that took its place. Simply switch targets to resume attacking the initial vyre.
- Kill the additional two vyres that spawn, then proceed to the next area.
- To fell the darkwood trees blocking your path, they must be chopped from two different sides; you may need to jump over the tree stumps multiple times from different sides in order to reach another side of a tree.
- A bronze axe can be taken from the nearby stump.
- Occasionally, ticks may crawl into your inventory and begin dealing 1 damage in fixed intervals; to remove them, simply find the tick in your inventory and click on it.
- Optionally, you may chop one of the darkwood trees at the southern end of the area to receive a rotten diary.
- Chop your way until you reach the north-east corner of the area, from which you can enter the next part of the forest.
- To avoid the maxilla beasts, you must disable run and walk along the path until you reach the cave. If you are running or are too close to them, they will deal 30-50 damage.
- Head north through the cavern to reach the next area.
- Waves of nylocas will spawn from two corners. They behave the same way as their Theatre equivalents, becoming immune to attacks if attacked with the wrong style (melee against white, ranged against green), and exploding if left alone long enough.
- There are throwable spines on the ground, so there is no need to re-gear for range. You can also harvest the dead venator for more spines if required.
- It is recommended to leave and return with fast hitting weapons, such as the toxic blowpipe and event rpg, if players are having trouble making it through this section.
- After defeating all the nylocas enter the darkwood trees to the north.
- Stand behind each of the three blood serpents and "wrangle" them to collect them. Catching them from the front will cause them to attack for 5 poison damage.
- Use three dead blood serpents on each other to make a serpent rope.
- Use the serpent rope on the long branched tree to the south-east to progress.
Hallowed Preparations
- Talk to Efaritay, then leave the palace via the northern doors and pick amitire leaves from the amitire plant east of the entrance.
- Return to the palace. Search the shelves next to the sink (south of Efaritay) for a bowl. Fill it with water.
- Search the cupboard by the western wall for a potato and raw impaler meat.
- Use the bowl of water on the potato.
- Cook the impaler meat at the range, then use the incomplete stew on the cooked meat.
- Cook the stew, then use the leaves on it to create an amitire stew.
- Talk to Efaritay, then use the stew on Safalaan.
- Talk to Efaritay again until you receive some hallowed marks.
- Free up seven inventory spaces, then head to the east side of the palace.
- Talk to Ivan or Sarei.
- Take all three tools from the workbench.
- Search the nearby crates for blisterwood logs and a blessed silver sickle.
- Search the chests in the room for a diamond and an enchant diamond tablet.
- Use the items on the sickle in the following order: diamond, tablet, logs.
- Create the hallowed flail at the anvil. The blisterwood flail must be present in the inventory.
- Using a knife on blisterwood logs create blisterwood stakes
- Make your way downstairs, then talk to Veliaf and then Vanescula. Talk with Veliaf again.
- Go back upstairs and talk to Sugadinti Vitur
- Gear up. Take ~15 rancid slimy potions, ~5 foul chunky potions, and 1 rank frothy potion from the supplies table in the base. Combination foods can be helpful, but it can just be easier to spam rancid slimy potions since they do not deplete your stats significantly.
- Go outside to the bridge to start the defence section.
Drakan's Siege
- You will need to defend the aranei from the incoming portals with the ballista. The portals will always be one-shot, but they will eventually begin to spawn faster than you can shoot them down.
- The next defence section requires you to heal aranei and repair the pillars and windows.
- You will fight off Drakan once again. This time, the aranei and Efaritay will help you, but expect to pull your weight.
- Alongside the spear lunges from the first encounter, Lowerniel will begin using cleaves that land as a 2x3 AoE in front of and behind him. Efaritay will occasionally heal you and the aranei, and you can always grab more supplies from the supply table if you die.
- Once Drakan is at 58% health, a cutscene will play.
Another Night at the Theatre
- Complete the dialogue at Burgh de Rott after the cutscene.
- Teleport to Ver Sinhaza using Drakan's medallion.
- Gear up for a wave based encounter against waves of nylocas, the Maiden of Sugadinti, and the Nylocas Vasilias. It is recommended to bring your strongest melee weapon, as well as fast weapons for each style for ease of completion.
- The rooms are significantly easier than during A Night at the Theatre, so full gear swaps are not necessary, but can be helpful when fighting the Nylocas Vasilias.
- Talk to Sugadinti just outside the notice board to begin the encounter.
- Wave 1 - Nylocas (range, melee, and mage)
- Wave 2 - The Maiden of Sugadinti
- Wave 3 - Repeat of wave 1
- Wave 4 - Nylocas Vasilias
Wyrd of the Hallowed
- Make your way to Burgh de Rott. Gear up for a melee-based fight with the hallowed flail.
- Head to the ruined building to the north-east to find Ivan and Veliaf. (Show map)
- Talk to Veliaf and enter the nearby entry
- You will fight the wyrd. He will knock back the player with every punch, so ensure there is space behind you.
- The wyrd attacks in a repeating cycle with 2 melee attacks, a screech, another 2 melee attacks, another screech, then a double slam. This cycle repeats until around 60% health, where he will sometimes use a bloody screech in place of a regular screech. See the clips below for a demonstration.
- Once the wyrd is at 10% health, a cutscene will play.
-
The wyrd on his second set of melee attacks, attacking with his right arm, then his left. The player reacts accordingly and moves in position to dodge his double slam attack.
-
The wyrd performs a bloody screech. The player uses the path immediately available to them, taking some damage in the process.
Night of the Blood Moon
- Climb over the broken fence
- Follow the bloody trail
- Inspect the fence
- Exit the Burgh de Rott hideout and gear up at the bank for another fight against Drakan.
- When ready, talk to Sugadinti or Ivan to initiate a cutscene.
- This fight is arguably easier than the previous with the assistance from all your allies, but you will still need to pull your weight. You will receive substantially more help, with Efaritay and Ivan both healing you periodically.
- The mechanics for this fight are the same as before; however, the blood swipes will now take place three times, and Drakan will begin firing an additional orb after every special attack.
- If you die or leave the fight, you can restart the fight by walking through the Drakan castle gates.
- Once Drakan reaches ~30% (900hp) of his health, the fight will be over.
The Blood Moon Falls
- Talk to Ivan after the cutscene ends.
- Talk to Sugadinti
- Travel to the Icyene Graveyard
- Talk to Efaritay
- Enter the portal to Vampyrium
- Gear up at the supply chest on the north wall before starting the fight.
- The final fight against Drakan has three distinct phases; for a detailed breakdown of the fight, see here.
- Drakan can now use a four-attack spear combo once he is below 2,700 health, which also incorporates the slam attack.
- Drakan will start phase 2 of the fight with blood waves, and can squeeze in magic attacks alongside his melee attacks.
- Drakan will start phase 3 of the fight with spear dashes.
- After defeating Drakan, finish the cutscene to complete the quest.
-
Once Drakan is below 2,700 health, he may begin using the spear lunge attack four times.
-
Drakan using two different type of spear cleaves. The player dodges them perfectly, alongside the spear lunges that come after.
-
The player dodges the blood waves during the second phase of the fight.
-
The player dodges Drakan's spear dash during the third phase of the fight.
Rewards
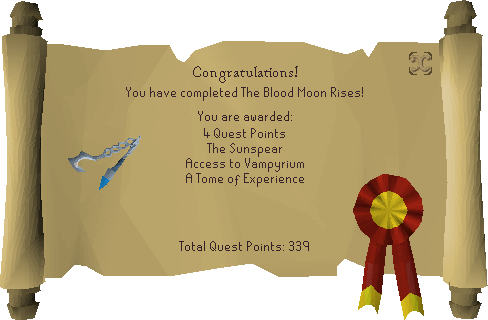
- 4
- Access to Vampyrium
- Access to the Maggot King boss, bloodwood trees, seeking arrows, leechfin fishing, stymphike and letvek hunting, and venator slaying.
- A tome of experience, granting 30,000 experience to any skill over level 70. This reward can be utilised six times and may be used for the same skill.
- This tome can be destroyed and reclaimed from Efaritay Hallow at Castle Drakan at a future time if desired
- Hallowed flail
- Sunspear
- A new fermenting vat for brewing, located in the Burgh de Rott Myreque Hideout. The pub itself is restored, and is run by Veliaf Hurtz.
- As the monks of Zamorak are cleared out of Paterdomus during the quest, Ivan now resides there. His role of selling vampyrebane weapons is taken over by Efaritay.
- The vyres of Morytania will now be tolerant to the player, and Darkmeyer services can be used without utilising a vyre noble outfit. This is unlocked before the final fight with Lowerniel.
- The Vyrewatch can bring players to the Meiyerditch mine upon request, and players can leave without needing to mine 15 daeyalt ore or wearing the outfit to leave the mines.
- Vyrewatch Sentinels will no longer be aggressive to the player by default. To reactivate their aggression, speak to the werewolf that was hired by Mischa Myrmel, in the house due south of the Drakan's Medallion teleport. He will offer garlic cocktails for 20 coins each; when one is in the player's inventory, vyres will become aggressive to them. These can be bought before the final Drakan fight.
| NPCs |
| ||||||||||||||||||||||||||||||||||||||||||||||||||||||
|---|---|---|---|---|---|---|---|---|---|---|---|---|---|---|---|---|---|---|---|---|---|---|---|---|---|---|---|---|---|---|---|---|---|---|---|---|---|---|---|---|---|---|---|---|---|---|---|---|---|---|---|---|---|---|---|
| Items |
| ||||||||||||||||||||||||||||||||||||||||||||||||||||||
| Locations | |||||||||||||||||||||||||||||||||||||||||||||||||||||||
| Music | |||||||||||||||||||||||||||||||||||||||||||||||||||||||
| Scenery | |||||||||||||||||||||||||||||||||||||||||||||||||||||||
| Related | |||||||||||||||||||||||||||||||||||||||||||||||||||||||


