Sophanem Dungeon
This copy was last processed on . The copied wiki revision is dated .
| Sophanem Dungeon | ||||
|---|---|---|---|---|
| Released | 10 January 2007 (Update) | |||
| Members | Yes | |||
| Floors | 2 | |||
| Location | Kharidian Desert | |||
| League region |  Desert✓ Desert✓ | |||
| Inhabitants | Scabarites | |||
| Music | Labyrinth | |||
| Map | ||||
| Advanced data | ||||
| Type | dungeon | |||
The Sophanem Dungeon is a series of tunnels under Sophanem which are filled with a variety of scabarites. It is a dangerous dungeon, especially on the cavern level, with many monsters over level 100, which all use different attack styles, making it hard to protect-pray from them. Also, the monsters can roam all over the place and they all have high max-hits, which can kill a weak player in a matter of seconds. A light source is required for the full dungeon.
Bank level
The dungeon is accessed through the underground floor of the Sophanem church. Players must have partially completed Contact! to enter the dungeon, with access to the bank itself requiring full completion of the quest.
Maze level
| Tile markers |
|---|
[{"regionX":22,"z":2,"regionId":8516,"regionY":52,"color":"#FFFFFF00"},{"regionX":47,"z":2,"regionId":8516,"regionY":43,"color":"#FFFFFF00"},{"regionX":48,"z":2,"regionId":8516,"regionY":43,"color":"#FFFFFF00"},{"regionX":49,"z":2,"regionId":8516,"regionY":44,"color":"#FFFFFF00"},{"regionX":50,"z":2,"regionId":8516,"regionY":44,"color":"#FFFFFF00"},{"regionX":51,"z":2,"regionId":8516,"regionY":43,"color":"#FFFFFF00"},{"regionX":52,"z":2,"regionId":8516,"regionY":43,"color":"#FFFFFF00"},{"regionX":53,"z":2,"regionId":8516,"regionY":44,"color":"#FFFFFF00"},{"regionX":54,"z":2,"regionId":8516,"regionY":44,"color":"#FFFFFF00"},{"regionX":28,"z":2,"regionId":8516,"regionY":27,"color":"#FFFFFF00"},{"regionX":27,"z":2,"regionId":8516,"regionY":27,"color":"#FFFFFF00"},{"regionX":26,"z":2,"regionId":8516,"regionY":26,"color":"#FFFFFF00"},{"regionX":25,"z":2,"regionId":8516,"regionY":26,"color":"#FFFFFF00"},{"regionX":33,"z":2,"regionId":8516,"regionY":13,"color":"#FFFFFF00"},{"regionX":32,"z":2,"regionId":8516,"regionY":12,"color":"#FFFFFF00"},{"regionX":47,"z":2,"regionId":8516,"regionY":52,"color":"#FFFF0000"},{"regionX":47,"z":2,"regionId":8516,"regionY":51,"color":"#FFFF0000"},{"regionX":46,"z":2,"regionId":8516,"regionY":51,"color":"#FFFF0000"},{"regionX":46,"z":2,"regionId":8516,"regionY":52,"color":"#FFFF0000"},{"regionX":27,"z":2,"regionId":8516,"regionY":56,"color":"#FFFF0000"},{"regionX":27,"z":2,"regionId":8516,"regionY":57,"color":"#FFFF0000"},{"regionX":26,"z":2,"regionId":8516,"regionY":57,"color":"#FFFF0000"},{"regionX":26,"z":2,"regionId":8516,"regionY":56,"color":"#FFFF0000"},{"regionX":33,"z":2,"regionId":8516,"regionY":52,"color":"#FF00FF00"},{"regionX":33,"z":2,"regionId":8516,"label":"Go east","regionY":51,"color":"#FF00FF00"},{"regionX":37,"z":2,"regionId":8516,"regionY":51,"color":"#FFFF0000"},{"regionX":36,"z":2,"regionId":8516,"regionY":51,"color":"#FFFF0000"},{"regionX":36,"z":2,"regionId":8516,"regionY":52,"color":"#FFFF0000"},{"regionX":37,"z":2,"regionId":8516,"regionY":52,"color":"#FFFF0000"},{"regionX":35,"z":2,"regionId":8516,"label":"Right click Evade","regionY":51,"color":"#FFFFFF00"},{"regionX":58,"z":2,"regionId":8516,"regionY":38,"color":"#FFFFFF00"},{"regionX":57,"z":2,"regionId":8516,"label":"Right click Disable","regionY":38,"color":"#FFFFFF00"},{"regionX":52,"z":2,"regionId":8516,"regionY":30,"color":"#FF00FF00"},{"regionX":52,"z":2,"regionId":8516,"label":"Go west","regionY":29,"color":"#FF00FF00"},{"regionX":46,"z":2,"regionId":8516,"label":"Walk","regionY":44,"color":"#FFFFFF00"},{"regionX":43,"z":2,"regionId":8516,"label":"NO STEP","regionY":35,"color":"#FFFF0000"},{"regionX":40,"z":2,"regionId":8516,"label":"Pray magic","regionY":38,"color":"#FFFFFF00"},{"regionX":43,"z":2,"regionId":8516,"label":"Pray magic","regionY":57,"color":"#FFFFFF00"},{"regionX":34,"z":2,"regionId":8516,"regionY":35,"color":"#FF00FF00"},{"regionX":37,"z":2,"regionId":8516,"regionY":27,"color":"#FF00FF00"},{"regionX":34,"z":2,"regionId":8516,"regionY":24,"color":"#FF00FF00"},{"regionX":34,"z":2,"regionId":8516,"label":"Go east","regionY":34,"color":"#FF00FF00"},{"regionX":36,"z":2,"regionId":8516,"label":"Go south","regionY":27,"color":"#FF00FF00"},{"regionX":34,"z":2,"regionId":8516,"label":"Go west","regionY":25,"color":"#FF00FF00"},{"regionX":29,"z":2,"regionId":8516,"label":"Walk","regionY":26,"color":"#FFFFFF00"},{"regionX":24,"z":2,"regionId":8516,"label":"Pray magic","regionY":20,"color":"#FFFFFF00"},{"regionX":31,"z":2,"regionId":8516,"regionY":9,"color":"#FF00FF00"},{"regionX":31,"z":2,"regionId":8516,"label":"Go west","regionY":8,"color":"#FF00FF00"},{"regionX":22,"z":2,"regionId":8516,"regionY":10,"color":"#FFFFFF00"},{"regionX":22,"z":2,"regionId":8516,"label":"Go west","regionY":9,"color":"#FFFFFF00"},{"regionX":12,"z":2,"regionId":8516,"regionY":9,"color":"#FFFF0000"},{"regionX":13,"z":2,"regionId":8516,"label":"NO STEP","regionY":9,"color":"#FFFF0000"}] |
| Tile markers guide • Data |
Players must bring a light source with them, or risk getting swarmed over with tiny insects.
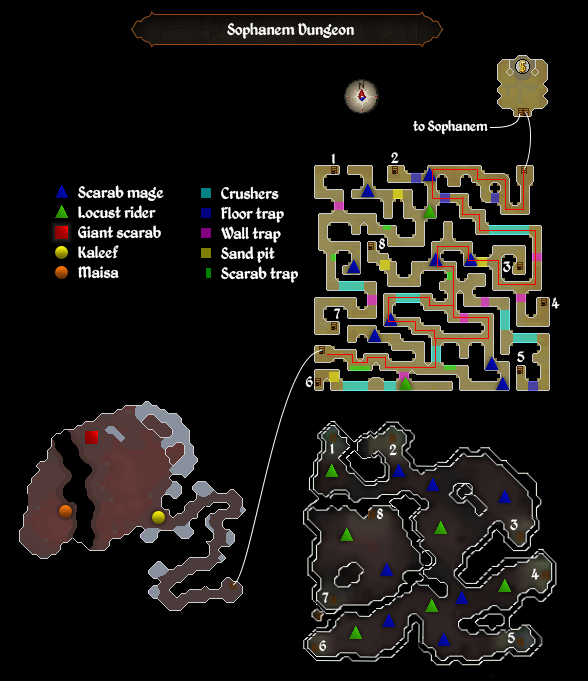
The maze level contains scarab mages and locust riders, which can do moderate to high damage on a player who is unprepared. It is quite dangerous due to these monsters, plus some floor traps, wall traps, trapdoors and wall crushers, but not as deadly as the third floor (see below).
Probably the most dangerous things on the second level are the trapdoors. Some of them are able to be spotted (look for the sandy circle on the ground; that's a trapdoor), but others are well-hidden and can easily outsmart players. If you fall down a trapdoor, you will land on the third floor, your light source will get extinguished, and dying is almost certain due to the darkness and the aggressive scarabs. Be very careful.
The provided tile markers give a short route that is as safe as possible to the ladder required for the quest.
- Green markers indicate the correct direction to travel when the path forks.
- Yellow markers indicate the correct tiles to stand on carefully, when dealing with traps or other threats.
- Red markers contain other warnings.
The markers additionally indicate when specific other actions should be performed (e.g. swapping protection prayers or right clicking on particular tiles).
Cavern level
In addition to traps doors, a player can voluntarily enter the cavern level by any one of the eight ladders. Using the ladders marked 2 and 6 on the map provides a fast, but deadly, route to the end of the dungeon's maze. It's an alternative for players that are unable to pass through traps on the second floor without damage because of low Agility or Thieving levels. However, the monsters in this multicombat section are level 100+ and they are ruthless. Players should expect to take a lot of damage, and prepare accordingly if taking this route through the dungeon. As all three combat styles are used against the player simultaneously, it is diffficult to mitigate damage using protection prayers. It is very easy to die here, so it is strongly recommended to carry an emergency teleport.
Monsters
Personalities
Gallery
-
The maze level of the dungeon.
| Inhabitants | |
|---|---|
| Monsters | |
| Shops | |
| Features | |
| Related | |


| Locations | |||||
|---|---|---|---|---|---|
| Monsters |
| ||||
| Objects |
| ||||